Using Java & Spring Cloud Streams (SCS) to create Event-Driven Applications with PubSub+ in PCF
- The purpose of this codelab is to introduce java developers to creating event-driven applications with Spring Cloud Streams and PubSub+ in Pivotal Cloud Foundry
- "Spring Cloud Stream is a framework for building highly scalable event-driven microservices connected with shared messaging systems."
- It is based on Spring Boot, Spring Cloud, Spring Integration and Spring Messaging

Developer IDE & Code Access
IDE Setup
The recommended IDE for the workshop is Spring Tools Suite (STS) Download Here. STS comes with some niceties, such as autodeploy, when used with spring-boot-devtools. Participants can of course use another IDE if preferred. It is also recommended that you begin the workshop with an empty STS workspace to avoid any unforeseen issues with existing projects/configurations/code.
Required libraries:
- Maven 3.5.3 or higher (ensure it's on your PATH) Install steps here
- Use the latest JDK 1.8 (ensure your PATH & JAVA_HOME are updated as needed)
- If using STS/Eclipse ensure your JDK 1.8 is thei default "Installed JRE" by choosing "Windows" -> "Preferences" -> "Java" -> "Installed JREs"
- If the correct JDK does not already have a checkmark next to it then click the "Add" button, choose "Standard VM", click "Next", navigate to your JDK -> Click "Finish". Then click the checkbox next to the added JRE and click "Apply and close"
Code Access
- Clone the github repo
- Use https
$ git clone -b pcf https://github.com/SolaceTraining/solace-workshop-scs.git
- OR Use SSH
$ git clone -b pcf git@github.com:SolaceTraining/solace-workshop-scs.git
- OR Navigate to https://github.com/SolaceTraining/solace-workshop-scs, Choose the pcf branch, click "Clone or download" -> "Download ZIP" & unzip in your desired directory
- Import the projects into STS In STS, use the File -> Import -> Maven -> Existing Maven Projects -> Click Next -> Click Browse and Navigate to the git repo you cloned in the previous step -> Select all the pom files and click Finish.
After importing everything you should see the following projects in STS:
- 01-scs-workshop-common
- 02-scs-source-tweets
- 03-scs-sink-analytics
- 04-scs-sink-tweetboard
- 05-scs-processor-feature
- 06-scs-processor-dynamicfeature
- 07-scs-sink-bossideas
- 08-scs-processor-yelling
- 09-scs-processor-positive
- 10-spring-boot-mqttwebapp
- The workshop uses a common data model which contains the Tweet object which is processed by the SCS services. You will need to prepare the shared artifact for use across the projects.
- Throughout this workshop we have two options when deploying apps: 1) via the Spring Tool Suite IDE and 2) via mvn on the command line.
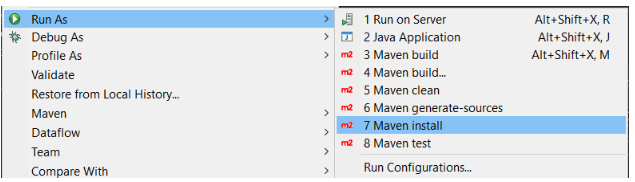
- If you prefer option 1 then in the 01-scs-workshop-common project, run a Maven build and install it to the local repository.
- If you prefer option 2 then navigate to the 01-scs-workshop-common directory and perform a maven install of the project.
$ cd ~/git/solace-workshop-scs/01-scs-workshop-common/
$ mvn clean install
Create and/or Verify access to a Solace PubSub+ Service
PubSub+ Service in Solace Cloud
If you want to stand up your Solace PubSub+ Service in Solace Cloud go ahead and login or signup at the Cloud Signup Page. Note that a free tier is available and will work for this workshop.
Local Solace PubSub+ Instance
When developing your application, you may want to test using a local instance of the Solace PubSub+ Event Broker. Refer to the Solace Docker Getting Started Guide to get you up and running quickly with a broker instance running in Docker. You may skip this step if you decide to use a broker running in PCF or Solace Cloud.
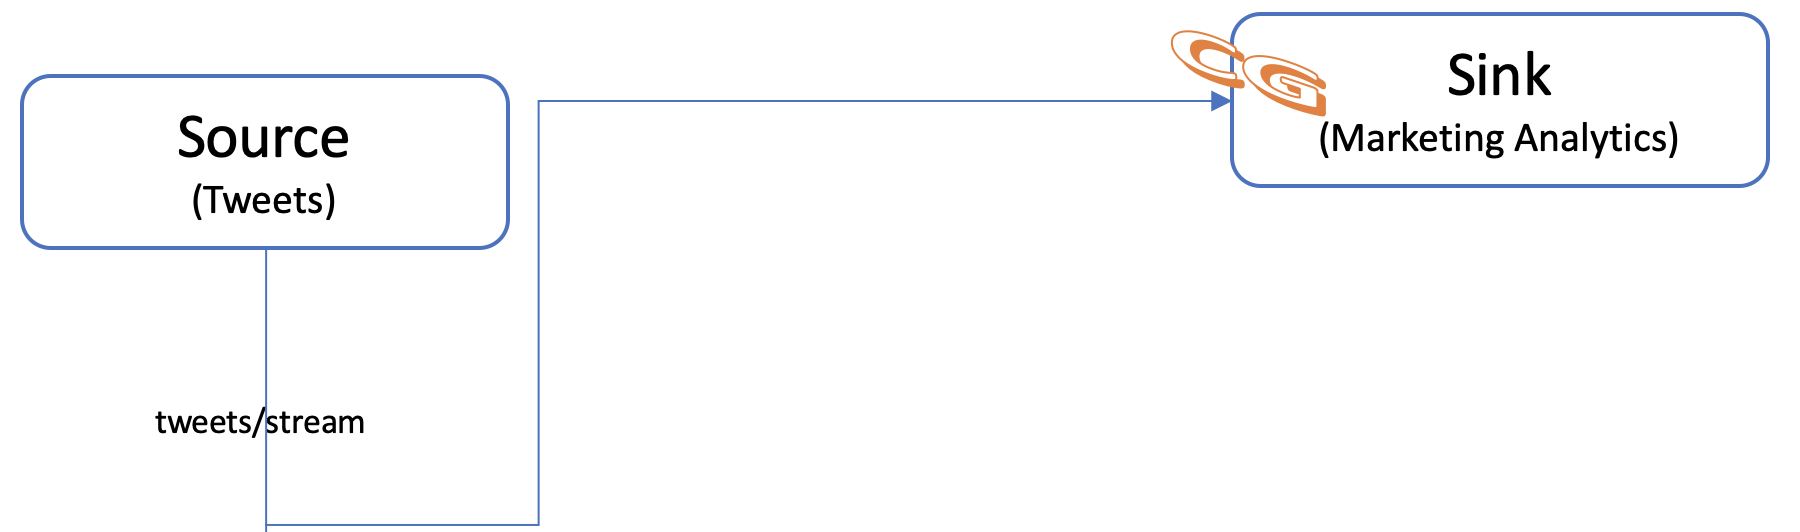
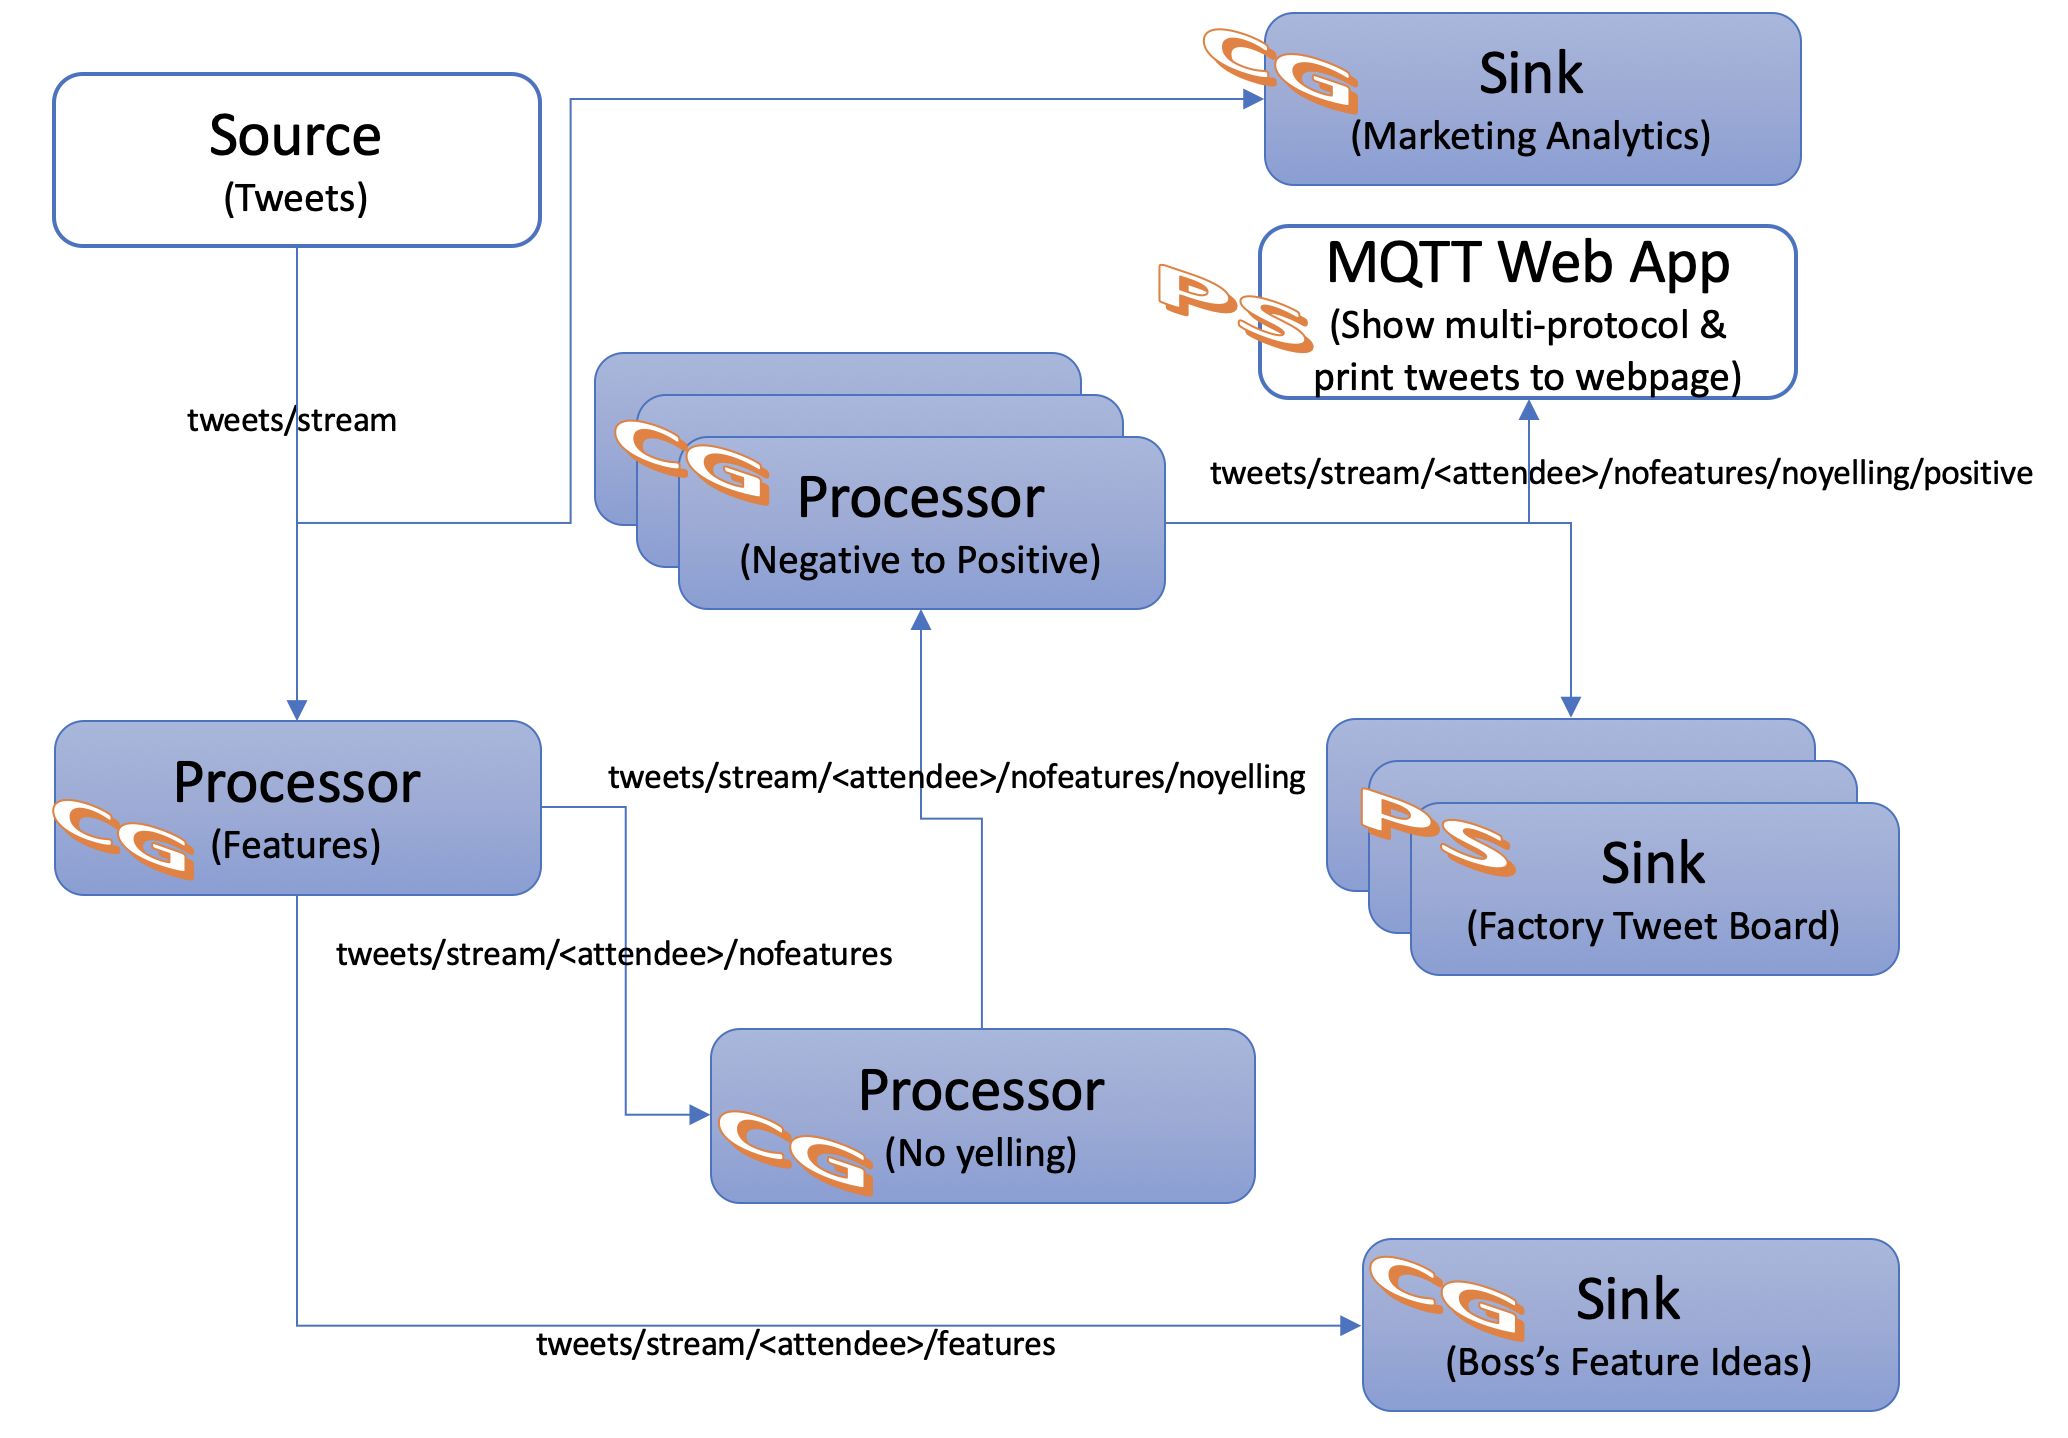
Application Architecture
At the end of this section we will have created the apps below! The Source will send out tweets that will be received by the marketing Sink.
Deploying a Source
Before our company can do anything with the tweets we have to start to receive an incoming stream of them! Let's get started! Please navigate to the "02-scs-source-tweets" project in your IDE.
Learn the Project Structure
Before we take a look at the code, let's take a quick look at the structure of a Spring Cloud Streams project.
- As a java developer you'll probably see a familiar project setup. You have your main application under src/main/java and unit tests under src/test/java.
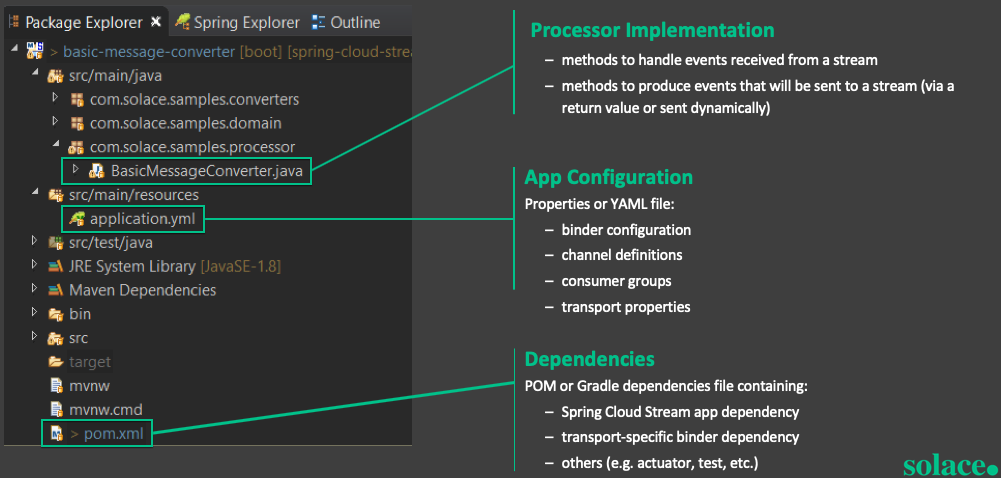
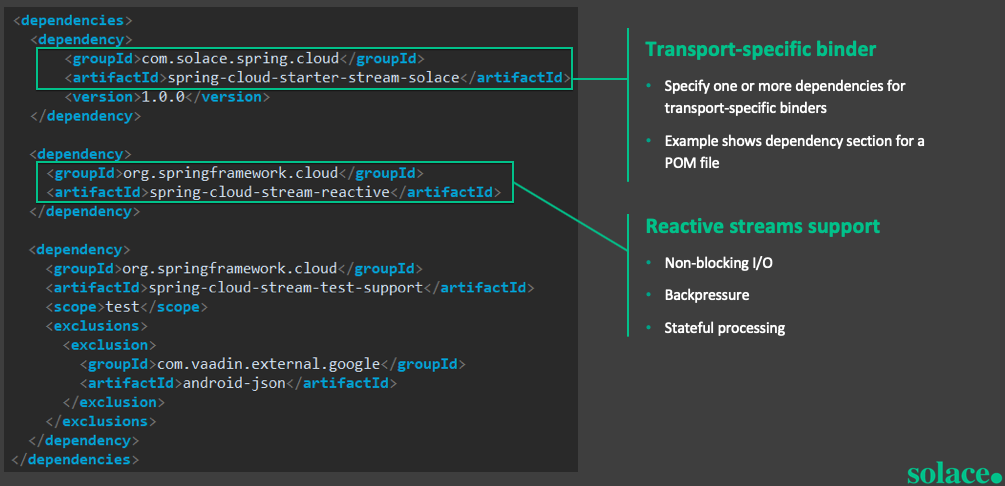
- Next go ahead and open up the pom.xml file in your "02-scs-source-tweets" project and search for "binder"; you should have a dependency for either "spring-cloud-starter-stream-solace" or "spring-cloud-stream-binder-solace" which is what is going to allow SCS to connect to Solace PubSub+. "spring-cloud-starter-stream-solace" includes the "spring-cloud-stream-binder-solace" dependency which is why you could have either one. It is recommended to start with the starter.
- Note that the "spring-cloud-stream-reactive" dependency is only required for reactive streams support, but we will also discuss the use of "Spring Cloud Functions" as an alternative in a later section.
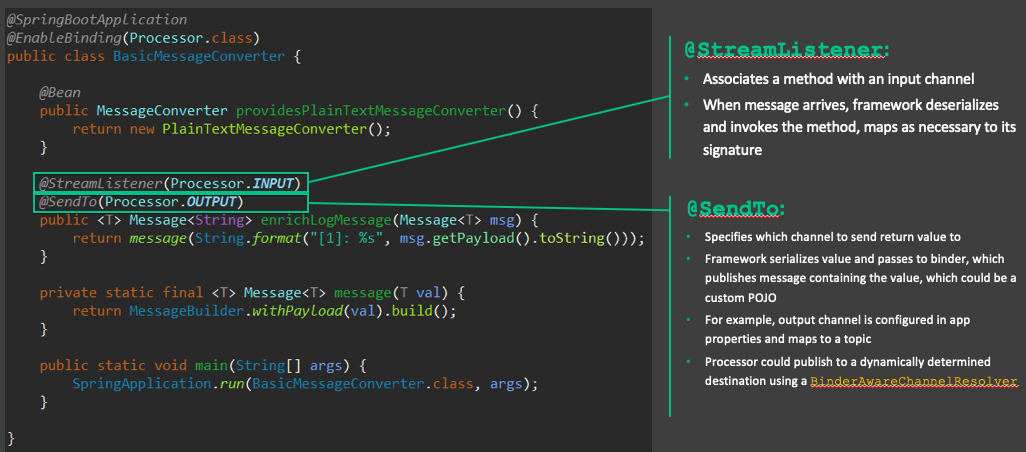
- Let's take a look at a simple sample implementation in the image below. You can see that the enrichLogMessage method is associated with both an INPUT and OUTPUT channel. In a future section we will create an application following a similar pattern, but notice that if you look at the ScsSourceTweets.java class in your "02-scs-source-tweets" project you will see something a bit different. We are using an @InboundChannelAdapter annotation in order to create our fake tweets at a fixed rate.
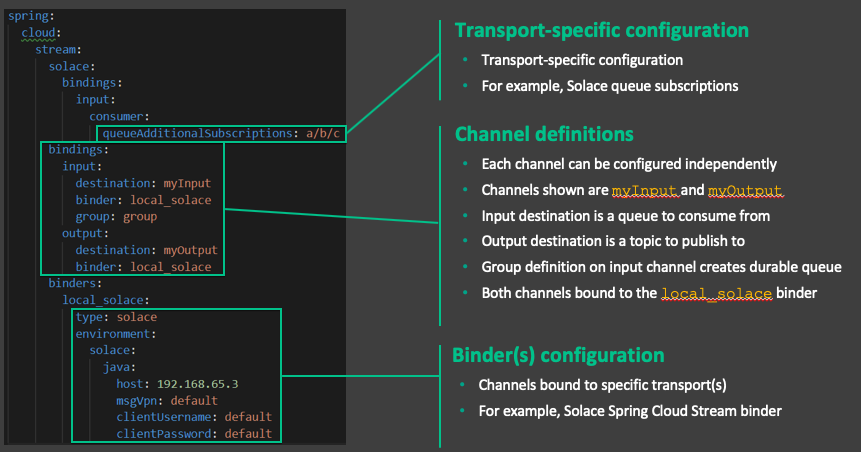
- One last thing to look at and then we'll deploy your first source! Go ahead and open your application.yml file. This file holds the bindings that tells the SCS binder how to connect your input/output channels to the specified middleware at runtime.
Deploy our 02-scs-source-tweets app
- First open the application.yml file and update the host, msgVpn, clientUsername & clientPassword to match your PubSub+ environment. When obtaining the connect info note that the SCS solace binder uses the Solace Java API with the SMF protocol. (Keep this connection info handy as you'll need it several more times throughout this lab!)
- If using STS, start the app by right clicking on the project and choosing "Run As" -> "Spring Boot App"
- If not using STS, open a cli and navigate to the project's directory and then run
$ mvn spring-boot:run
- Whichever way you started the app you should see the app start, connect and begin to send tweets by looking at the console.
To do this we will deploy a sink app. Recall that a sink app binds to an INPUT channel.
Deploying a Sink
- Open the "03-scs-sink-analytics" project
- Take a look at the code in the ScsSinkAnalytics.java class; you'll notice we have a very simple class with only a few methods. As we saw earlier, the @StreamListener attribute identifies which channel our sink method will receive events from. Also notice that the sink method is expecting a POJO tweet parameter of type Tweet
- Now update the application.yml file for the "03-scs-sink-analytics" project with the same info that you used when deploying the source app.
- While updating this file also replace the ATTENDEE_NAME group with your unique name
- Time to deploy! Deploy the "03-scs-sink-analytics" app the same way you started "02-scs-source-tweets"
- Now that your sink is started you should see it logging the tweets as they come in!
- Developer - Woohoo! We've deployed our first SCS source and sink applications and the marketing department is now getting the stream of tweets as they requested! Time to give our boss the good news.
Configure a Cloud Foundry Target in STS
STS provides integrated support for deploying, running and debugging your SCS services in PCF. In the Boot Dashboard view, configure a connection to your PCF deployment by clicking the "+" button as seen in the image below.
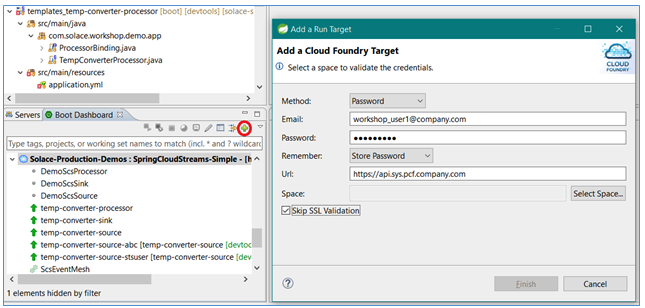
Follow the dialog prompts and fill in the username / password associated with your PCF account. You may need to skip SSL validation if your PCF deployment uses self-signed certificates.
Cloud Foundry CLI Setup
- Install the cf-cli using these instructions: Install CF CLI
- Login to your cf org & space with your API endpoint, username/email & password.
- Choose the proper Org & Space
$ cf login -a <API_URL> -u <USERNAME>
$ Password>
Verify PubSub+ Service in Pivotal Cloud Foundry (PCF)
If you are using PCF, your administrator will have created an org and space for your workshop demo in which you can deploy and run your microservices. Moreover, a Solace PubSub+ service instance will have been created so that it can be bound by any app running in the space and automatically lookup credentials to connect to a broker instance running in PCF. You should determine the name of this service instance before deploying or running your application to avoid any service binding errors. You can do this through the Apps Manager or via the cf CLI. You'll need this service instance name later so don't forget it.
$ cf services
Getting services in org test-org / space development as user1...
name                    service             plan                       bound apps
solace-pubsub-service   solace-pubsub       Enterprise Shared Plan     sample-app
Deploy the Source to PCF
IF PARTICIPATING IN AN INSTRUCTOR LED WORKSHOP THE INSTRUCTOR WILL PUSH TO PCF. YOU ARE WELCOME TO RUN LOCALLY IF YOU WOULD LIKE
- Open the manifest.yml file under the 02-scs-source-tweets project
- Change the services name from "solace-eventmesh" to whatever Solace Service instance is running your space.
- If using STS run a Maven build and install it to the local repository.
- Open the "Boot Dashboard" view (Window -> Show View -> Other -> Boot Dashboard)
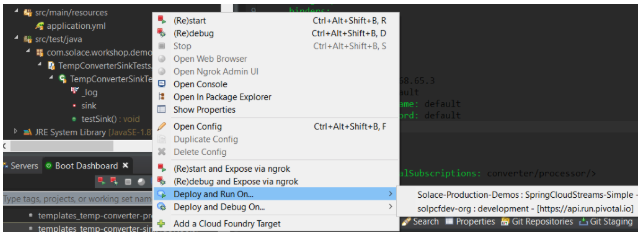
- Right-click on your app in the Spring Boot Dashboard, and select the Deploy and Run On... -> [CHOOSE YOUR DEPLOYMENT TARGET WE SETUP EARLIER]:
- At this point you should see the app deploying to the chosen space and the console should automatically open to follow the progress. Once complete you should see the app start to send a tweet every second.
- If not using STS open a cli and navigate to the 02-scs-source-tweets project and then run
$ mvn clean install
$ cf push
- At this point you should see the app being deployed to PCF. If all goes correctly you should see the app start and have a requested state of "started" before the command exits.
- You can then see the app logs by executing the command below and should see a tweet being sent every second.
$ cf logs 02-scs-source-tweets
Deploy the Sink to PCF
- Open the manifest.yml file under the 03-scs-sink-analytics project
- Change the services name from "solace-eventmesh" to whatever Solace Service instance is running your space.
- Replace ATTENDEE_NAME with your unique name.
- If using STS run a Maven build and install it to the local repository.
- Open the "Boot Dashboard" view (Window -> Show View -> Other -> Boot Dashboard)
- Right-click on your app in the Spring Boot Dashboard, and select the Deploy and Run On... -> [ CHOOSE OUR DEPLOYMENT TARGET WE SETUP EARLIER]:
- At this point you should see the app deploying to the chosen space and the console should automatically open to follow the progress. Once complete you should see the app start to send a tweet every second.
- If not using STS open a cli and navigate to the 03-scs-sink-analytics project and then run
$ mvn clean install
$ cf push
- At this point you should see the app being deployed to PCF. If all goes correctly you should see the app start and have a requested state of "started" before the command exits.
- You can then see the app logs by executing the command below and should see a tweet being sent every second.
$ cf logs 03-scs-sink-analytics
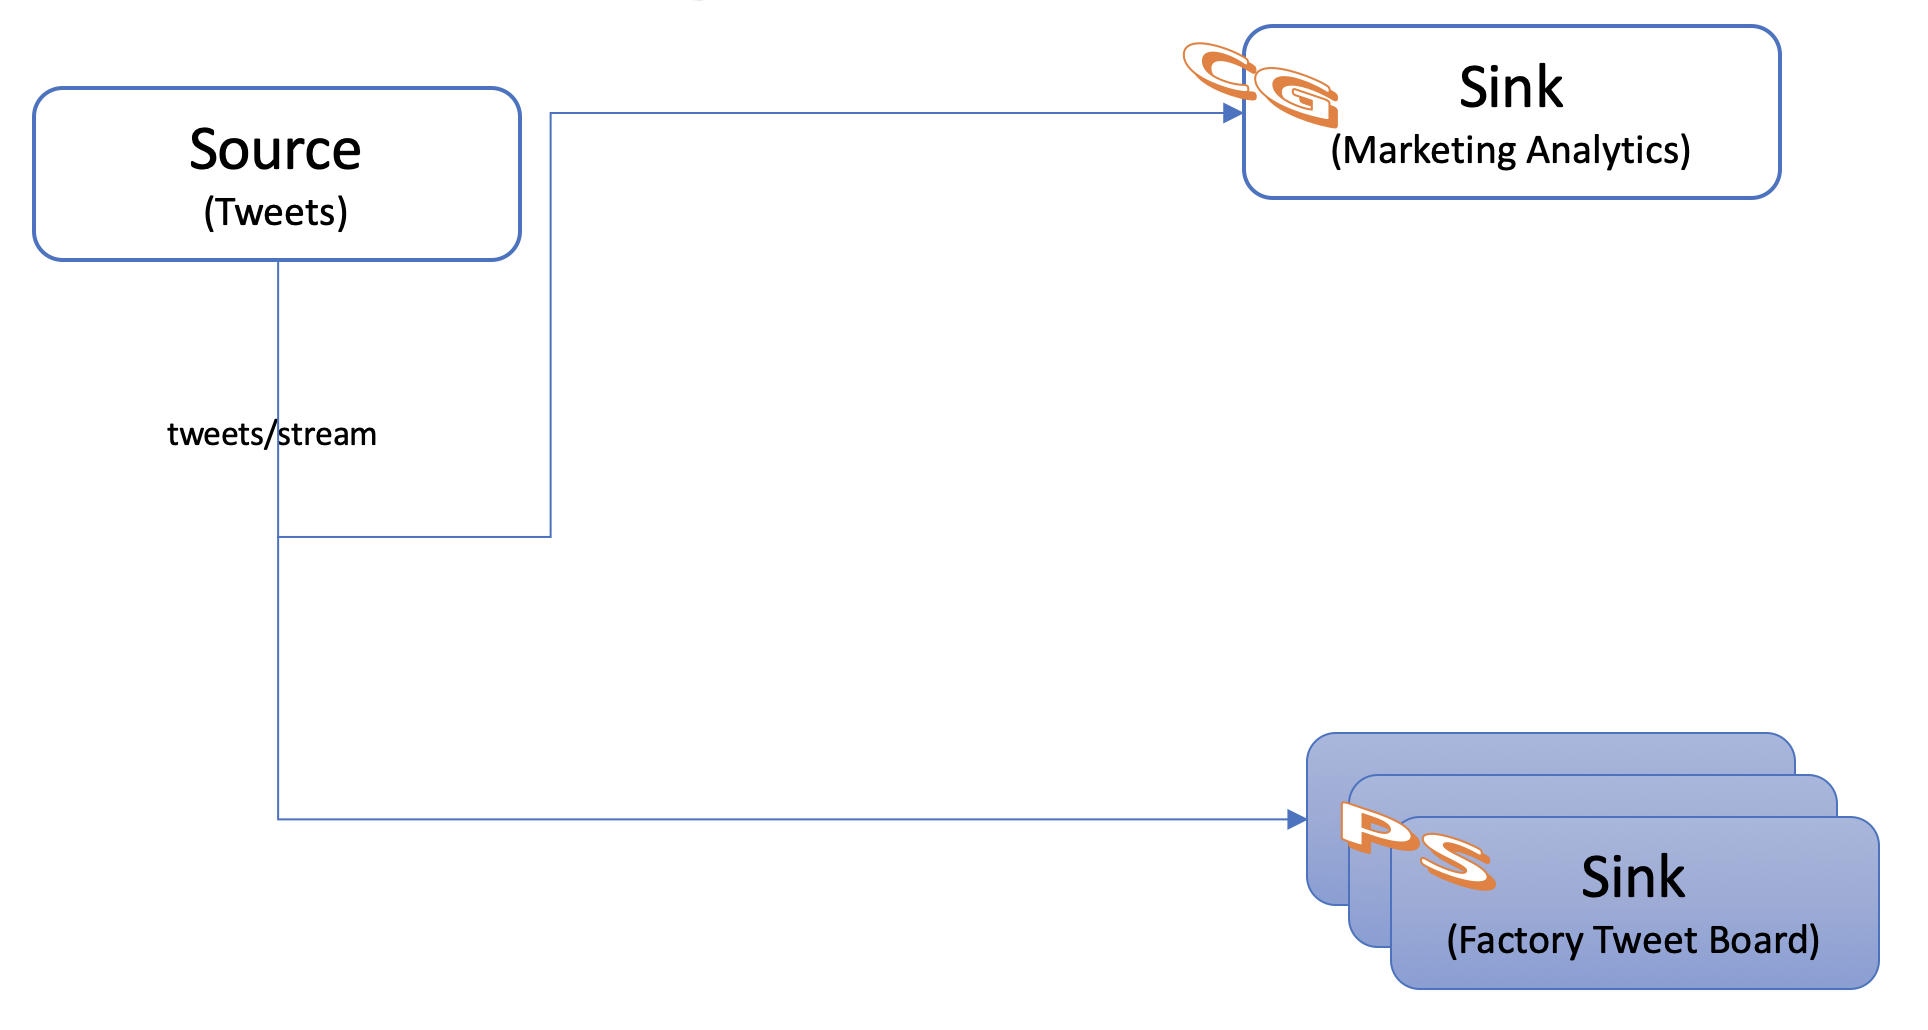
Application Architecture
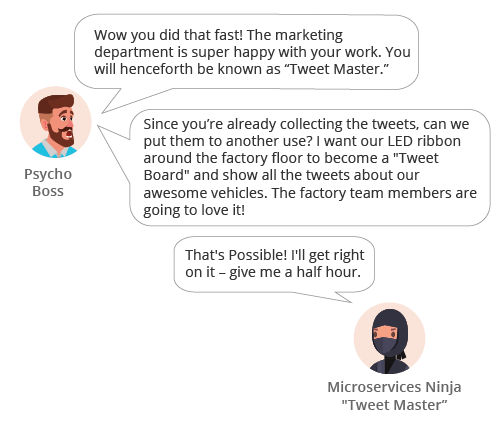
At the end of this section we will have added the Factory Tweet Board Sink.
Creating the Tweet Board Sink
We obviously don't have a giant LED board that we can use so we're going to settle for logging the tweets as they come in.
- Open the "04-scs-sink-tweetboard" project
- Open the ScsSinkTweetBoard.java class
- Add the @EnableBinding(Sink.class) annotation to label the app as a Sink
- Add a "sink" method that takes in a "Tweet" POJO from the INPUT channel and logs that it was received.
- Update the application.yml file, verify that there is indeed a destination configured for the input channel, and add your name to the end of the destination name (e.g: TWEETS.Q.BOARD.Marc). Note that by not specifying a group we are using the "Publish-Subscribe" messaging model.
- If not deploying to PCF you'll also need to update the host, msgVpn, clientUsername, clientPassword in the application.yml file.
- If you are deploying to PCF you'll need to open the manifest.yml file and update 2 items: 1) Update the solace service name, and 2) Change ATTENDEE_NAME to your name
Deploying the Tweet Board
At this point we have created our "04-scs-sink-tweetboard" application and it needs to be deployed.
- If using STS run a Maven build and install it to the local repository.
- Open the "Boot Dashboard" view (Window -> Show View -> Other -> Boot Dashboard)
- Right-click on your app in the Spring Boot Dashboard, and select the Deploy and Run On... -> [CHOOSE YOUR DEPLOYMENT TARGET WE SETUP EARLIER]:
- At this point you should see the app deploying to the chosen space and the console should automatically open to follow the progress. Once complete you should see the app start to send a tweet every second.
- If not using STS open a cli and navigate to the 04-scs-sink-tweetboard project and then run
$ mvn clean install
$ cf push
- At this point you should see the app being deployed to PCF. If all goes correctly you should see the app start and have a requested state of "started" before the command exits.
- You can then see the app logs by executing the command below and should see a tweet being sent every second.
$ cf logs 04-scs-sink-tweetboard-**ATTENDEE_NAME**
So far in this workshop we have created source or sink applications. In this section we will create our first processor.

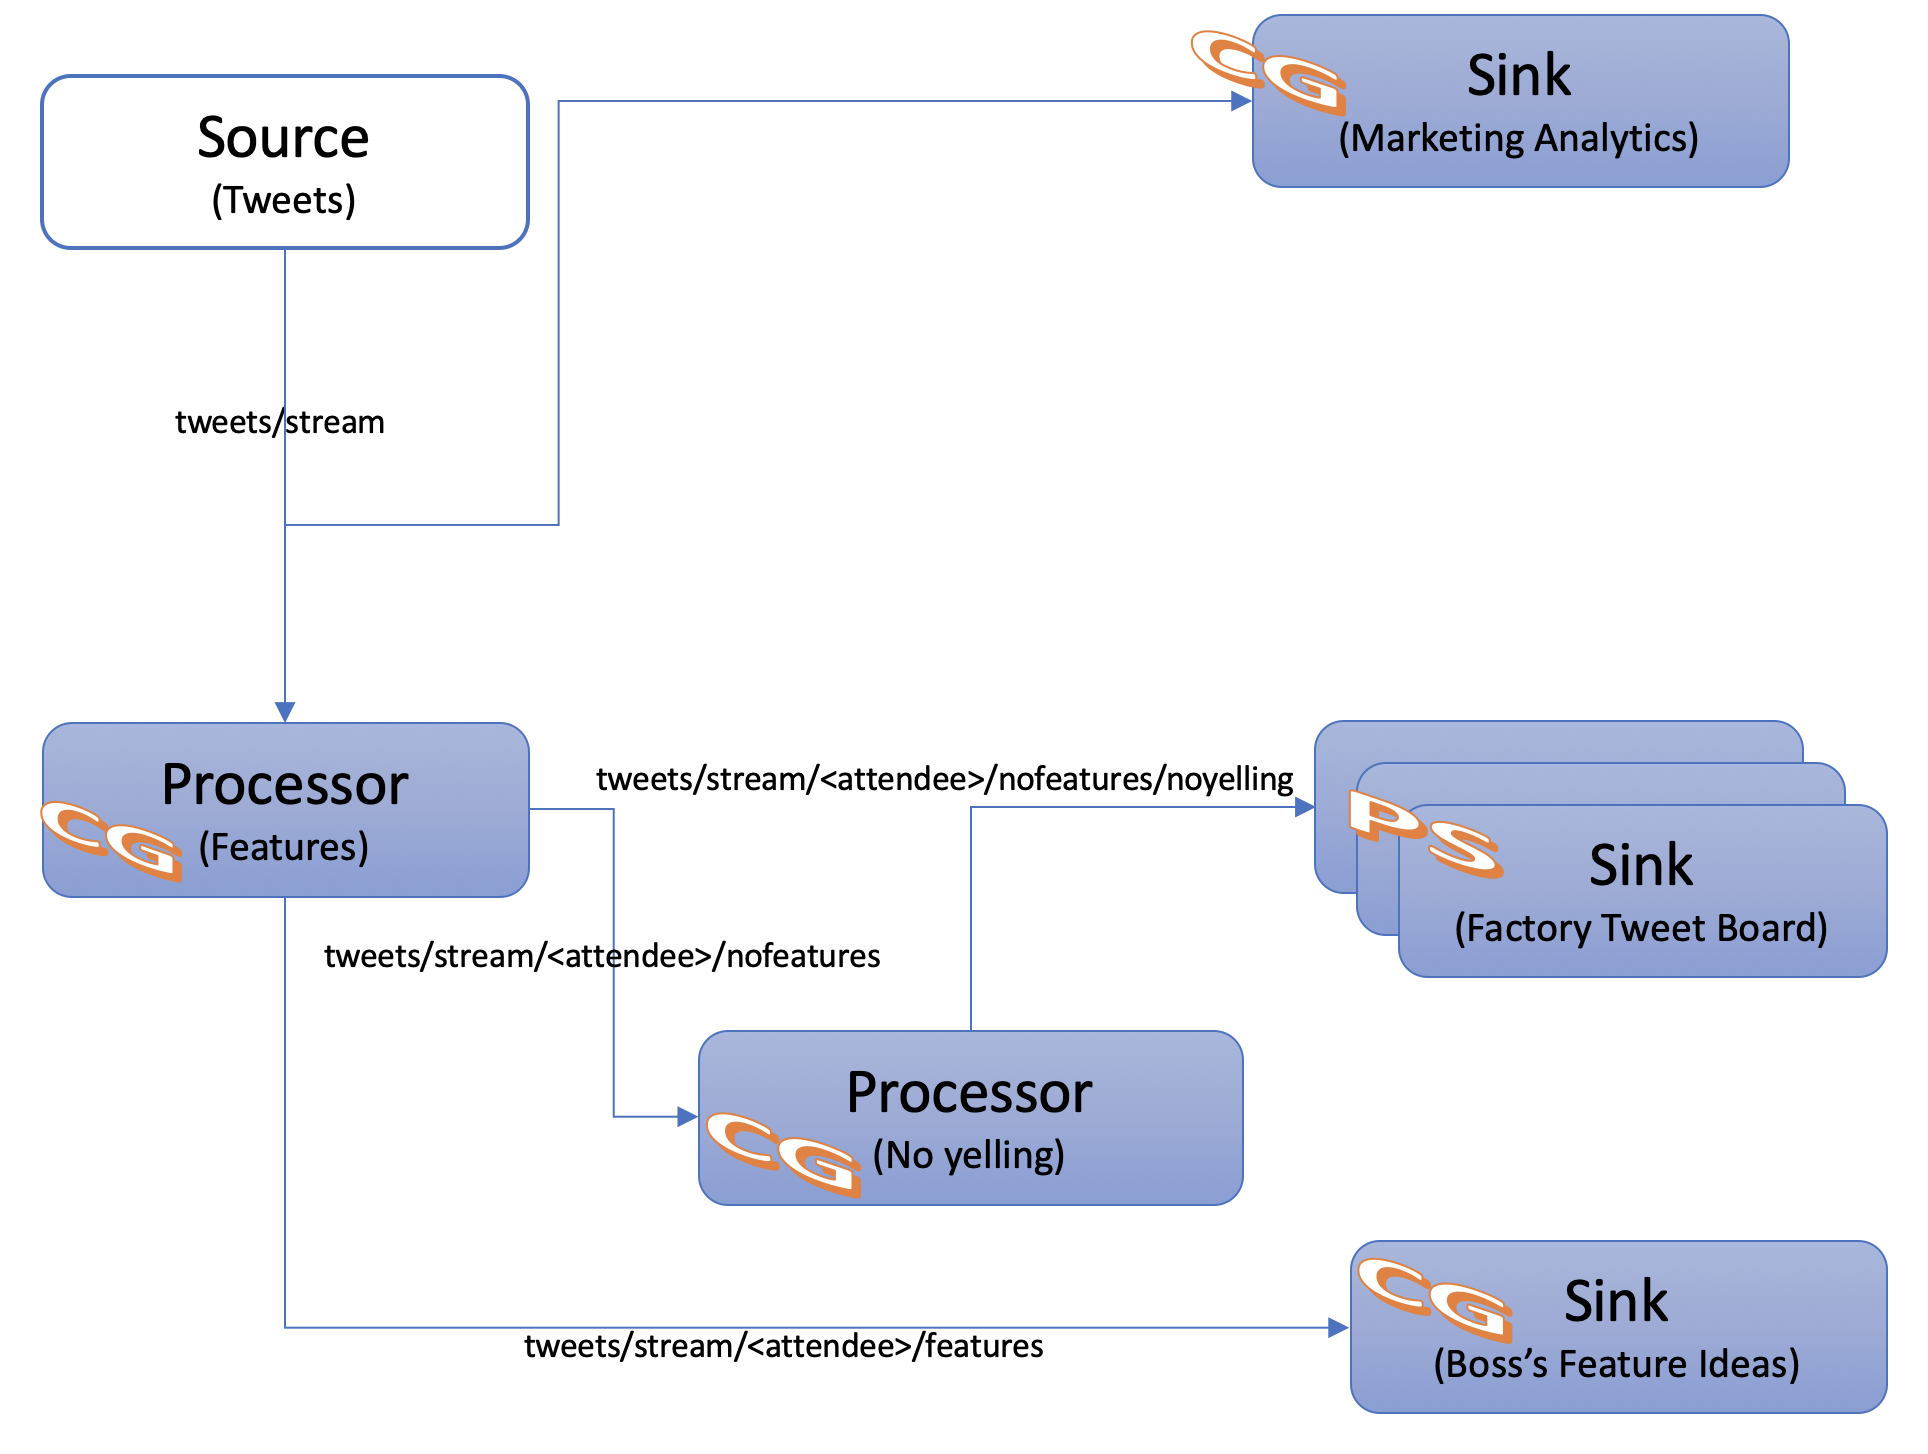
Application Architecture
In order to meet our new goal we will add the Features processor and a new Sink as seen below.
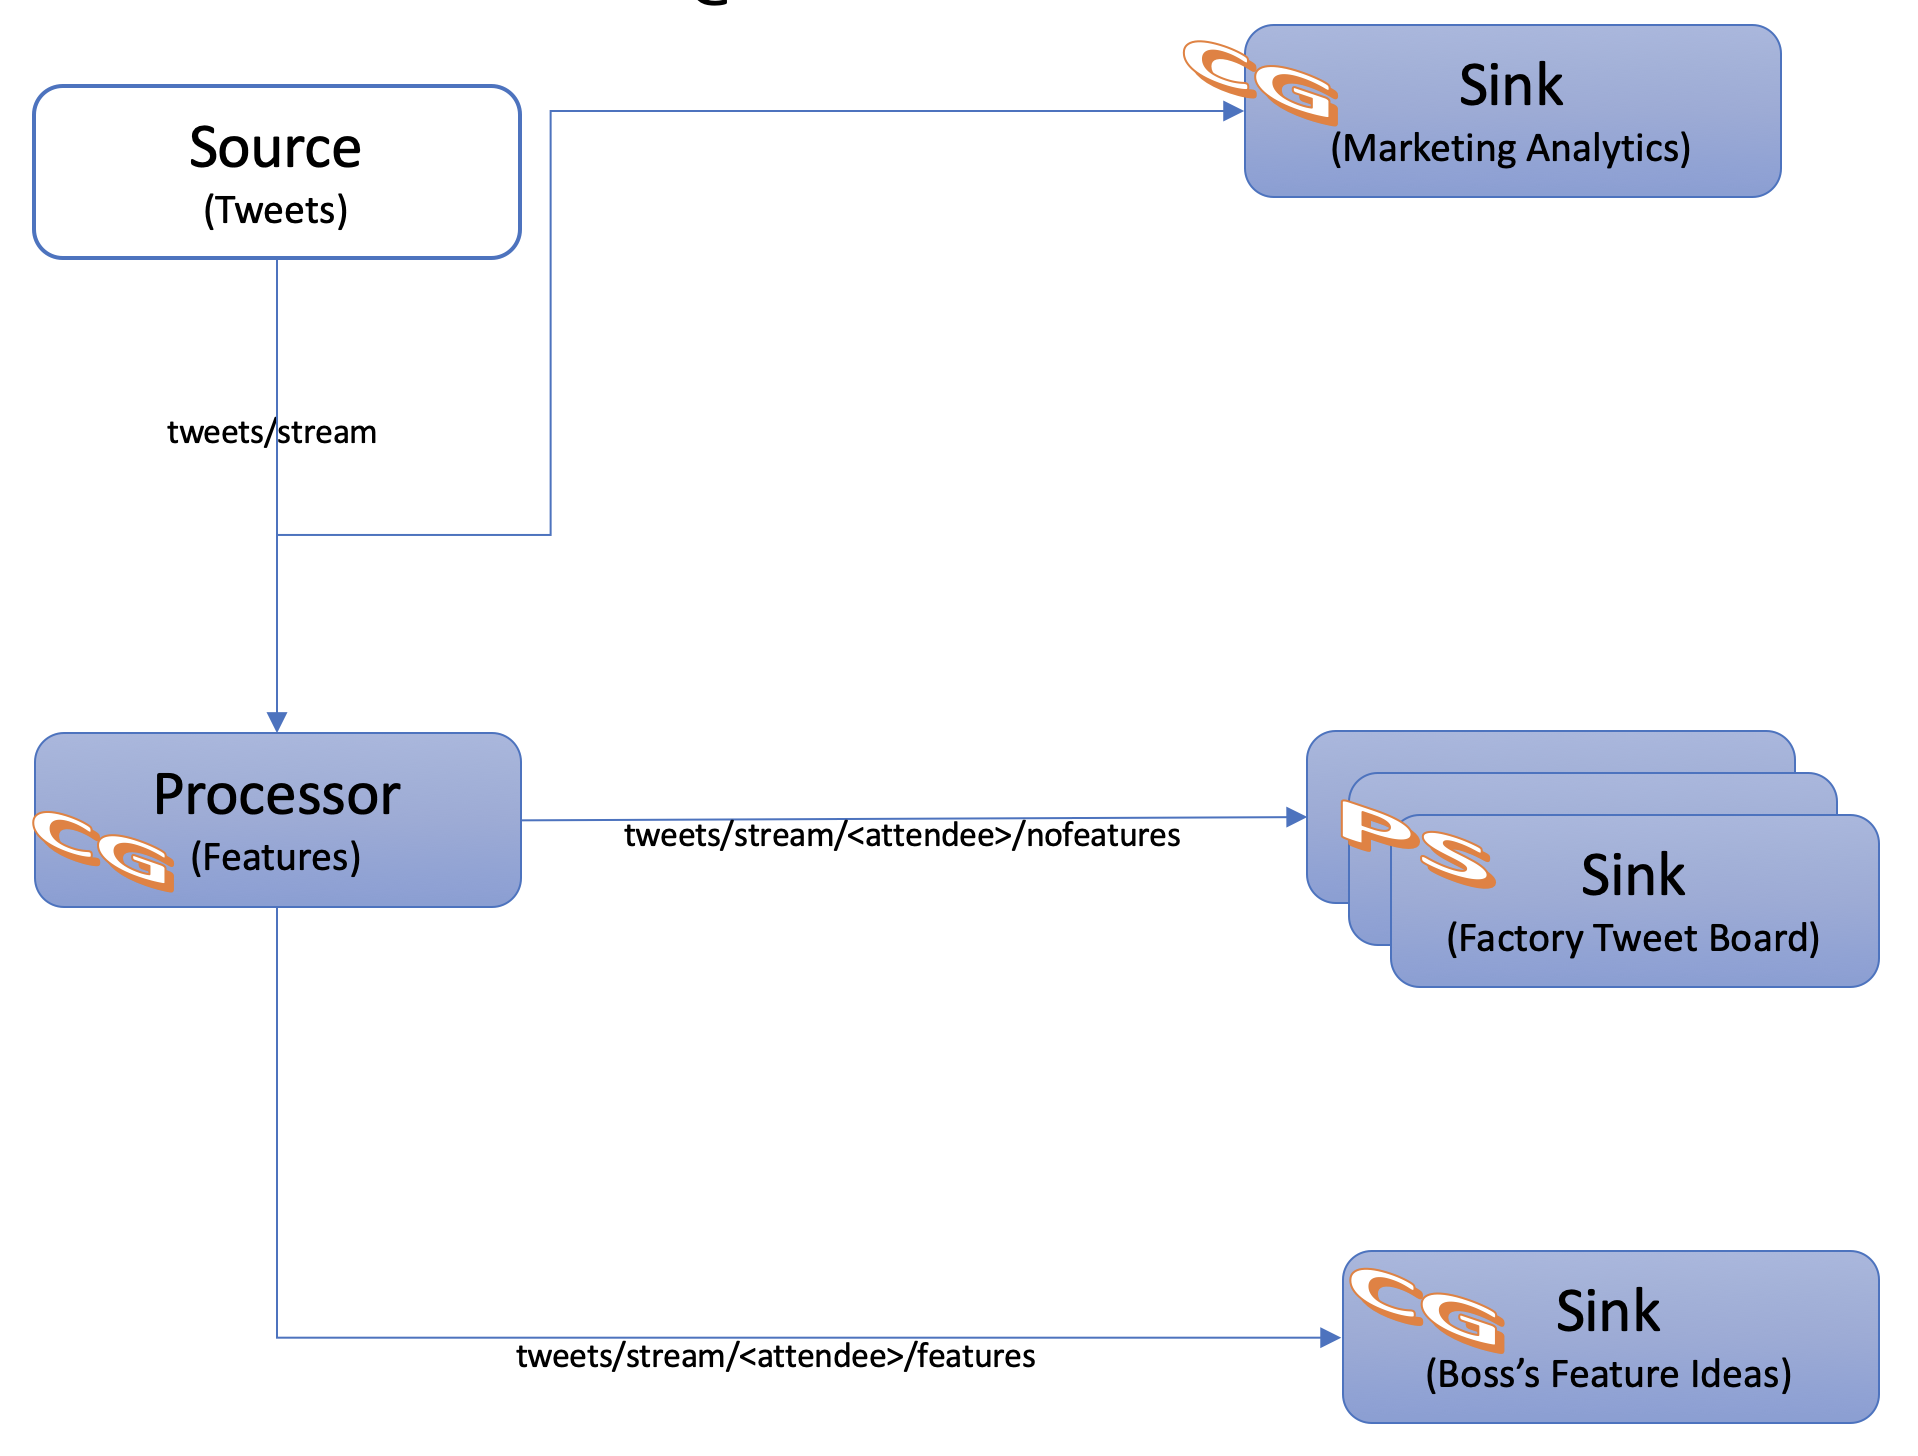
Create the Feature Processor
Processor with a Custom Binding Interface
- Open the "05-scs-processor-feature" project
- Note that we have the same project setup as the source and sink apps from the previous section and the pom file doesn't have any extra dependencies to create a Processor.
- Now open the ScsProcessorFeatures.java class.
- Note that our @EnableBinding Annotation is specifying the ProcessorOneInTwoOutBinding class; this is because we have specified a custom interface to have 2 output channels (one for tweets with features, and one for all other tweets)
- Note that in the application.yml file the bindings that are listed include input, outputFeature, and outputNoFeature as defined in our custom bindings interface.
- Update the ATTENDEE_NAME to be your name each time it occurs in the application.yaml file.
- If not using PubSub+ in PCF, update the host, msgVpn, clientUsername, clientPassword in the application.yml file so we can connect to the PubSub+ service
- Deploy the app in the same manner that you've been deploying the others. (Don't forget to update the ATTENDEE_NAME & the solace service in the manifest.yml file to point to your PubSub+ service!)
Processor using Dynamic Destinations
- Let's create a second feature processor that makes use of dynamic destinations.
- Open the "06-scs-processor-dynamicfeature" project
- Open the ScsProcessorFeaturesDynamic.java class
- You'll notice that the @EnableBinding annotation defines the app as a "Sink" app. This is because we only bind the INPUT channel at startup and then at runtime we are using a BinderAwareChannelResolver (which is registered automatically by the @EnableBinding annotation) to dynamically create output channels.
- Update the topicStart variable to replace ATTENDEE_NAME with your unique name
- Review the handle method to see an example of how to specify dynamic destinations
- Open the application.yml file and change ATTENDEE_NAME to your unique name
- Open the manifest.yml file to update the solace service name & replace ATTENDEE_NAME with your unique name.
- Build (mvn clean install) & Deploy the app to PCF
Create the Feature Sink for the Boss
- Open the "07-scs-sink-bossideas" project
- Open the ScsSinkBossideas.java class
- Add the @EnableBinding(Sink.class) annotation to label the app as a Sink
- Add a "sink" method that takes in a "Tweet" POJO from the INPUT channel and logs that it was received.
- Update the application.yml file and verify that there is indeed a destination & group configured for the input channel. Note that by specifying a group we are now using the consumer group model. Since this application will likely do further processing in the future we want to provide the option of scaling up to keep up with the number of events that come in. Replace ATTENDEE_NAME with your unique name in BOTH spots
- At this point we have created our "07-scs-sink-bossideas" application and it needs to be deployed. Time to see if you've been paying attention!
- Deploy the app in the same manner that you've been deploying the others. (Don't forget to update the ATTENDEE_NAME and solace service in the manifest.yml file to point to your PubSub+ service!)
Update the Tweet Board Subscription
Note that our processor that we created earlier in this lab publishes to multiple topics essentially splitting our feed into two. Due to our new requirements to not show new features on the twitter board we need to update that sink appropriately.
- Navigate to your "04-scs-sink-tweetboard" project
- Open your application.yml file
- Update the queueAdditionalSubscriptions property to listen on "tweets/stream/ATTENDEE_NAME/nofeatures"
- Save the file
- Redeploy the updated App (Note if you had deployed locally it would automatically re-deploy since we're using devtools; this can also be configured to work with PCF, but is not recommended in production environments for obvious reasons)
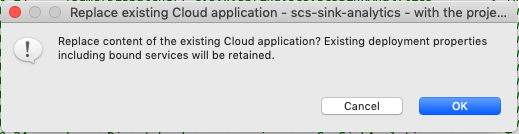
- If deploying via STS deploy as normal by doing a Maven install on the project and then in the Boot Dashboard right clicking and choosing Deploy and Run on your target. When asked if you would like to replace content of the existing Cloud application choose "OK"
- If using the cf cli, then you also push updates the same way
$ cd /path/to/app
$ mvn install
$ cf push
Application Architecture
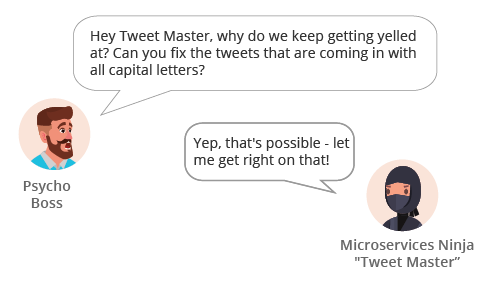
We're going to add a "No Yelling" processor in our event driven architecture in order to meet this new need.
Deploying a SCS Processor using Spring Cloud Functions
- Navigate to your "08-scs-processor-yelling" project
- Open your pom.xml file and note that it was not necessary to include Spring Cloud Functions as a dependency. It's included as a dependency of the "spring-cloud-steam" artifact.
- Open the ScsProcessorYelling.java class and note that although we still have the @EnableBinding(Processor.class) annotation we are now bindings a bean of type "java.util.function.Function" to the external destinations by providing the spring.cloud.stream.function.definition property.
- Open the application.yaml file and change ATTENDEE_NAME to your unique name
- Now that we've seen how to create a SCS app using Spring Cloud Functions go ahead and deploy it. (Don't forget to update the ATTENDEE_NAME & solace service in the manifest.yml file to point to your PubSub+ service!)
- After deploying you should start to see the BEFORE and AFTER log entries scrolling across the console where the AFTER log entries do not contain any uppercase letters in the text field.
Application Architecture
A processor will be added to our architecture in order to convert negative words to positive ones.
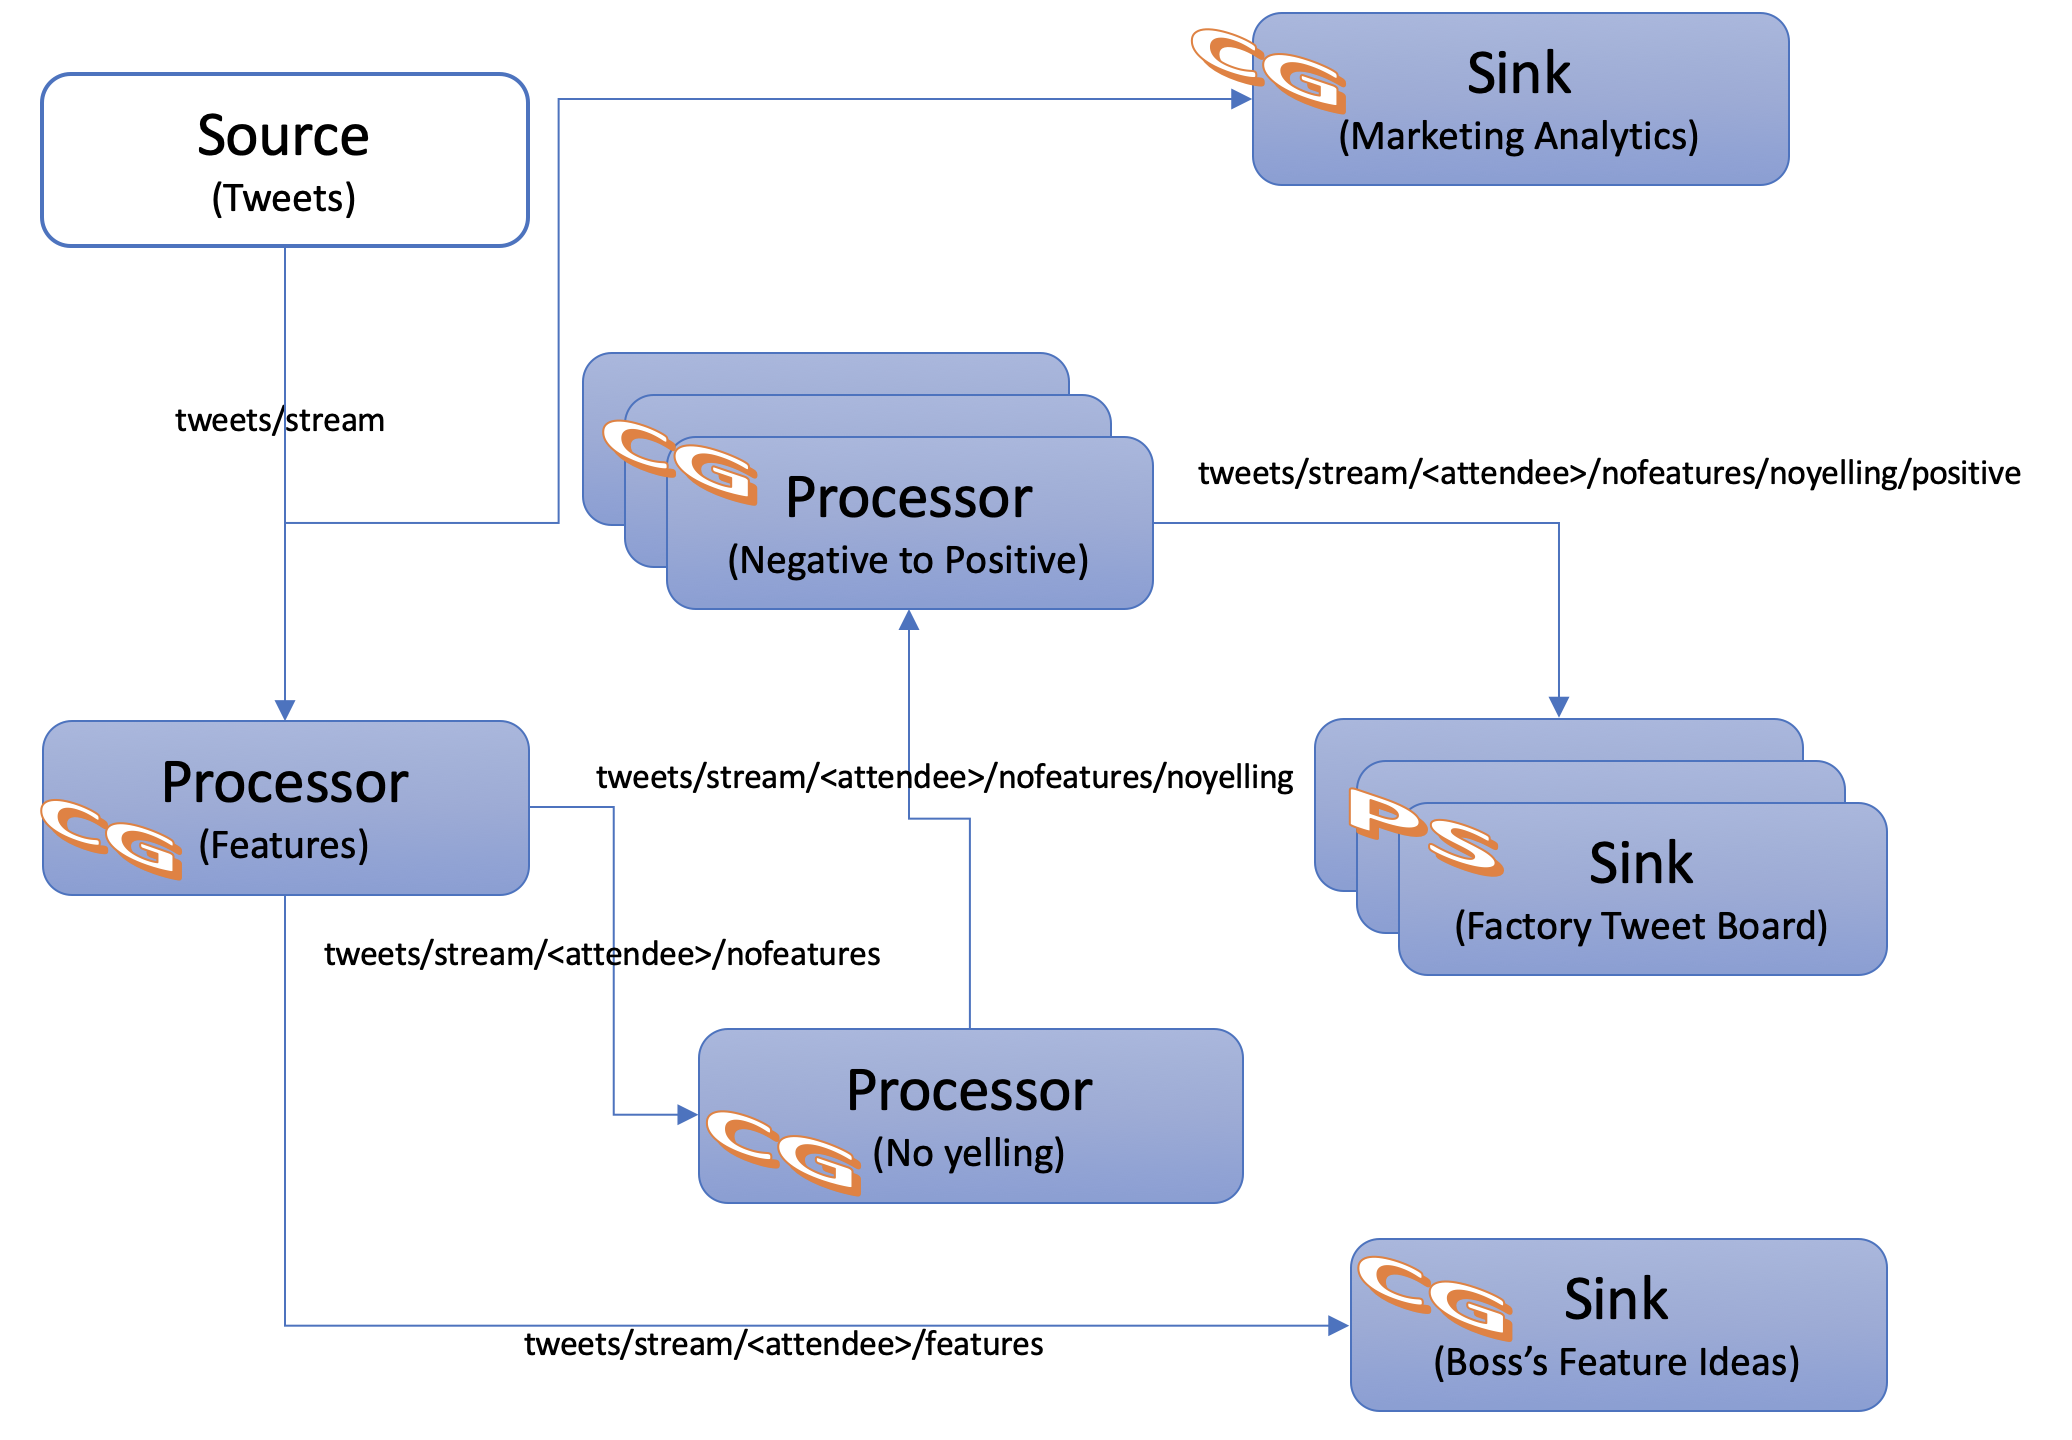
Create the Processor
Let's get started and hopefully have a bit of fun!
- Open the "09-scs-processor-positive" project
- Open the manifest.yml file and change ATTENDEE_NAME to your name
- Don't forget to update the solace service in the manifest.yml file to point to your PubSub+ service!
- Open the application.yml file and change all 3 ATTENDEE_NAME placeholders with your name (in the input group, output destination & queueAdditionalSubscriptions)
- Find & Open the ScsProcessorPositive.java class. At this point we know how to create and deploy a processor so we'll do something a bit different. At the top of the class you'll see that the negToPosMap object is being initialized in a static method. This Map holds the key for changing our negative tweets to positive ones. Go ahead and fill in some positive words for each negative one in the map. Remember that you can find the canned tweets in the canned_tweets.txt file under the "02-scs-source-tweets" project if you need some more context :)
- After filling in your "positive" words go ahead and deploy the app
Update the Tweet Board Subscription
- Navigate to your "04-scs-sink-tweetboard" project
- Open your application.yml file
- Update the queueAdditionalSubscriptions property to listen on "tweets/stream/ATTENDEE_NAME/nofeatures/noyelling/positive" replacing ATTENDEE_NAME with your name
- Save the file
- Redeploy the updated App (Note if you had deployed locally it would automatically re-deploy since we're using devtools; this can also be configured to work with PCF, but is not recommended in production environments for obvious reasons)
- If deploying via STS deploy as normal by doing a Maven install on the project and then in the Boot Dashboard right clicking and choosing Deploy and Run on your target. When asked if you would like to replace content of the existing Cloud application choose "OK"
- If using the cf cli, then you also push updates the same way
$ cd /path/to/app
$ mvn install
$ cf push
Application Architecture
To meet this new requirement we are going to add the MQTT Web App shown in the diagram below:
Obtain PubSub+ Credentials for an App that can't use the Cloud Connector & Auto-config
IF PARTICIPATING IN AN INSTRUCTOR LED WORKSHOP THE INSTRUCTOR WILL PERFORM THIS SECTION. YOU ARE WELCOME TO RUN LOCALLY IF YOU WOULD LIKE
- Open Pivotal Apps Manager & Login
- Navigate to your Org & Space
- Click on "Services"
- Choose your "Solace PubSub+" service instance
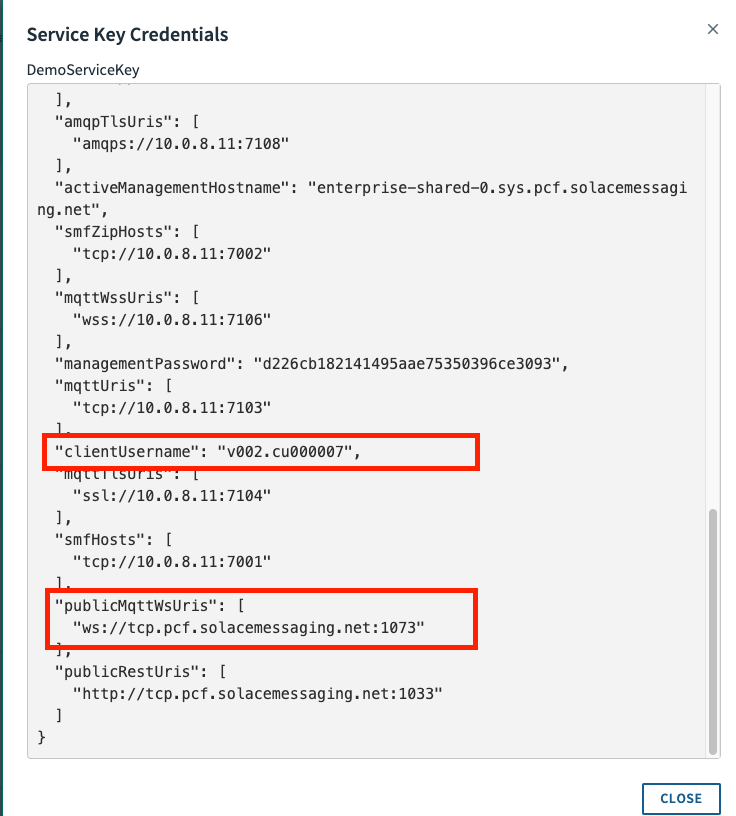
- Click "Create Service Key" (in red box below)

- Type in a Credentials key name, such as "DemoServiceKey" & Click "Create"
- After it's created, click on your Service Key Credentials & find and record the "publicMqttWsUris", "clientUsername" & "clientPassword" as we'll need them in the next step
Create the Web App
IF PARTICIPATING IN AN INSTRUCTOR LED WORKSHOP THE INSTRUCTOR WILL PERFORM THIS SECTION. YOU ARE WELCOME TO RUN LOCALLY IF YOU WOULD LIKE
- Since we're Spring experts let's go ahead and whip up a quick Spring Boot app that uses JavaScript and the open source MQTT Paho library to connect to PubSub+ and receive the stream of tweets.
- Open the "10-spring-boot-mqttwebapp" project
- Check out the pom.xml file and notice that there is nothing spring-cloud-streams related; only spring boot!
- Then open up the mqttListener.html to see how simple it was to connect & receive events using MQTT Paho.
- In mqttListener.html update the host/port/username/credentials to connect to PubSub+ (Search for "UPDATE" to find where the updates need to be made) using the information found in the previous subsection.
- Lastly look at the MqttWebApp.java class. You'll see that we just have a simple RestController that is smart enough to make the files in src/main/resources/static available for HTTP access.
- Now that we've taken a look at how the app works go ahead and deploy it.
- Once deployed navigate to http://LOOKUP YOUR ROUTE/mqttListener.html to see the incoming tweets! You can lookup your route in the apps manager or by using the command below:
$ cf app 10-spring-boot-mqttwebapp
Review
Continued learning topics:
This course was just an introduction to Spring Cloud Streams, but we've included some resources below if you're interested in learning more about it or some of the features that complement it! Happy Learning :)