1. Introduction
> Do you use REST-over-HTTP (GET, POST, etc.) for application communication?? Read on!
In traditional microservice applications, the primary form of communication is often REST-over-HTTP. However, this can be limiting as:
- REST architecture is client-to-server (not bidirectional)
- REST-over-HTTP is point-to-point (only one URL destination)
- HTTP is a synchronous/blocking protocol (waiting for 200 OK)
Modern applications are embracing publish-subscribe communication as a way to enable event-driven architectures.
- But how to migrate?
- How to integrate?
- Is it possible to combine both traditional REST interaction with efficient pub/sub communication??
What you'll build
What you'll learn
- How to configure the Solace PubSub+ broker to accept incoming REST requests
- How to configure the Solace broker to pass incoming REST requests straight though, similar to a proxy, using a Rest Delivery Point (RDP)
- How to utilize the publish-subscribe pattern to allow easy access to multiple copies of the same data
- How to build a Solace messaging application to consume and respond to incoming REST requests
Useful Links
2. Prerequisites & Assumptions
- It is assumed you have a basic understanding of what a Solace PubSub+ event broker is, and what it does.
- You have access (and admin access) to a Solace PubSub+ broker. This can either be a hardware appliance, the software broker, or a Solace Cloud service instance. (See below)
- cURL, Postman, or other REST utility that will allow the injection of REST-over-HTTP requests.
- (optional) A REST-enabled web server, web application, or microservice that can accept incoming REST (GET, POST, etc.) requests, and generate a response. If not, the tutorial will use an available Postman test server.
- (optional) The Solace Java (JCSMP), JavaScript, C#, JMS, or other messaging API, which can be found at either solace.com/downloads or github.com/solacesamples.
Free Solace Access!
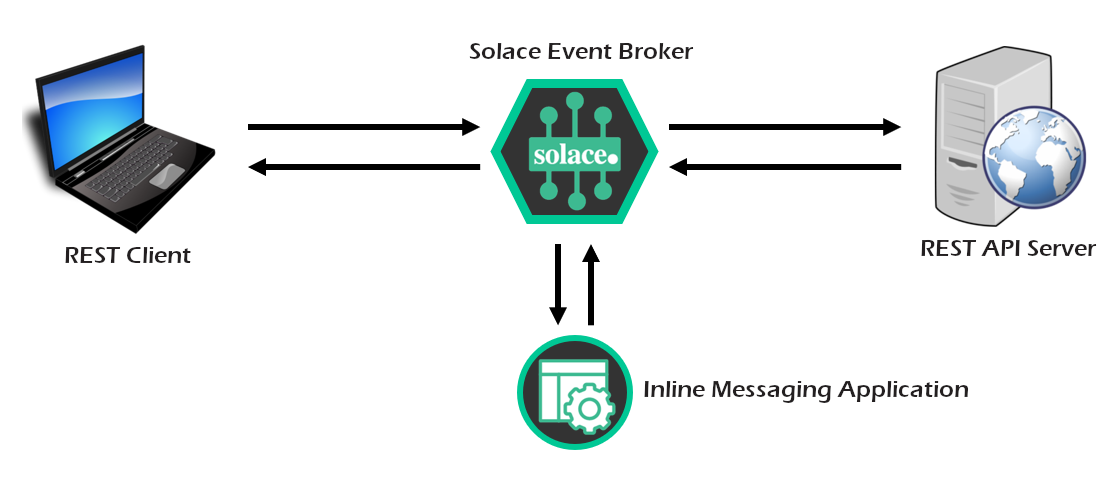
3. Overview of Sections: A, B, and C
This tutorial will walk though a number of steps to configure the Solace PubSub+ broker to be used in REST Gateway mode, as well as code examples using the Solace JCSMP (or other) API for building a request-reply back-end messaging application.
Starting Configuration
- In the beginning, you have a client making a REST request to a back-end REST server. (We'll use a free one if you don't have one available).

Part A
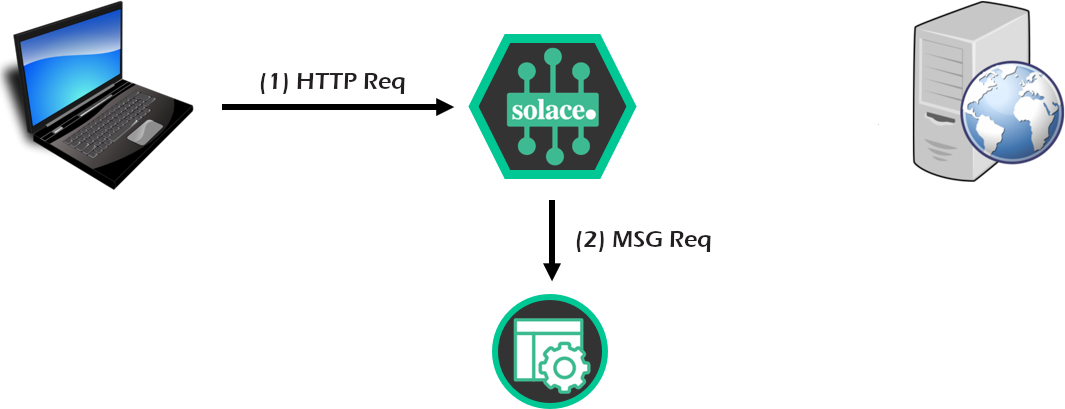
- First, we configure and test the Solace PubSub+ broker to ensure it is receiving REST requests. Solace will convert the incoming requests to messages for testing.
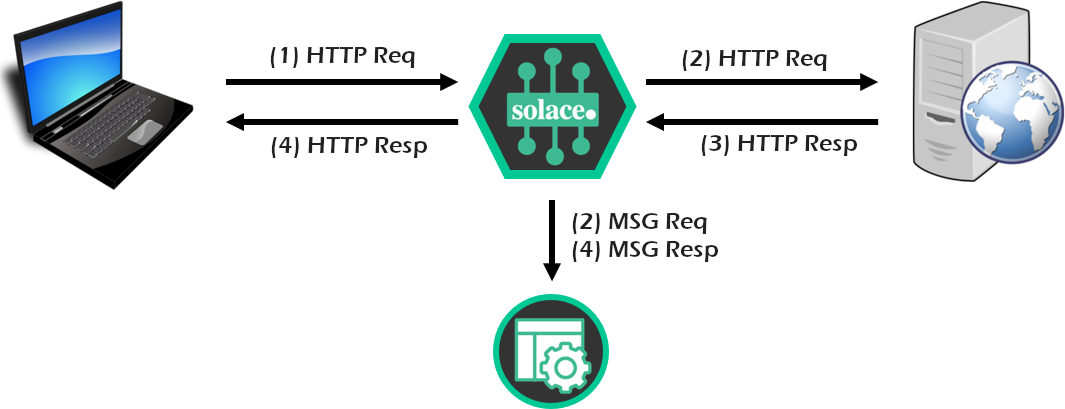
Part B
- Next, configure all the necessary "outbound" REST components in the Solace broker to allow the REST request to reach the back-end REST API, and respond. This allows Solace to essentially be a REST proxy.

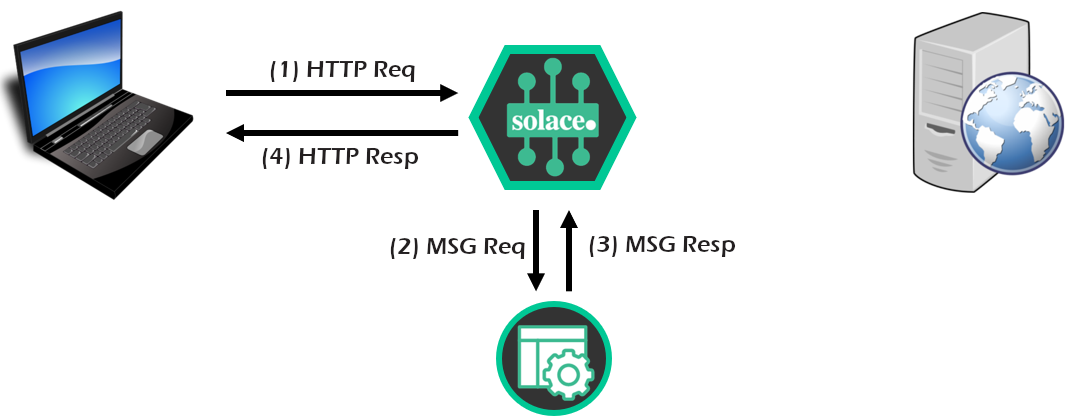
Part C
- Finally, configure a "sniffer" messaging application to listen to the REST request/reply flow through Solace broker, using the publish-subscribe pattern. Could be very useful for logging, diagnostics, or audit.
- Configure a messaging application to replace/extend/complement the back-end REST server, allowing a REST-to-pub/sub conversion within the Solace broker.
4. Three Options for Config Management
You can (generally) configure the Solace PubSub+ broker using three different methods; this section provides a very brief outline of those.
Each section of this CodeLab that performs a configuration step on the Solace broker will include all three options.
For any configuration management, you will need a username/password with either admin or read/write level privileges.
PubSub+ Manager GUI
The PubSub+ Manager for Solace brokers is a web GUI, usually accessed on port 8080 on the software broker, port 80 of the management plane of the hardware appliance, or via the Solace Cloud console and clicking on "Manage Service" in the top right. (It is a replacement for SolAdmin, if you know that that is).
SEMP Management API
All of the commands and capabilities within the PubSub+ Manager can also be accomplished programmatically via the RESTful Solace Element Management Protocol (SEMP) API. For more information on the SEMP API, please consult the following links:
Command Line Interface (CLI)
The Solace Command Line Interface (CLI) can be reached by one of the following methods (as appropriate):
- Software broker, SSH to port 2222, and login with the admin username/password
- Software broker running as Docker container:
sudo docker exec -itcli - Software broker running as machine image: login to the machine image, then:
solacectl cli - Hardware appliance: login to port 22 of the management VRF
Note that show commands can be run anywhere in CLI, from any "level". But configuration commands must be executed in a specific order.
I've also included a lot of double-quotes " in the CLI commands for completeness... but you almost never need to use them. FYI. (Just never put a space in any object name!!)
5. Part A - Objective
Recall:
- First we configure and test the Solace PubSub+ broker to ensure it is receiving REST requests. Solace will convert the incoming requests to messages for testing.
6. [A] Verify/Assign REST Port
In this first section, we will verify what port has been configured (if any) to allow incoming REST requests to your particular Message VPN. If using the default Message VPN on the software broker, this section can be skipped.
PubSub+ Manager
Login to the PubSub+ GUI Manager, then select your Message VPN: 
Select "Services" from the Message VPN's menu items: 
Scroll down to the section on REST and verify the port is configured and enabled: 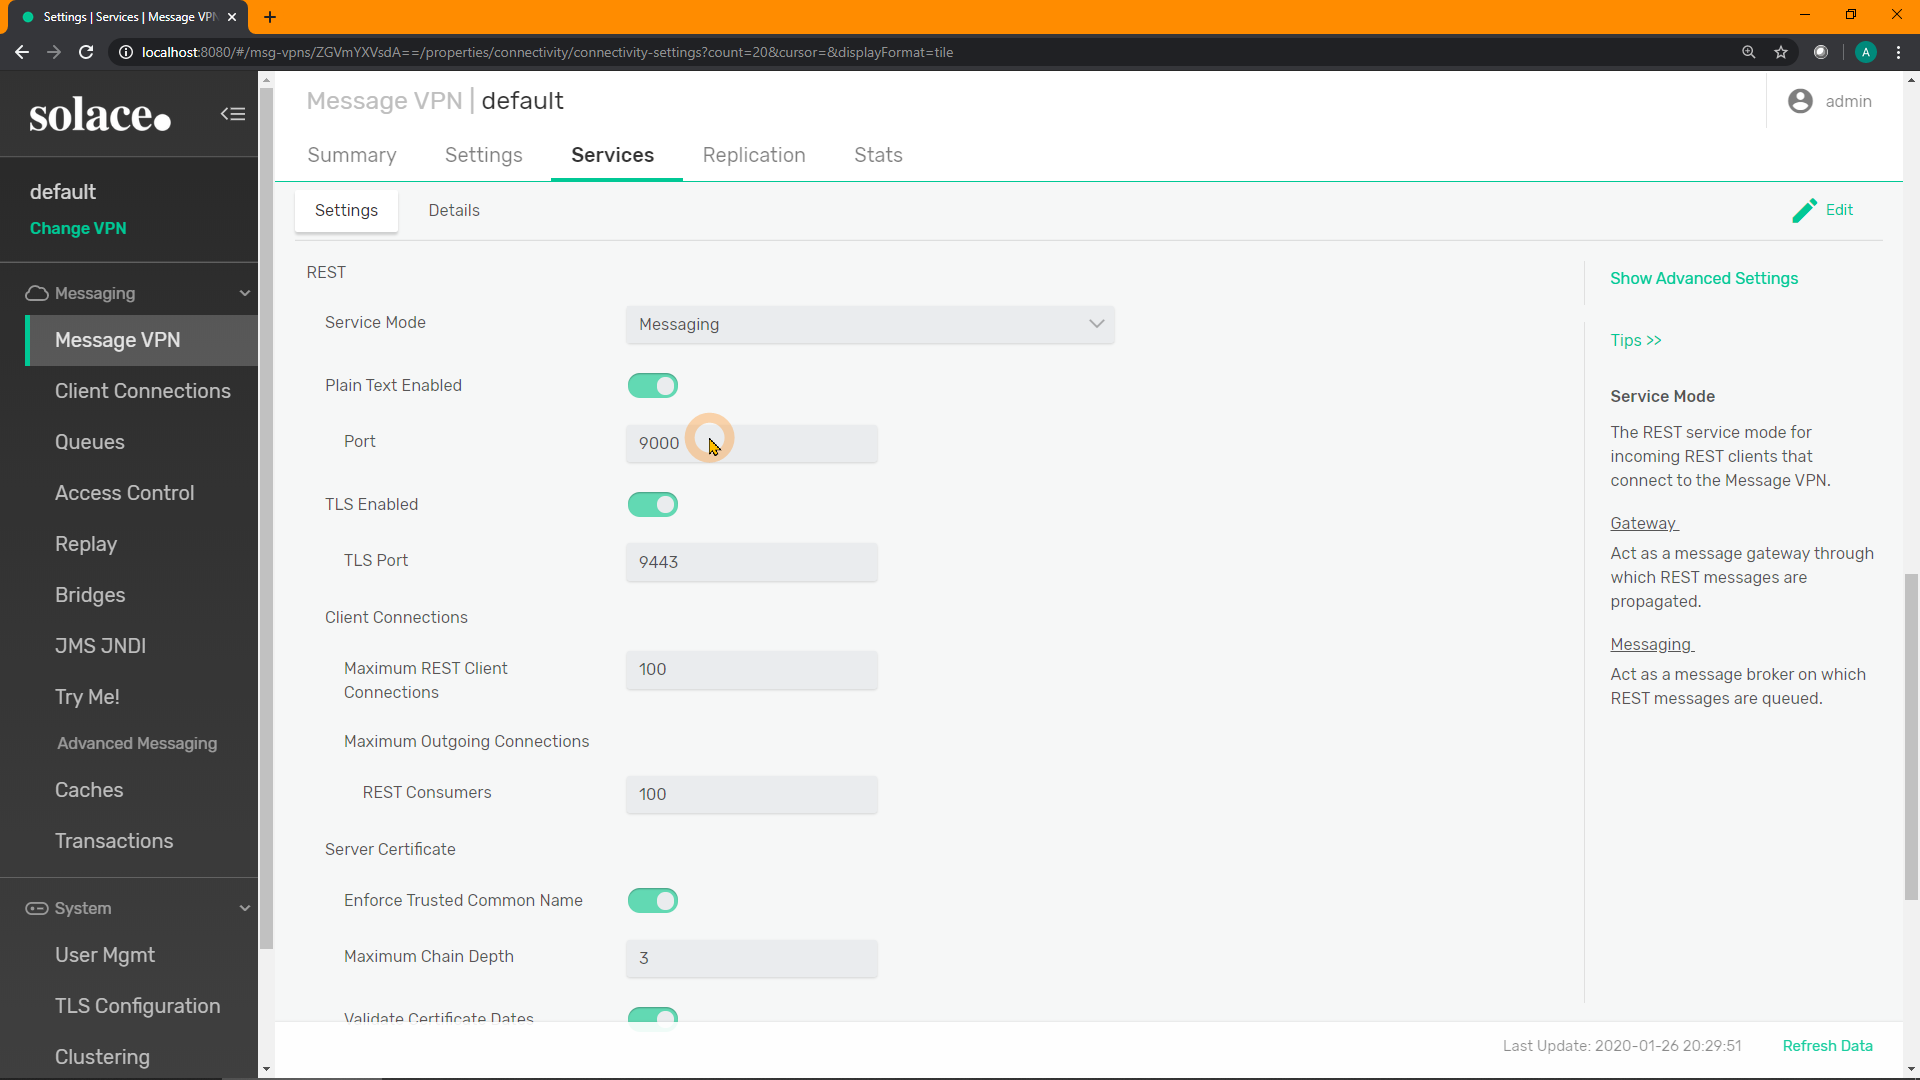
SEMP
To view the incoming REST port, perform the following (replace default with your Message VPN name, and user credentials as appropriate):
curl -u admin:admin "http://localhost:8080/SEMP/v2/config/msgVpns/default?select=serviceRest*"And the response should look something like:
{
    "data":{
        "serviceRestIncomingMaxConnectionCount":100,
        "serviceRestIncomingPlainTextEnabled":true,        <----
        "serviceRestIncomingPlainTextListenPort":9000,     <----
        "serviceRestIncomingTlsEnabled":true,
        "serviceRestIncomingTlsListenPort":9443
        "serviceRestMode":"messaging",
        "serviceRestOutgoingMaxConnectionCount":100
    },
    "links":{},
    "meta":{
        "request":{
            "method":"GET",
            "uri":"http://localhost:8080/SEMP/v2/config/msgVpns/default?select=serviceRestIncoming*"
        },
        "responseCode":200
    }
}
To configure the incoming port and enable it using SEMP, perform the following 2 commands. First, shutdown the port:
curl "http://localhost:8080/SEMP/v2/config/msgVpns/default" \
  -X PATCH \
  -u admin:admin \
  -H "Content-type:application/json" \
  -d '{ "serviceRestIncomingPlainTextEnabled": false }'
Then change the port number and re-enable it:
curl "http://localhost:8080/SEMP/v2/config/msgVpns/default" \
  -X PATCH \
  -u admin:admin \
  -H "Content-type:application/json" \
  -d '{ "serviceRestIncomingPlainTextListenPort": 9001,
        "serviceRestIncomingPlainTextEnabled": true }'
CLI
Perform the following show command in CLI. Look for the line with REST and an N in the S(ecure) column for the port to use. If the broker has a server certificate installed, you may use port in the line below (9443 in this case).
Note that solace> is simply the prompt, ignore that.
solace> show message-vpn default service

// snip //
Service TP  S C VRF    Port A O Failed Reason
------- --- --- ----- ----- --- ------------------------------
SMF     TCP N N MsgBB 55555 U U
SMF     TCP N Y MsgBB 55003 U U
SMF     TCP Y N MsgBB 55443 U D No Cert
REST    WEB N - MsgBB  9000 U U              <----
REST    WEB Y - MsgBB  9443 U D No Cert
SMF     WEB N - MsgBB    80 U U
SMF     WEB Y - MsgBB   443 U D No Cert
MQTT    TCP N - MsgBB  1883 U U
MQTT    TCP Y - MsgBB  8883 U D No Cert
// snip //
To configure a different port (e.g. if you are using a different Message VPN) and enable it, enter the following CLI commands in this exact order:
home
enable
  config
    message-vpn "default"
      service rest
        incoming
          plain-text shutdown
          listen-port 9001
          no plain-text shutdown
          exit
Solace Cloud
If using Solace Cloud, from within the console for your Solace Cloud instance, select "Connect": 
Scroll down to the section on REST and verify the username, password, port, and URL: 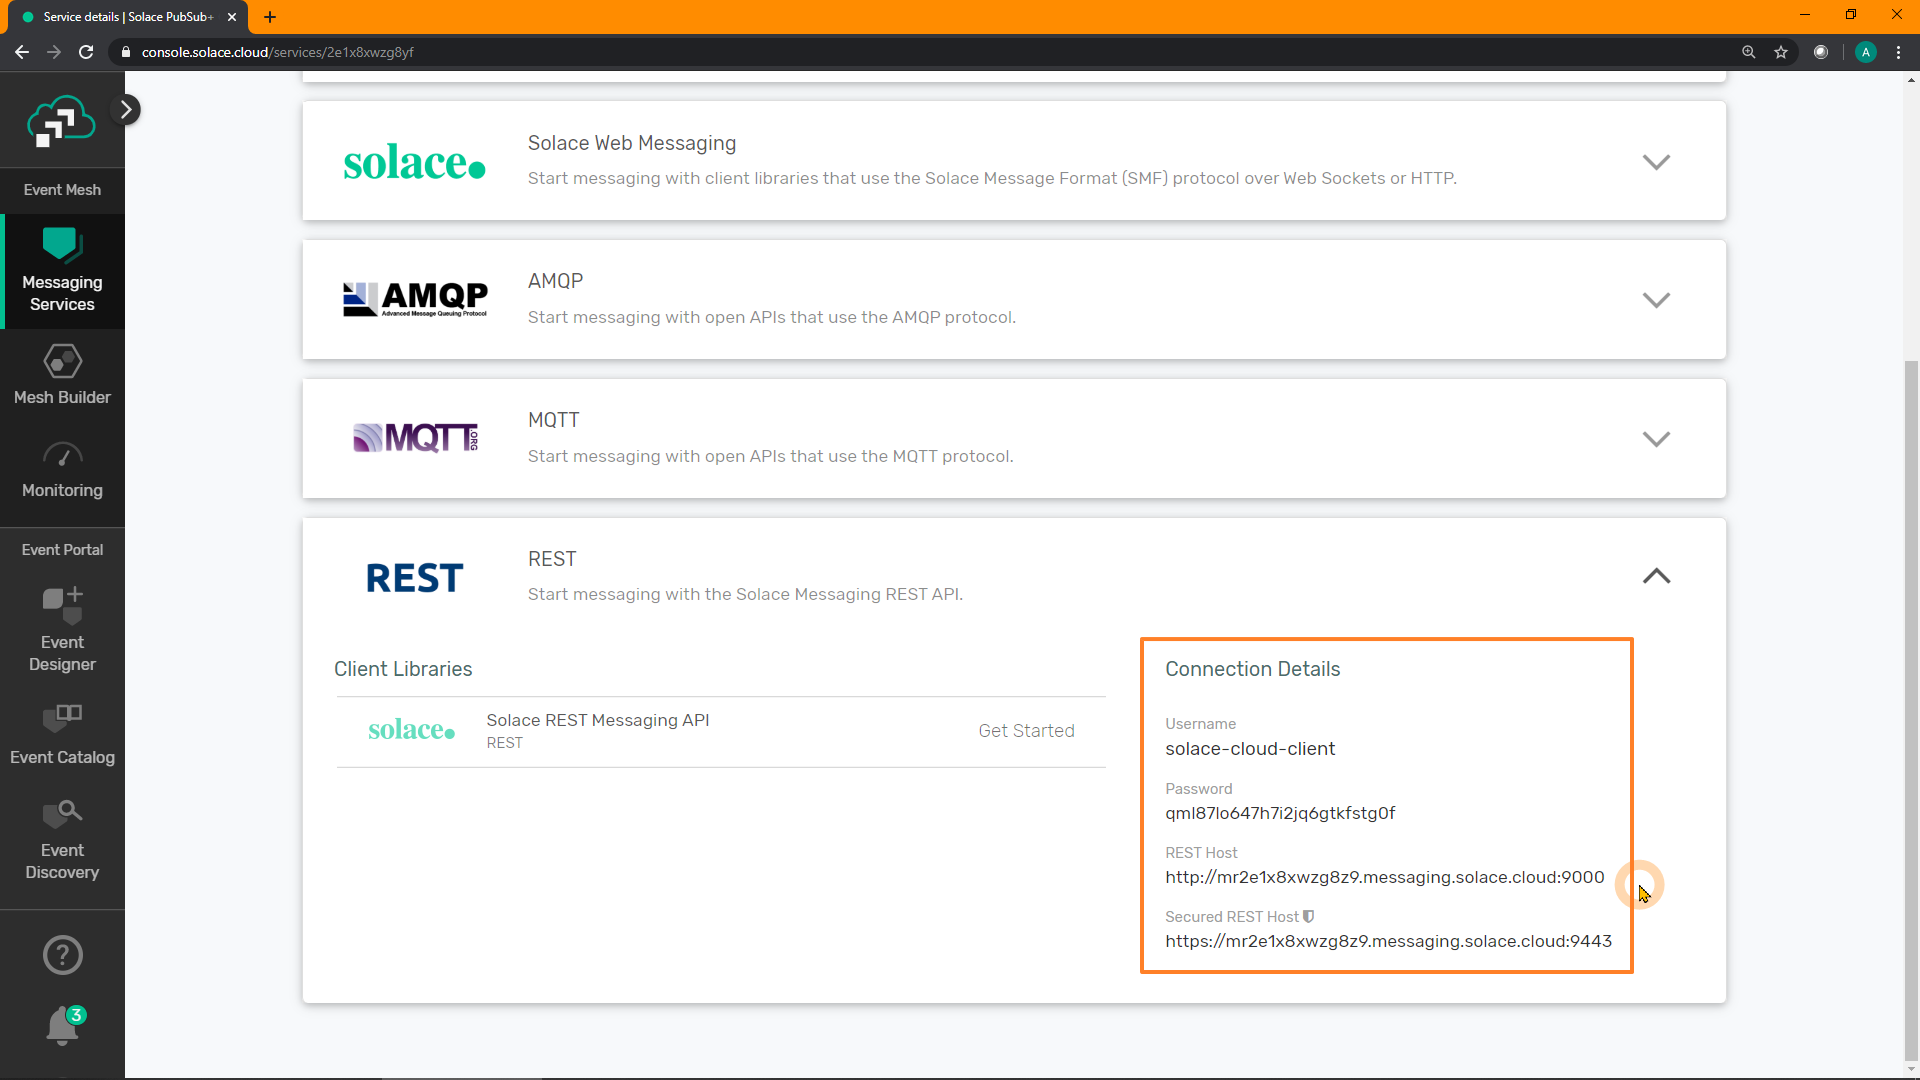
7. [A] Enable REST (Micro)Gateway Mode
In this section, we will switch the REST mode for our Message VPN from Messaging (the default) to Gateway. MicroGateways allow Solace PubSub+ event brokers to act as HTTP load balancers, or simple API gateways between RESTful API clients and RESTful API service providers. Learn more about MicroGateways here
PubSub+ Manager
Inside the "Services" menu of the Message VPN, either click "Edit" in the top-right, or double-click the Service Mode: 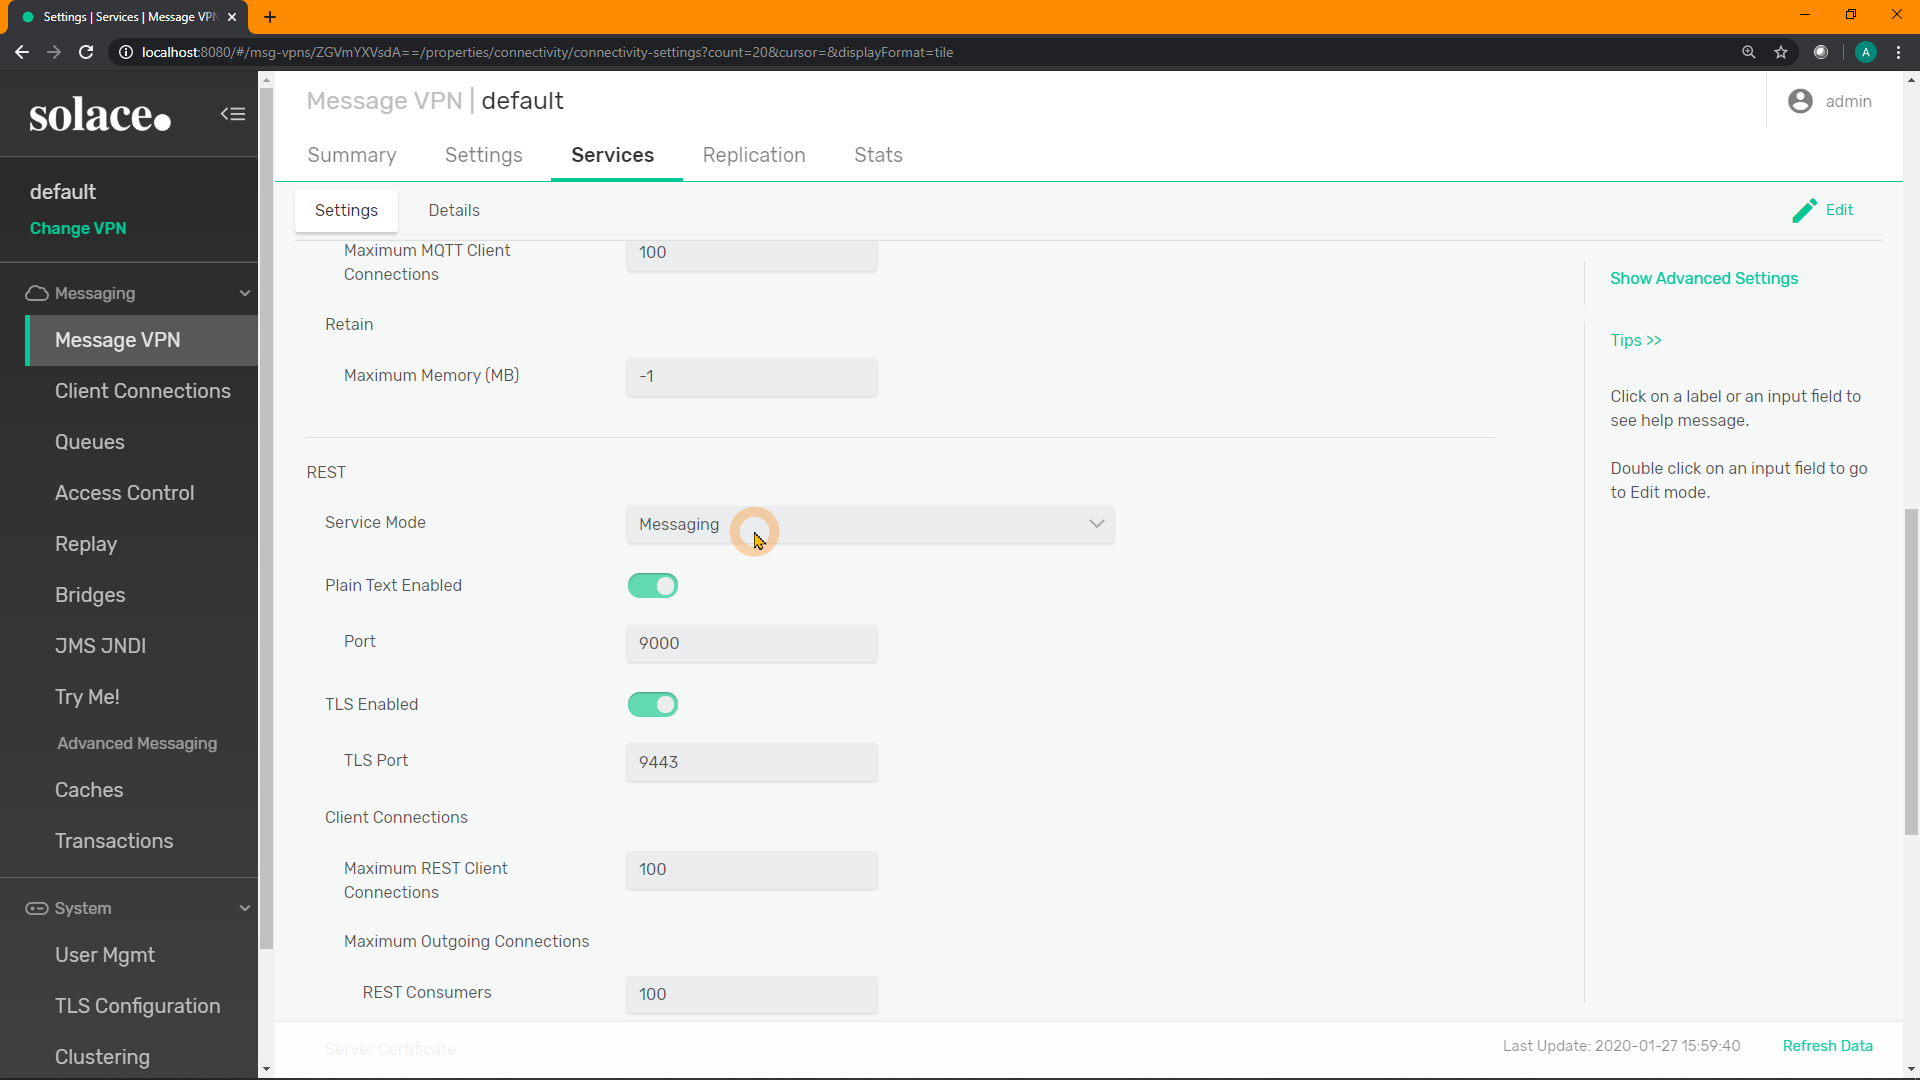
Select Gateway from the drop-down list, and click "Apply": 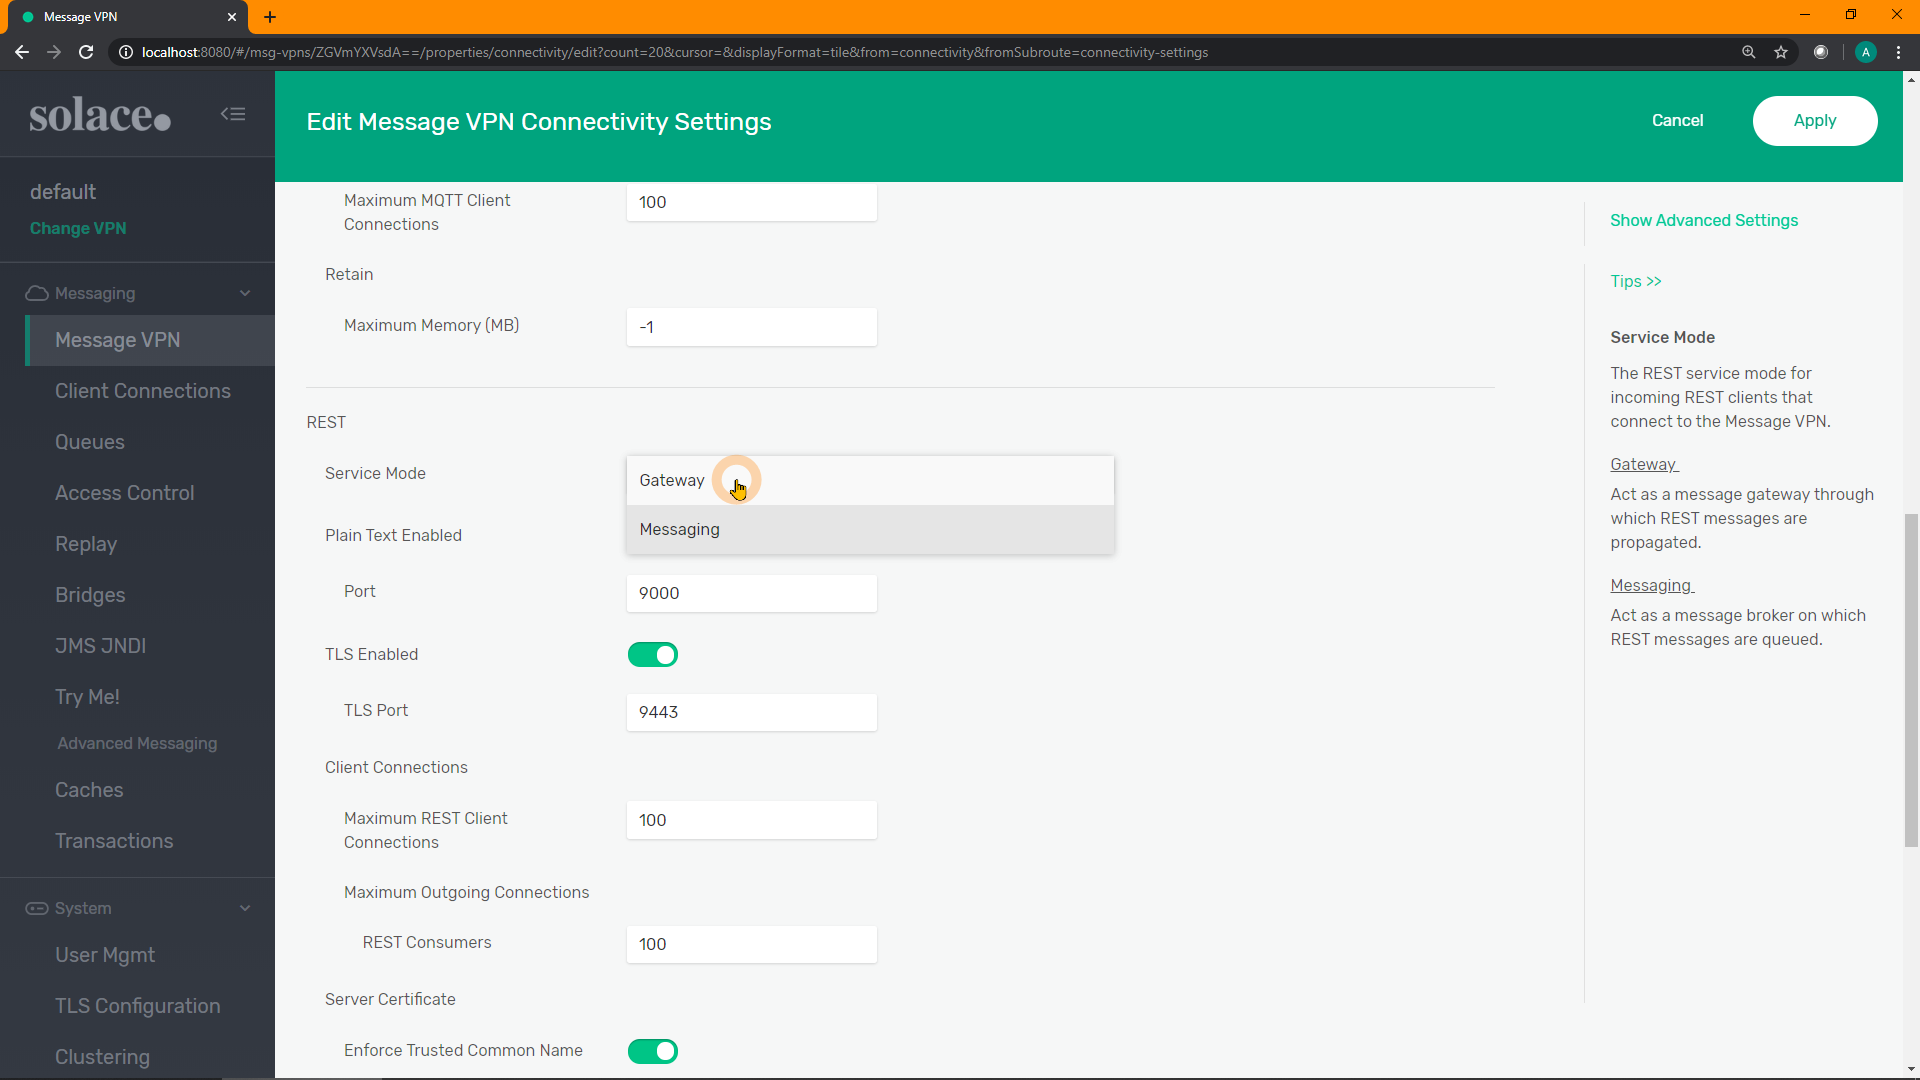
SEMP
Change to gateway with just one command:
curl "http://localhost:8080/SEMP/v2/config/msgVpns/default" \
  -X PATCH \
  -u admin:admin \
  -H "Content-type:application/json" \
  -d '{ "serviceRestMode": "gateway" }'
To verify, use the previous GET command:
curl -u admin:admin "http://localhost:8080/SEMP/v2/config/msgVpns/default?select=serviceRest*"{
"data":{
"serviceRestIncomingMaxConnectionCount":100,
"serviceRestIncomingPlainTextEnabled":true,
"serviceRestIncomingPlainTextListenPort":9000,
"serviceRestIncomingTlsEnabled":true,
"serviceRestIncomingTlsListenPort":9443,
"serviceRestMode":"gateway", <----
"serviceRestOutgoingMaxConnectionCount":100
},
"links":{},
"meta":{
"request":{
"method":"GET",
"uri":"http://localhost:8080/SEMP/v2/config/msgVpns/default?select=serviceRest*"
},
"responseCode":200
}CLI
Set the Message VPN into REST gateway mode with the following CLI commands. If continuing from the previous CLI command and are still at the rest level, simply enter the last line.
home
enable
  config
    message-vpn "default"
      service rest
mode gatewaysolace> show message-vpn default
Message VPN: default
Configuration Status: Enabled
Local Status: Up
Distributed Cache Management: Enabled
SSL to plain text downgrade allowed: No
REST mode: Gateway <----
Total Local Unique Subscriptions: 9
// snip //8. [A] Test REST Connectivity
Now that the Message VPN on the Solace broker has been configured for REST Gateway mode, let's verify that REST requests are reaching the broker.
Inject a REST Request
Using cURL, Postman, or another REST program, inject a REST GET request to the broker on the correct port, using any path you'd like.
For example:
curl -u default:default "http://localhost:9000/test" -vAnd you should see a response similar to the following:
<solace-error-response>
<code>404</code>
<reason><![CDATA[No Subscription Match]]></reason>
<detail><![CDATA[
No subscription matching topic "GET/test"           <----
]]></detail>
<internal-use>1:7633</internal-use>
</solace-error-response>
Which means that it is reaching the broker, however there is nowhere to route this incoming request as there are no listeners currently configured.
Consuming the Incoming REST Request
As a test, to simply receive the incoming REST request, let's use the "Try Me!" test app built into the PubSub+ Manager:
Click on "Try Me!" on the left-hand menu: 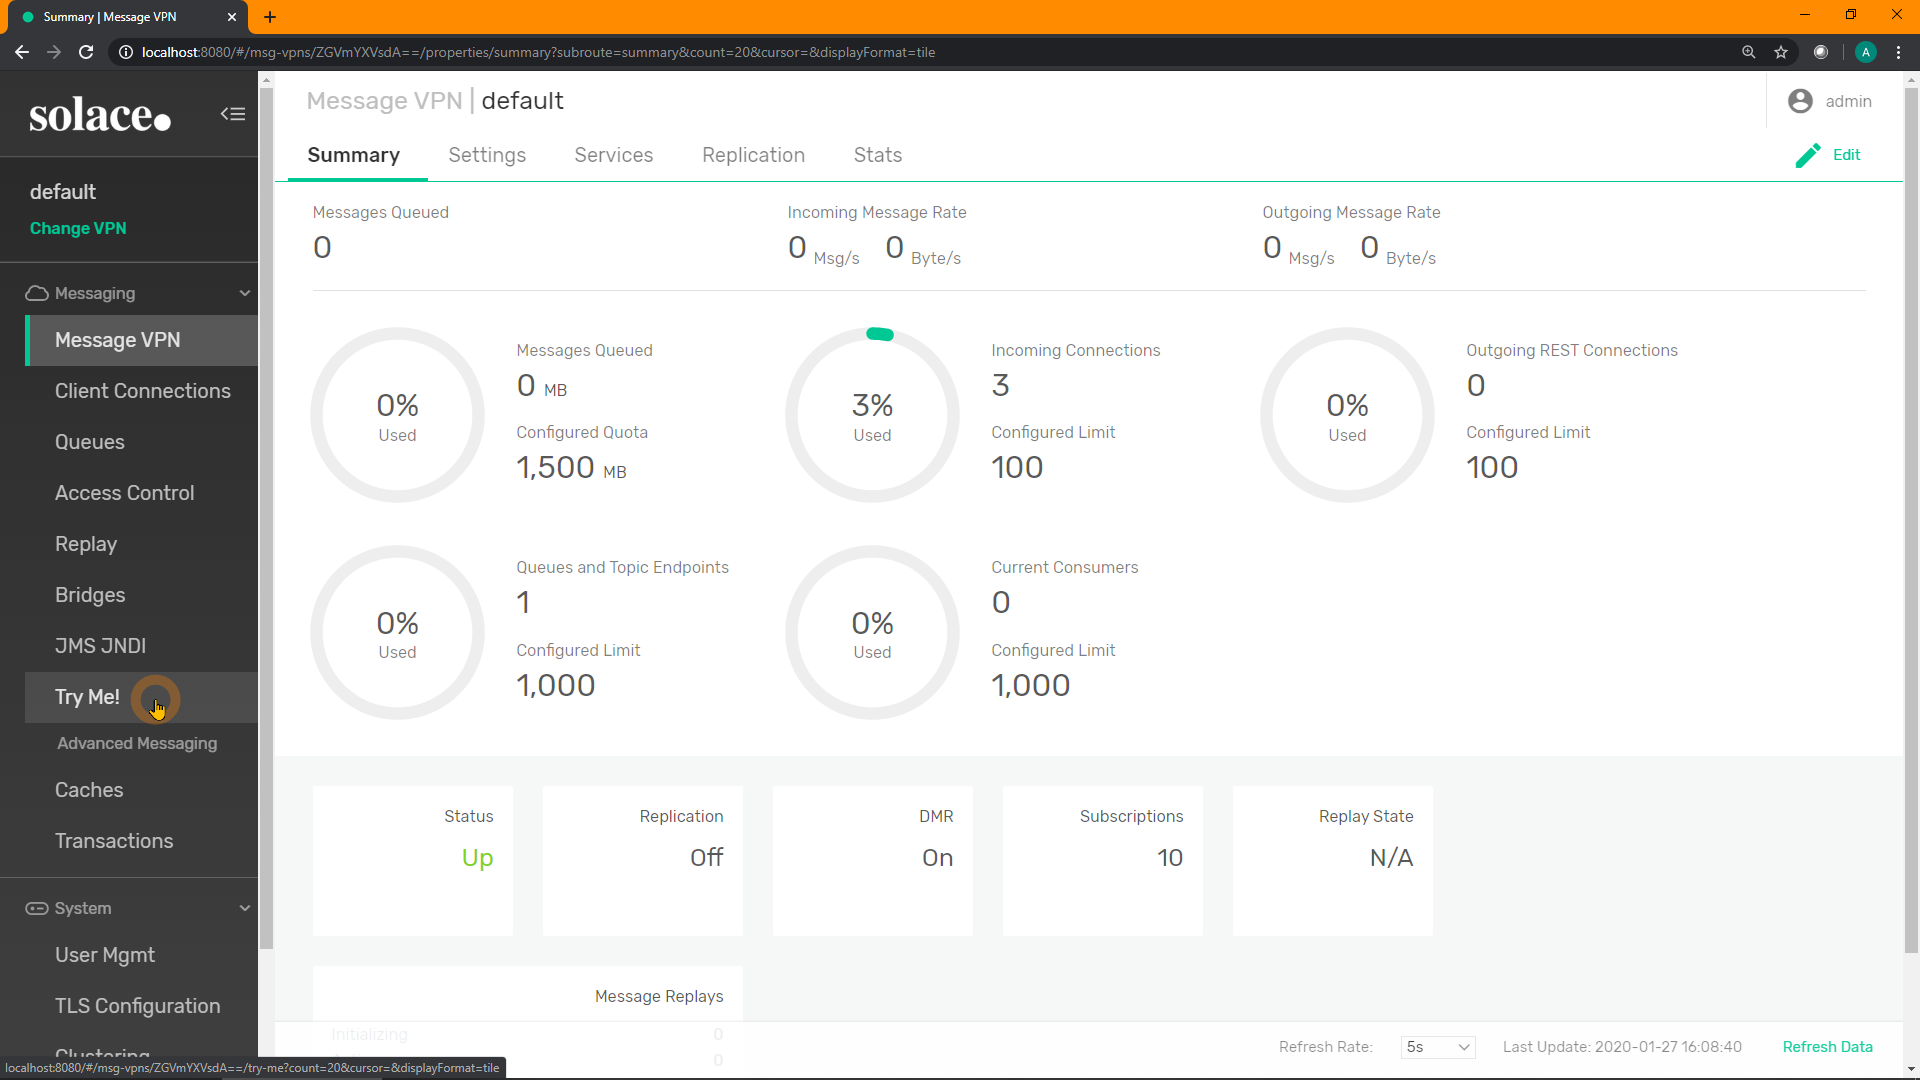
Click on "Connect" for the Subscriber on the right: 
Enter the subscription GET/> into the text field, and click "Subscribe". Recall: the > wildcard in Solace is a multi-level wildcard. This subscription will receive anything that is a "GET" request. 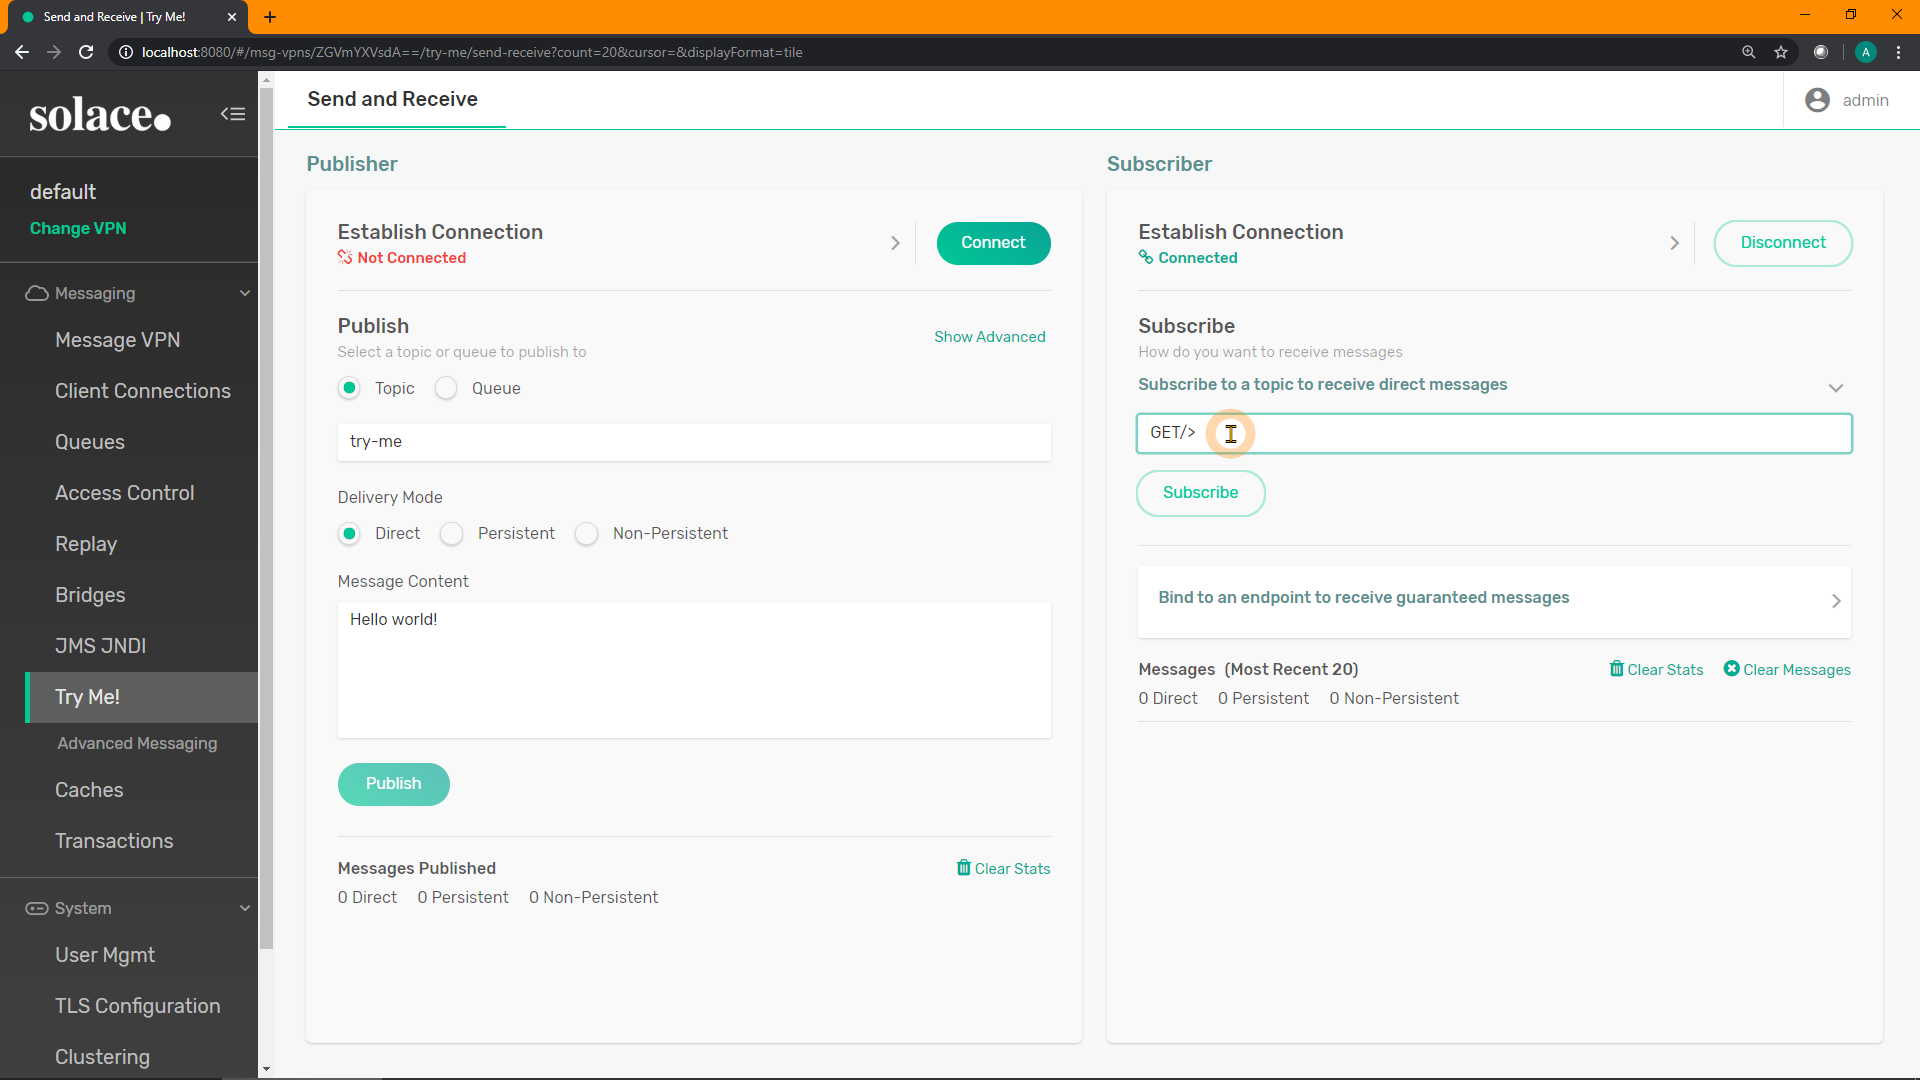
Resubmit the REST request from before, and it should pop up as a message on the Subscriber's received messages: 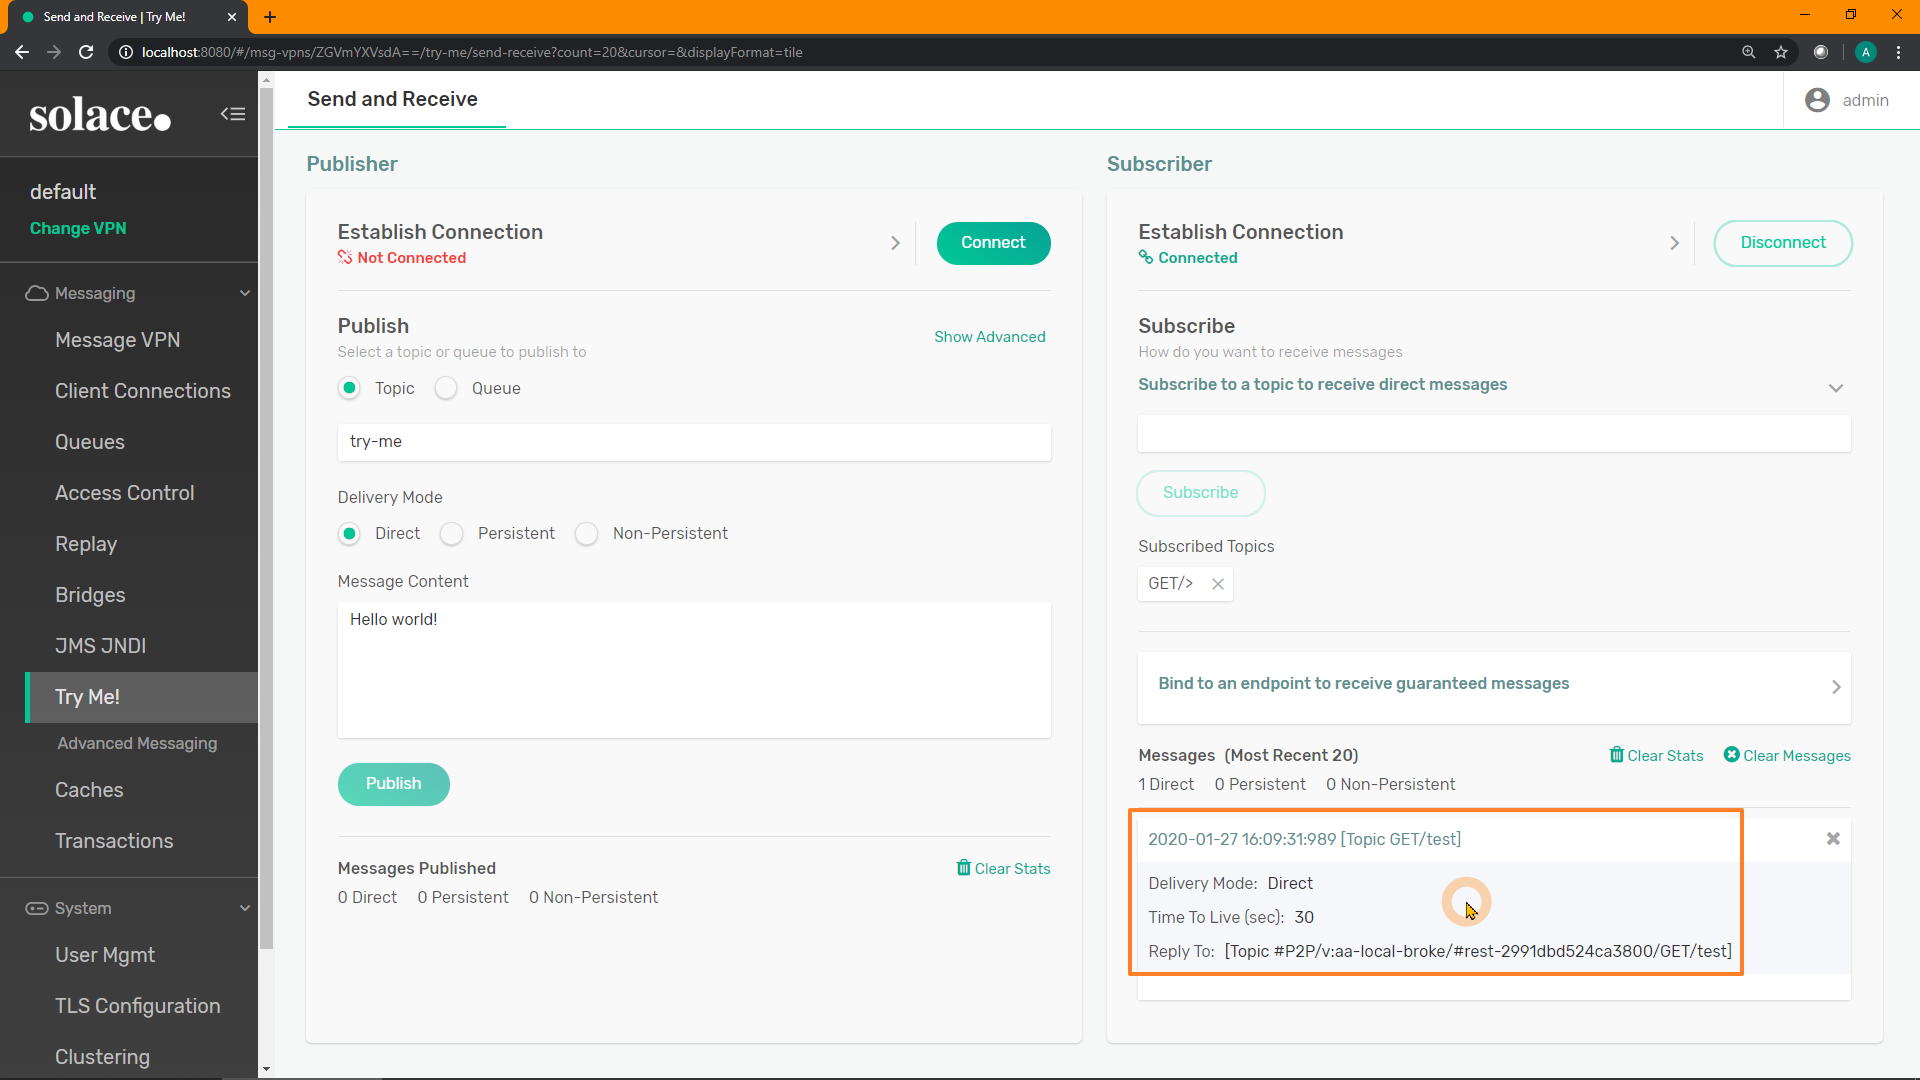
How about POST requests?
In the Subscriber application's subscription text field, try entering POST/> as a subscription. Then, submit a different REST request to see how it appears:
curl -u default:default -X POST "http://localhost:9000/hello/world" -d '{"body":"hello world!!","status":"great"}' -v
9. Part B - Objective
Recall:
- Next, configure all the necessary "outbound" REST components in the Solace broker to allow the REST request to reach the back-end REST API, and respond. This allows Solace to essentially be a REST proxy.
10. [B] Prepare for Outbound REST Pass-Through
For the Solace broker to act as a "pass-through" for REST requests in MicroGateway mode, we need to configure some additional "outbound" components on the broker.
- A REST Delivery Point (RDP): this is the "parent" object which contains all the necessary configuration for sending outbound REST requests from the Solace broker
- A persistent Queue: each RDP is bound to one or more queues from which it receives messages
- A REST Consumer: this defines where/how the outbound request will be sent, essentially the destination
The remainder of this tutorial will use a Postman API test server to generate a response to a HTTP GET request. If you have another API endpoint available to you that you'd like to use, please feel free.
Test Server Details
- Host: postman-echo.com
- Port: 80
- Authentication: none
We will use the GET API to receive a response. The response will consist of some JSON, including any parameters that are passed with the URL. E.g.:
curl "http://postman-echo.com:80/get?hello=world&solace=cool"Should result in the following response (pretty-printed for visibility):
{
  "args": {
    "hello": "world"
    "solace": "cool",
  },
  "headers": {
    "x-forwarded-proto": "https",
    "host": "postman-echo.com",
    "accept": "*/*",
    "user-agent": "curl/7.58.0",
    "x-forwarded-port": "80"
  },
  "url":"https://postman-echo.com/get?hello=world&solace=cool"
}
11. [B] Create a New Queue
When sending an outbound REST request, we need to configure a Queue to (temporarily) store the message before it gets sent out from the RDP.
PubSub+ Manager
Click on "Queues" on the left-hand menu: 
Click on "+ Queue" in the top-right to create a new queue: 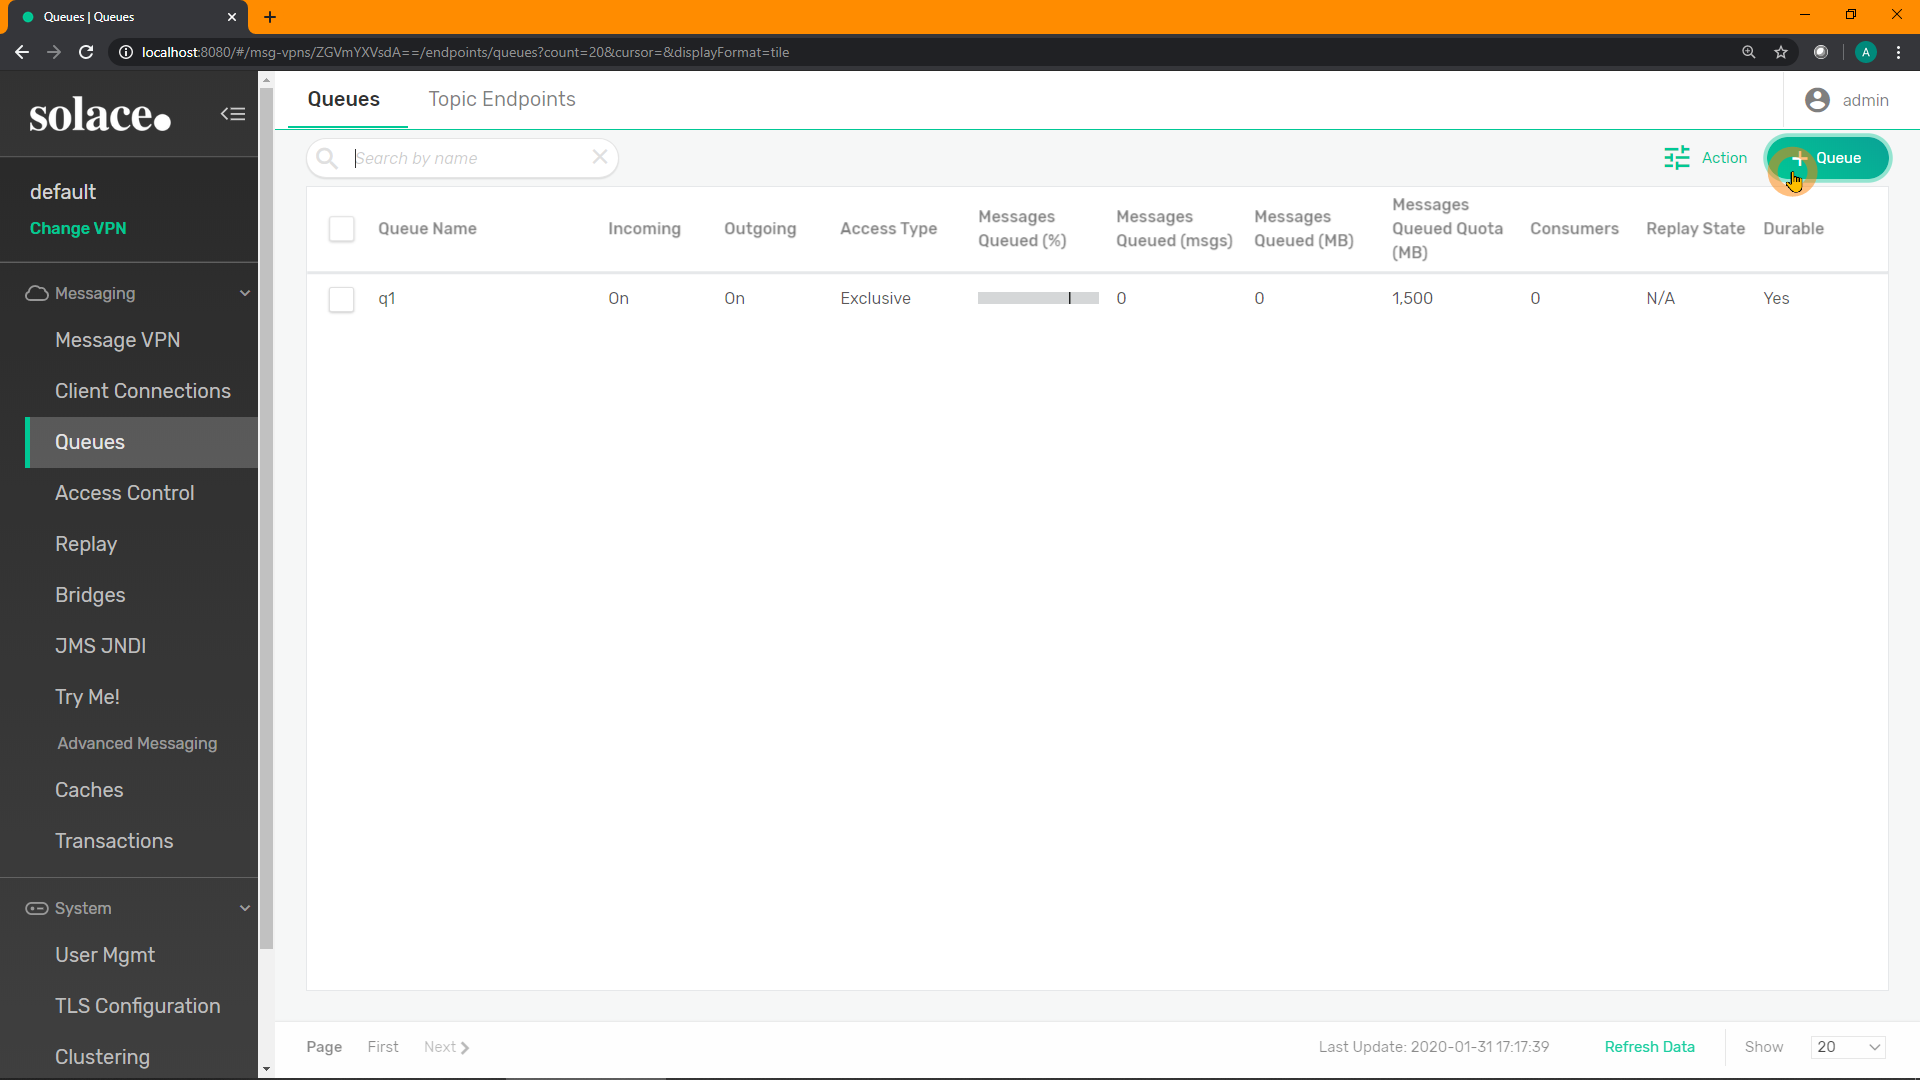
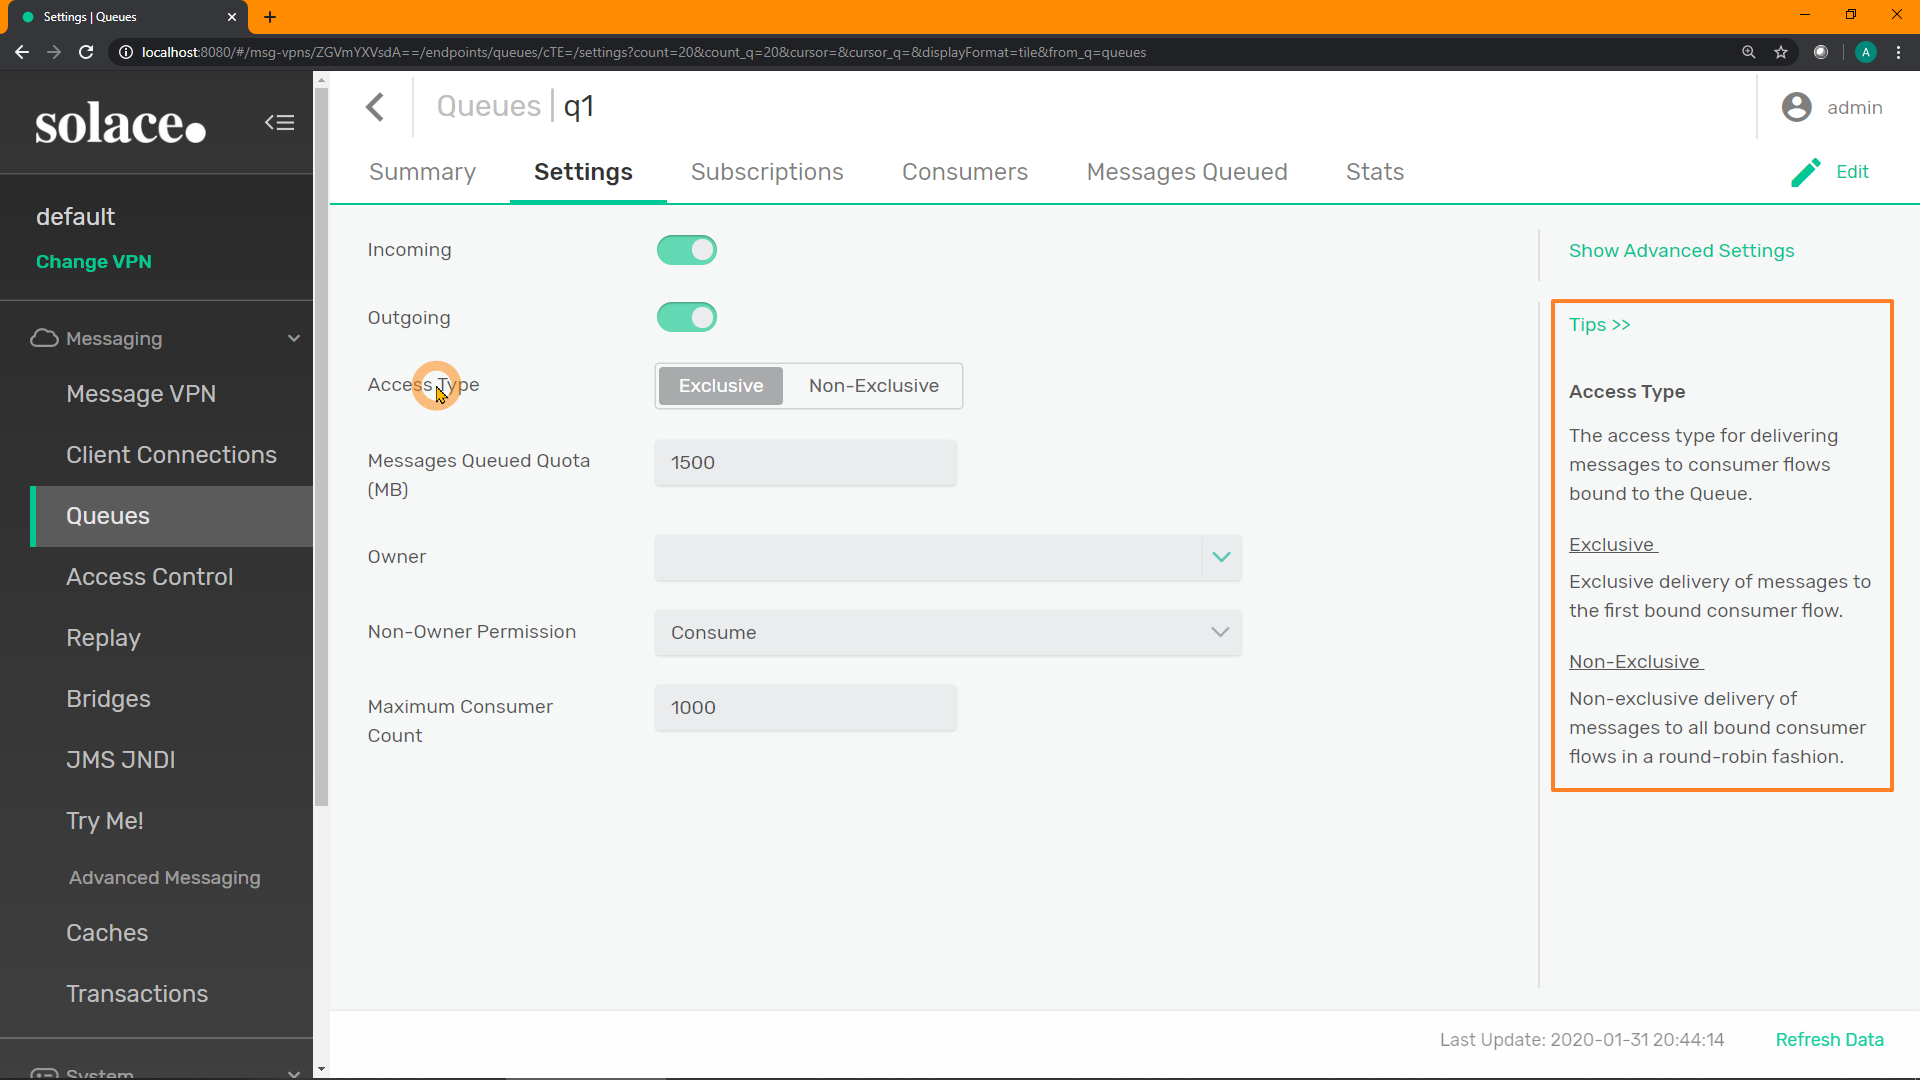
Enter a name for your new queue. E.g. q_rest_get. Click "Create": 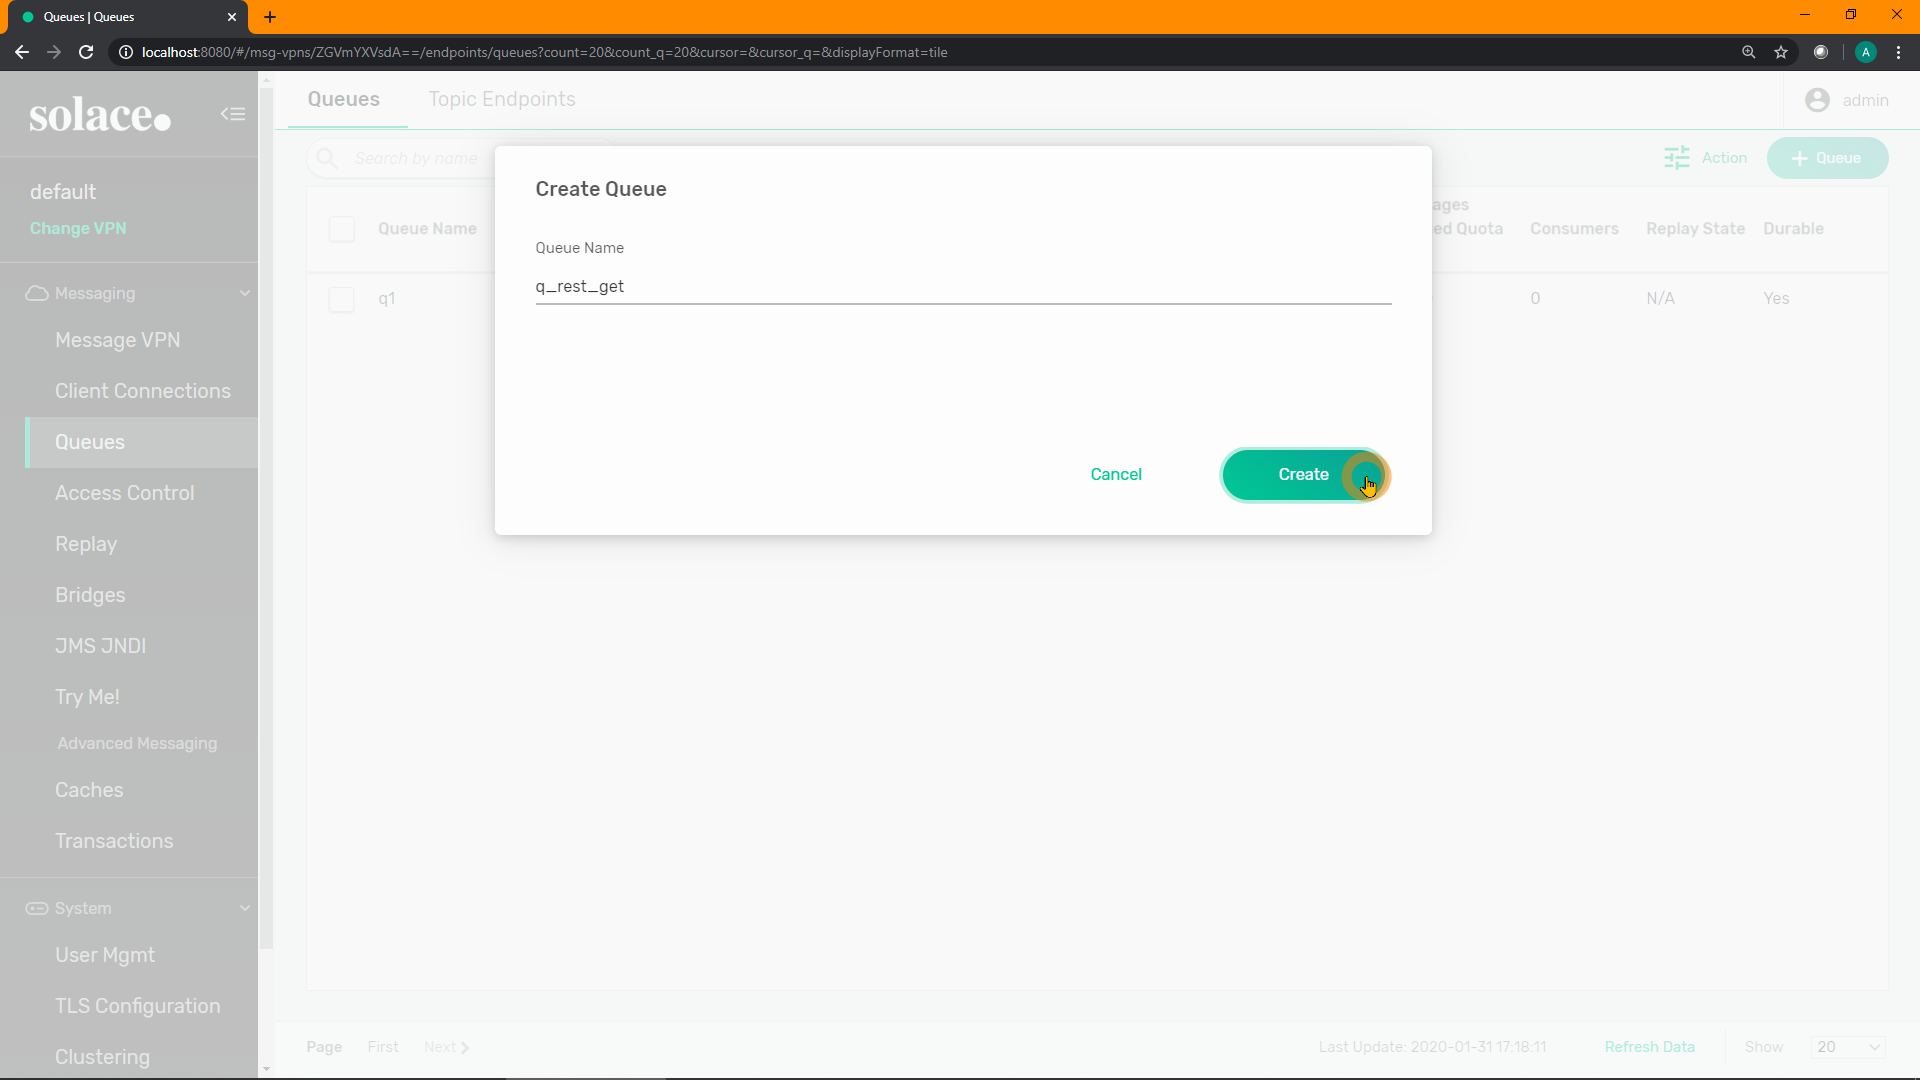
Adjust any of the default attributes if you wish (e.g. message quota / queue size), although probably unnecessary. Click "Apply": 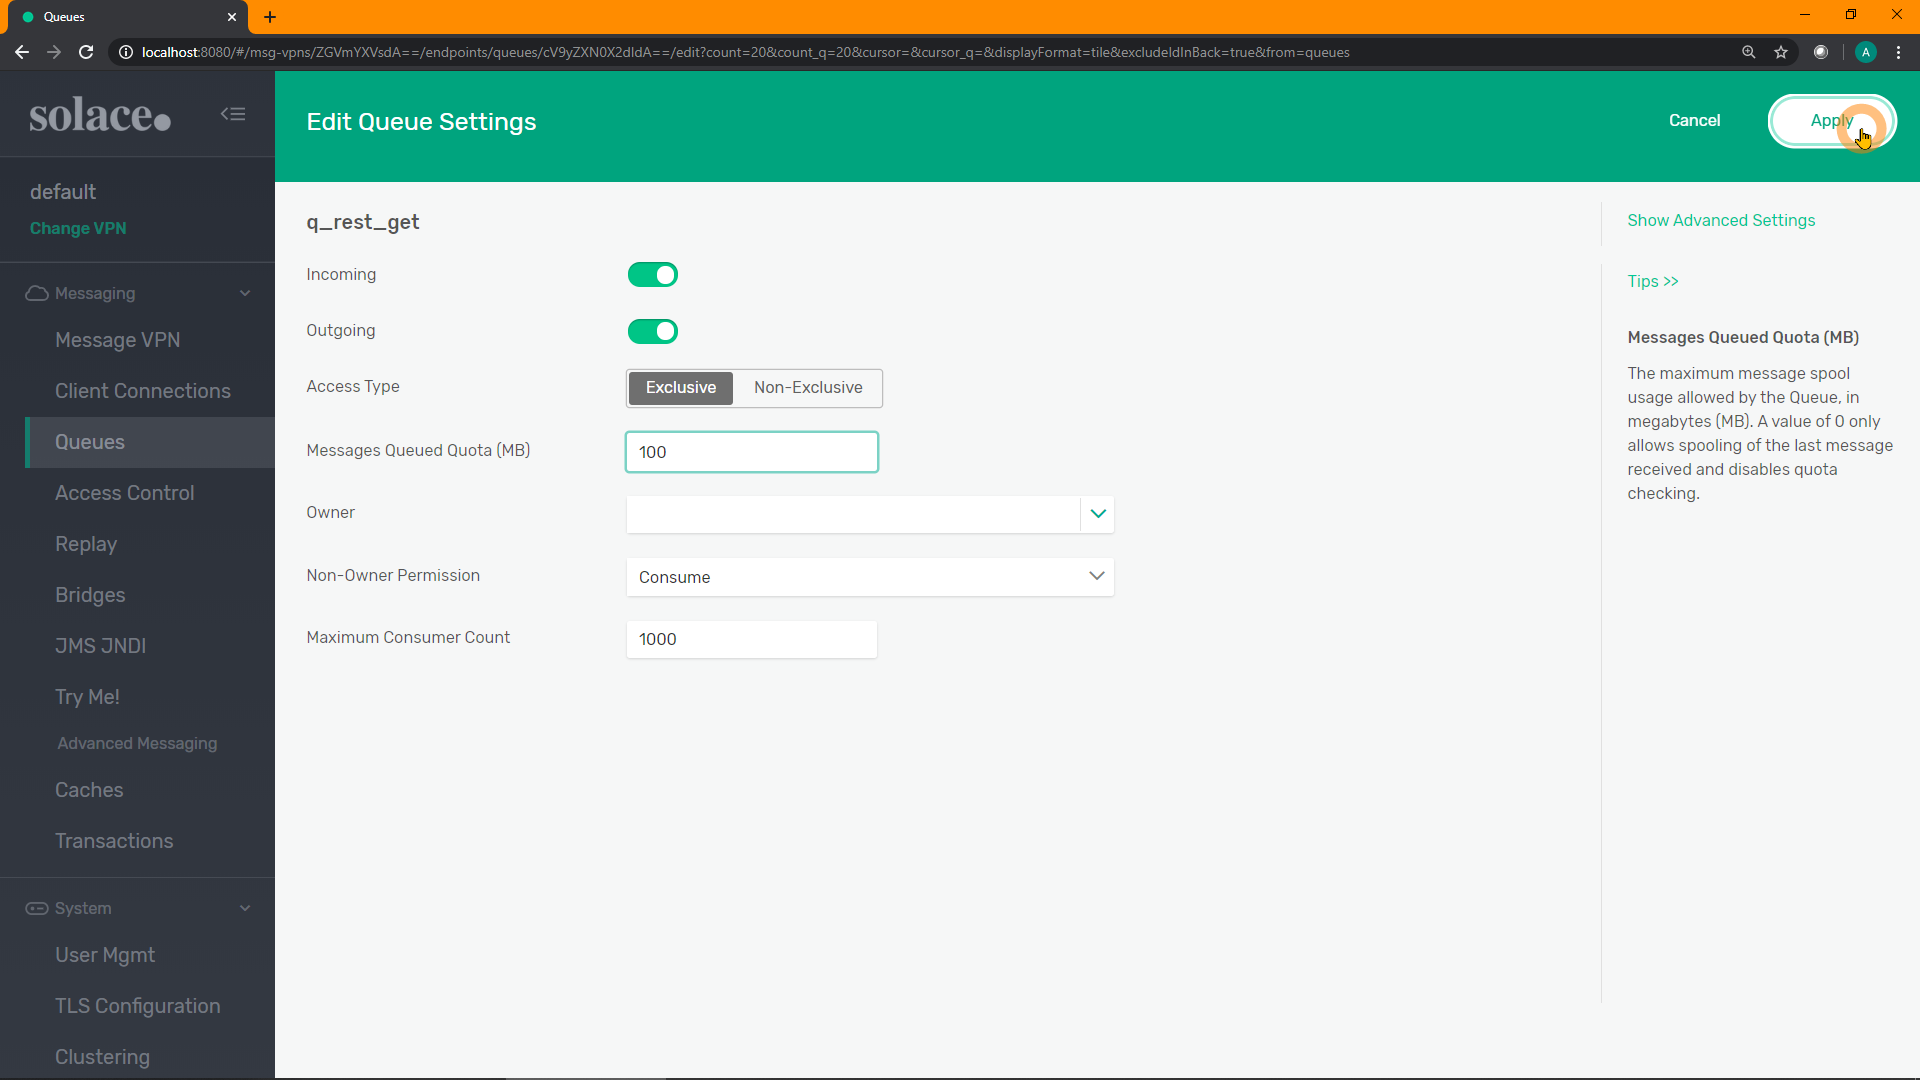
Click on the newly created queue to view it: 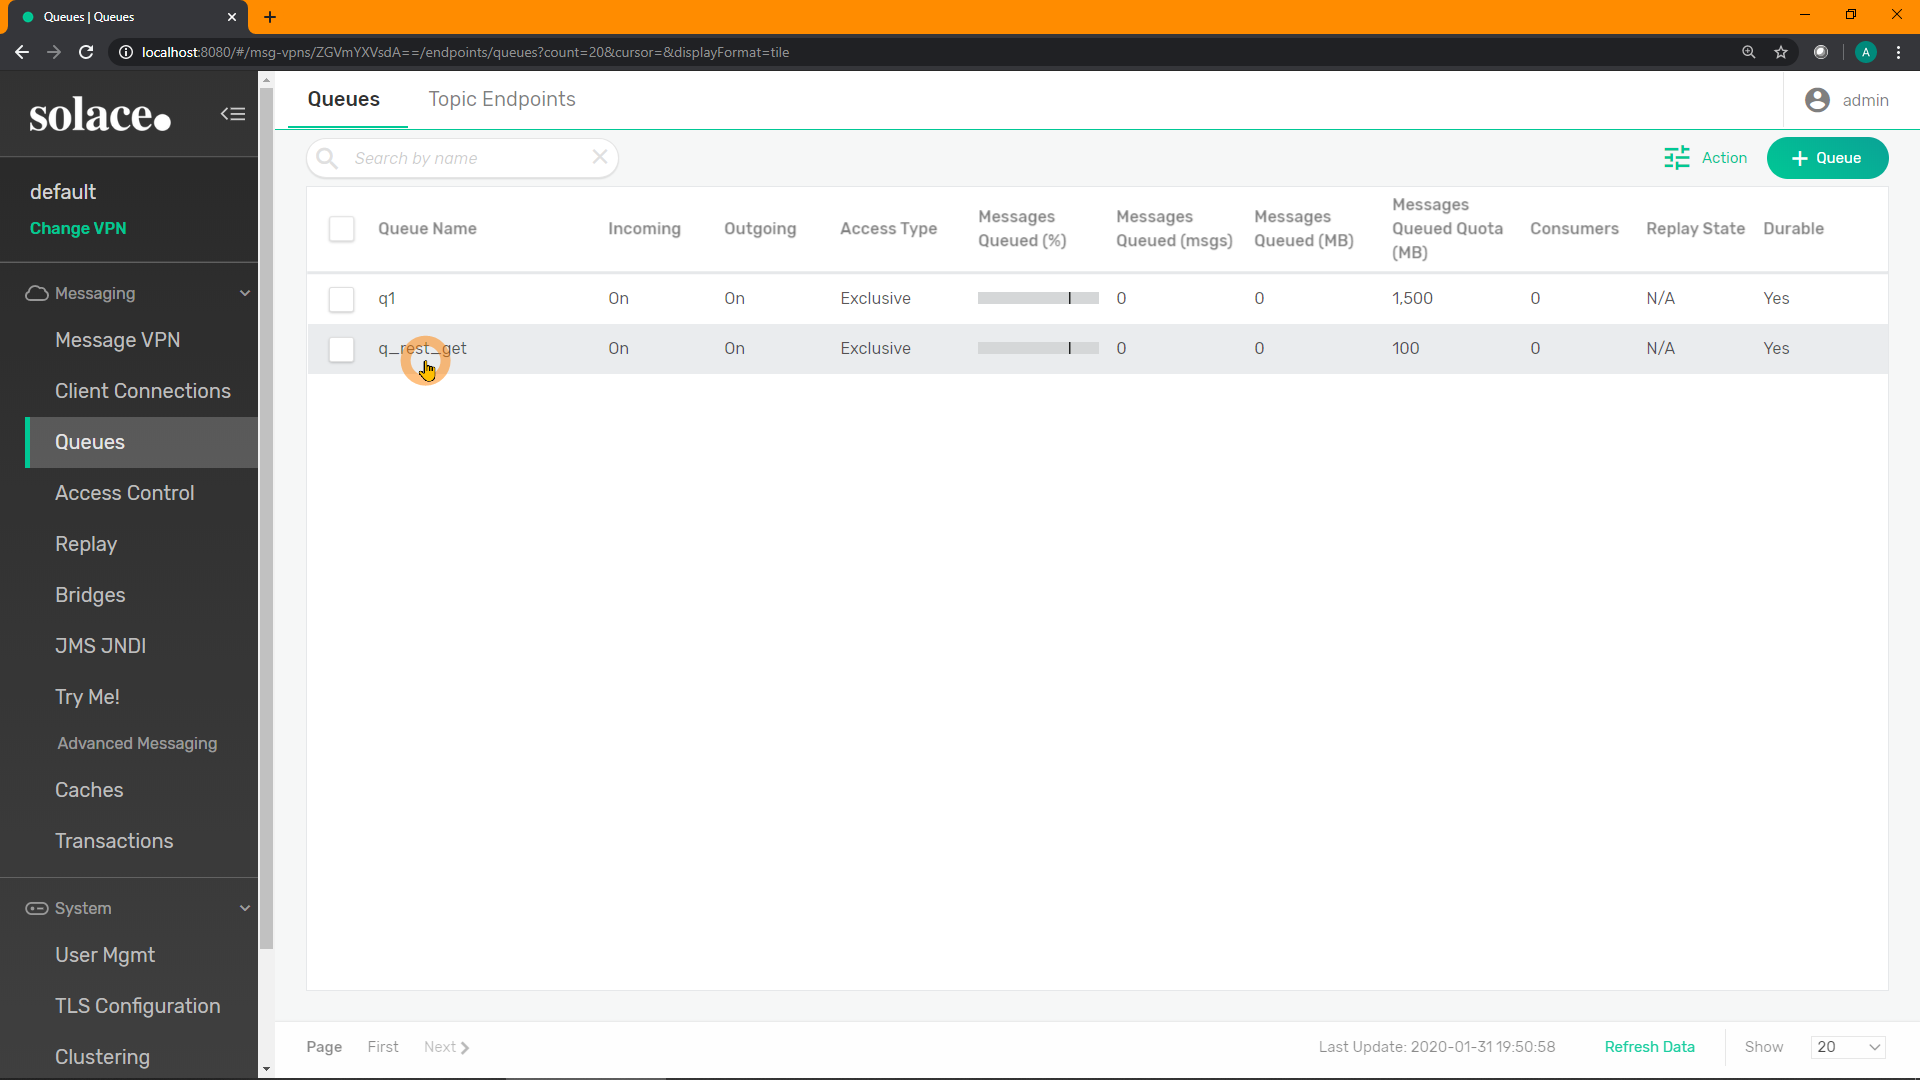
Click on "Subscriptions": 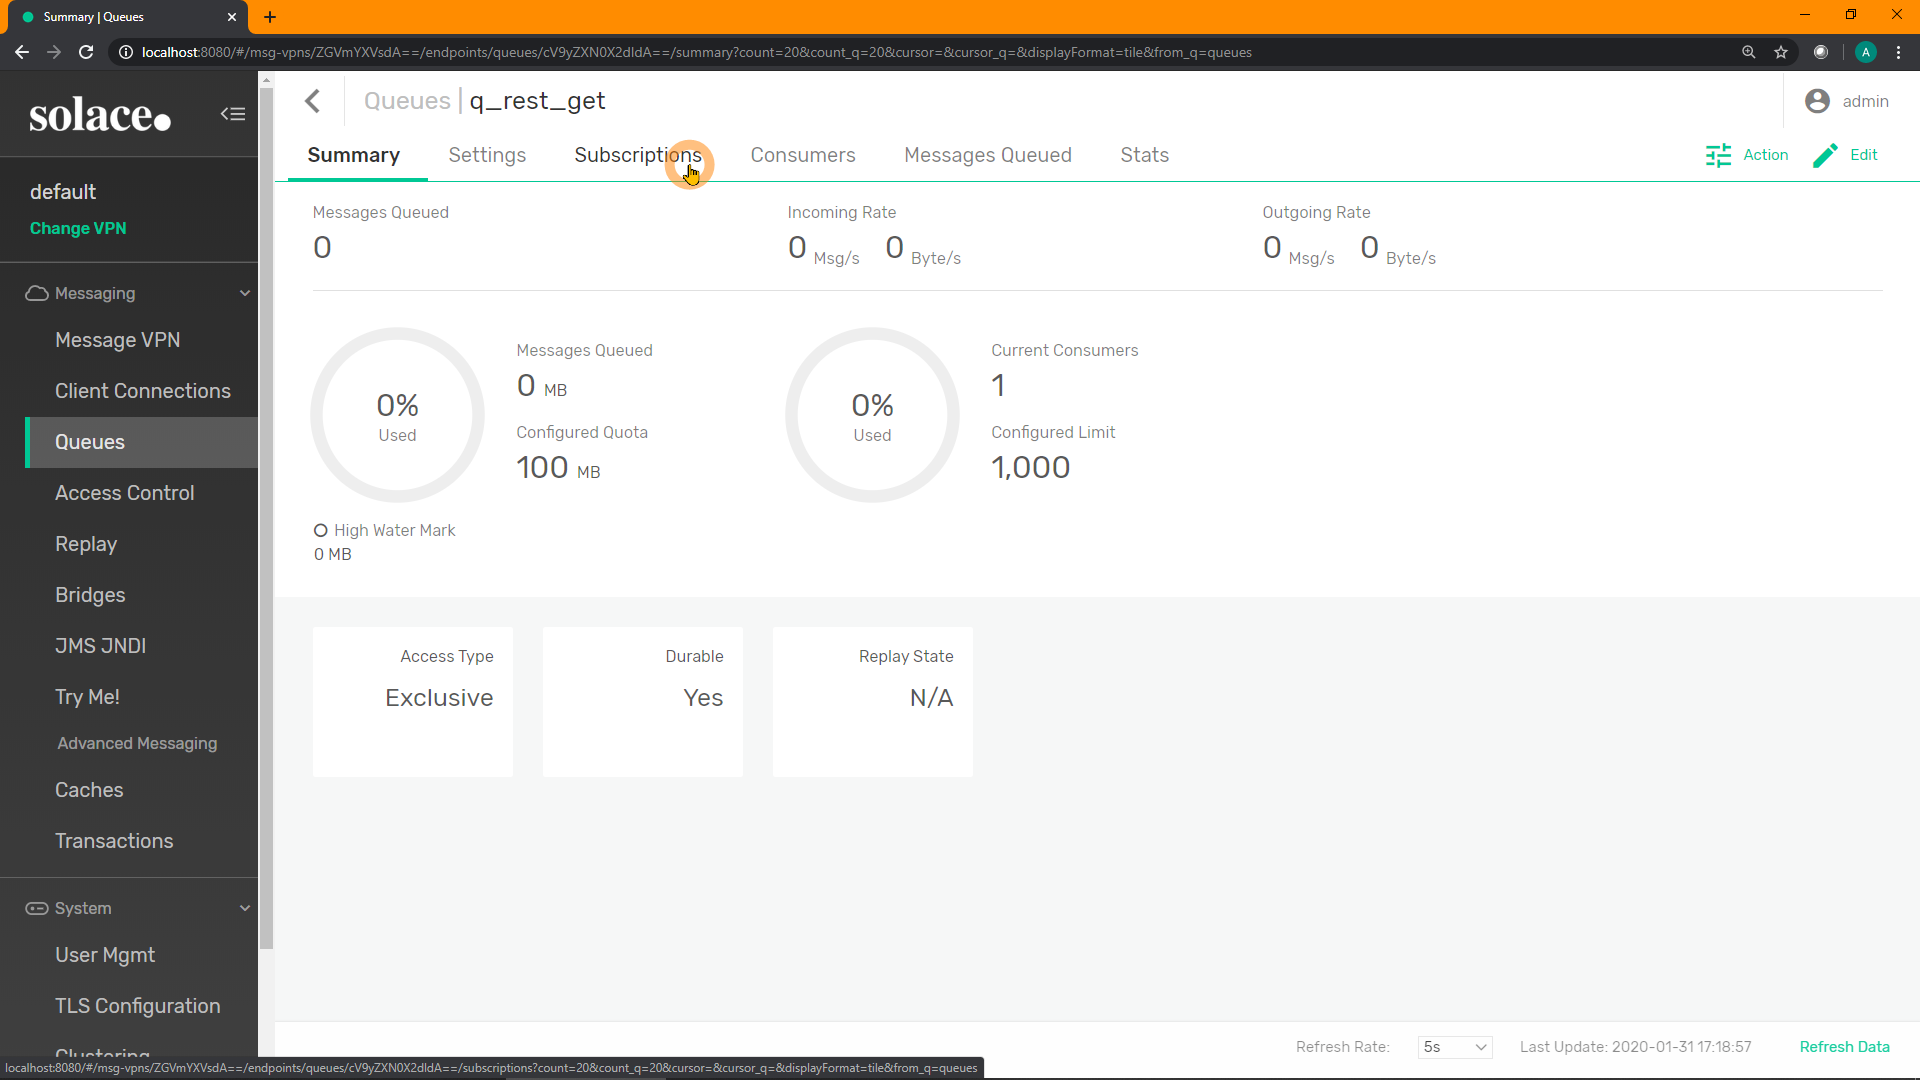
Click on "+ Subscription" in the top-right to add a new subscription(s): 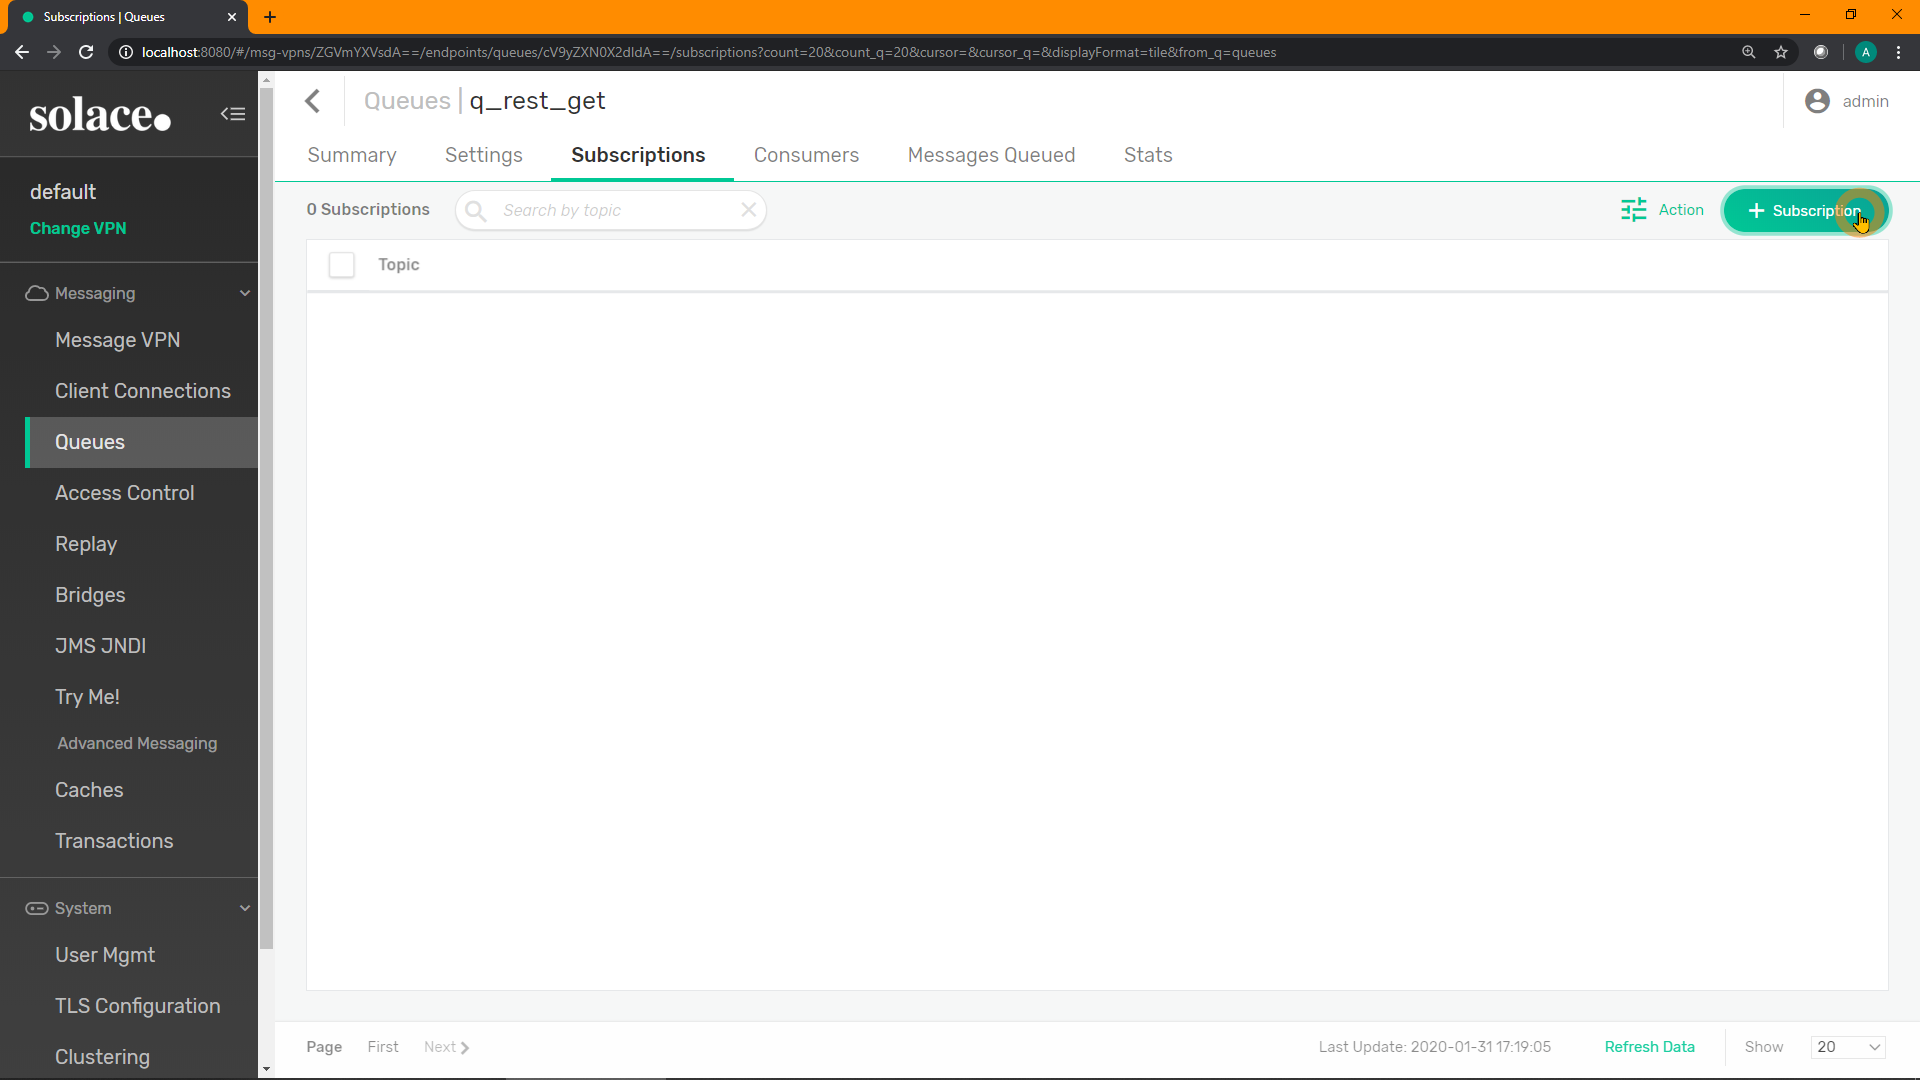
Add the subscription GET/> for the queue to attract any HTTP GET requests to the queue. Click "Create": 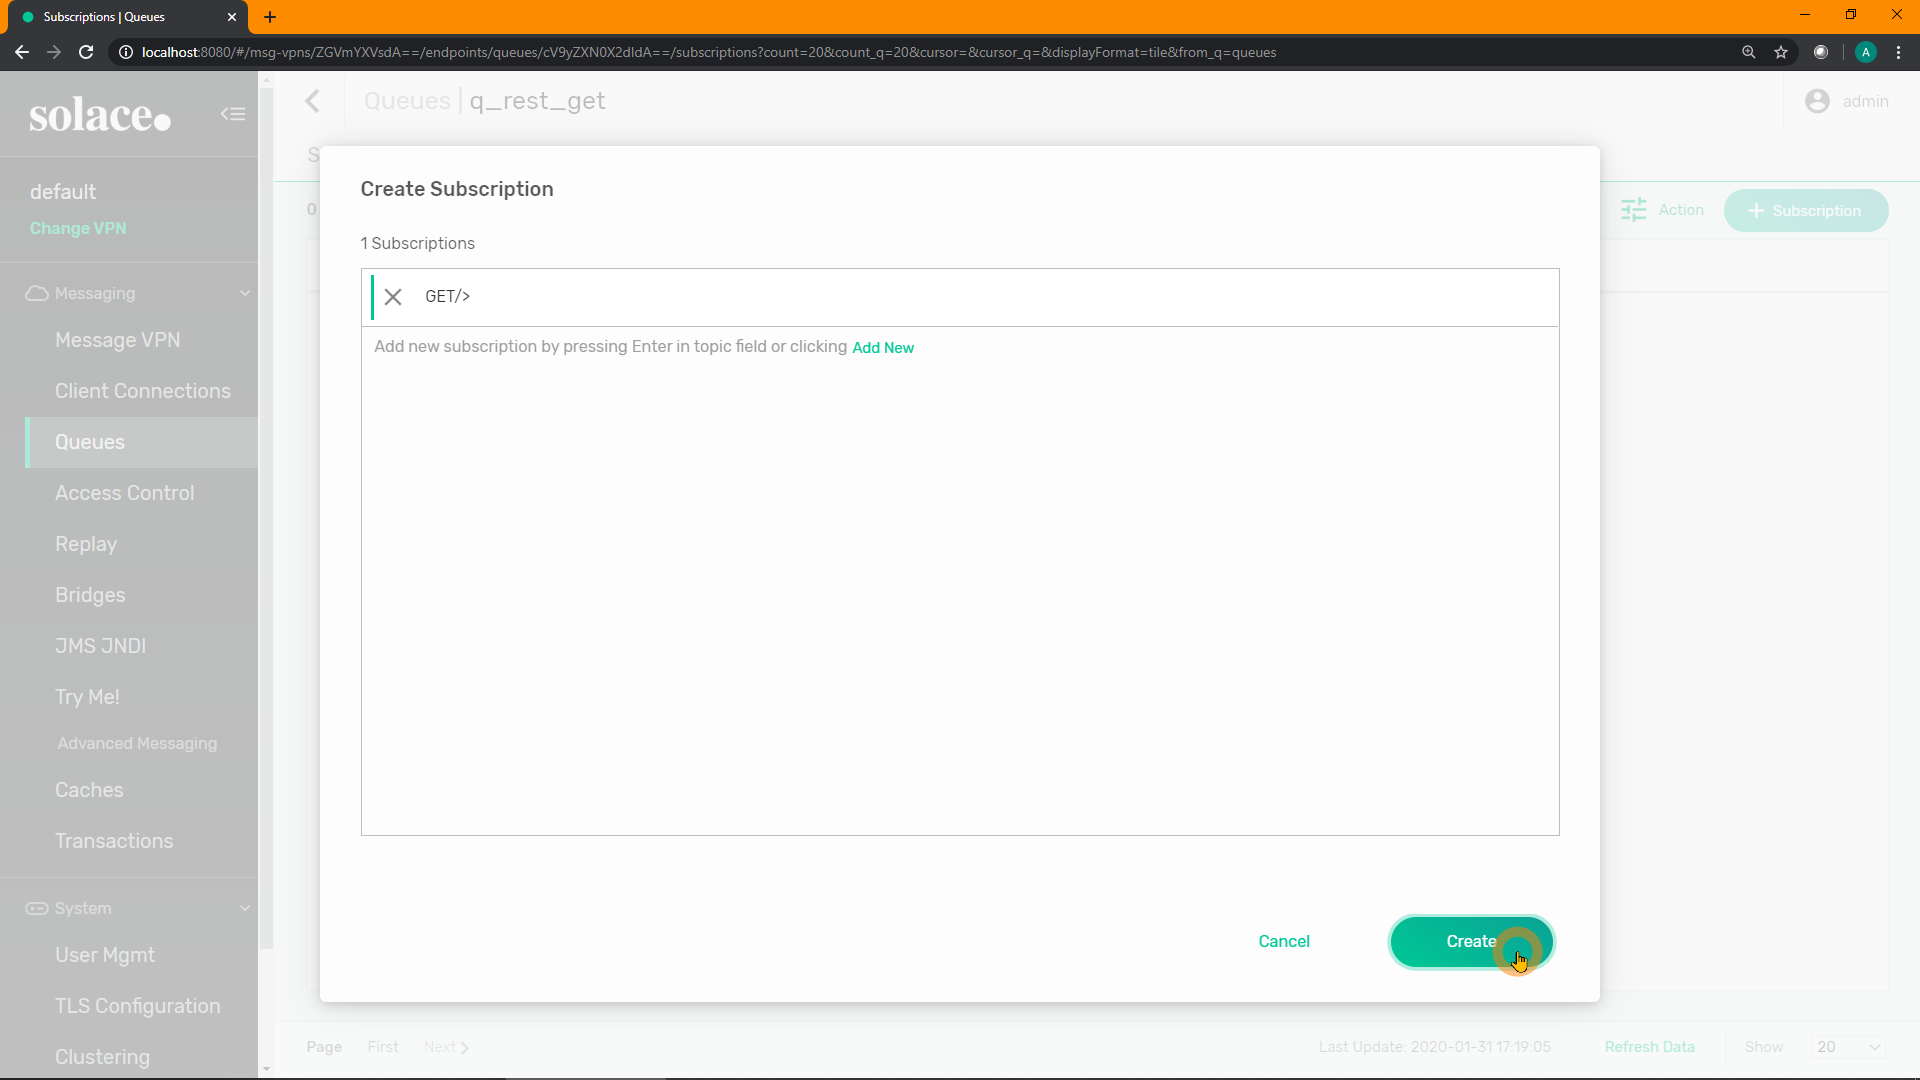
You can read more about Wilecard Topic Subscriptions here
SEMP
Create a new queue:
curl "http://localhost:8080/SEMP/v2/config/msgVpns/default/queues" \
  -X POST \
  -u admin:admin \
  -H "Content-type:application/json" \
  -d '{ "queueName": "q_rest_get",
        "accessType": "exclusive",
        "maxMsgSpoolUsage": 100,
        "permission": "consume",
        "ingressEnabled": true,
        "egressEnabled": true }'
Add a subscription to it:
curl "http://localhost:8080/SEMP/v2/config/msgVpns/default/queues/q_rest_get/subscriptions" \
  -X POST \
  -u admin:admin \
  -H "Content-type:application/json" \
  -d '{ "subscriptionTopic": "GET/>" }'
CLI
home
enable
  config
    message-spool message-vpn "default"
      create queue "q_rest_get"
      access-type exclusive
      permission all consume
      max-spool-usage 100
      subscription topic "GET/>"
      no shutdown
      exit
    end

show queue q_rest_get detail
12. [B] Create a REST Delivery Point (RDP)
Next, we need to create a new Rest Delivery Point (RDP) and bind it to the new queue.
PubSub+ Manager
Click on "Client Connections" on the left-hand menu: 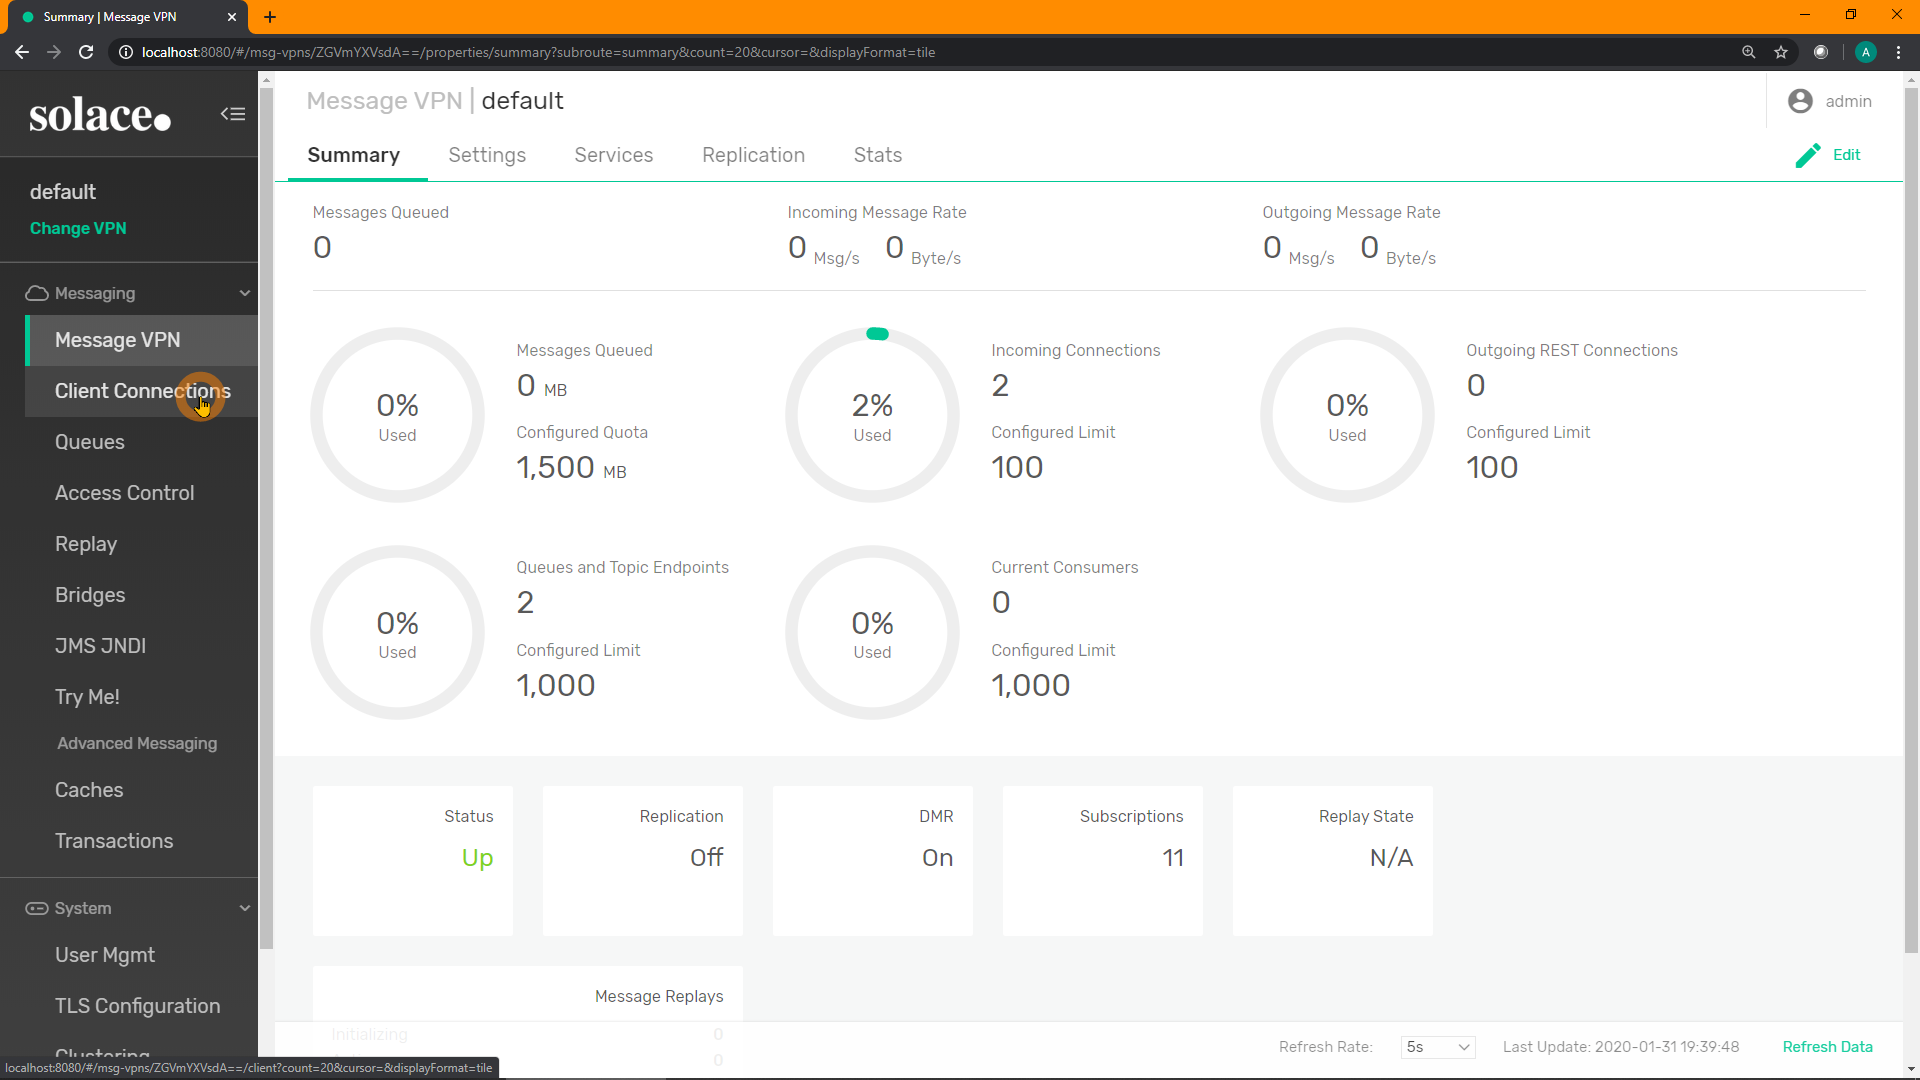
Click on "REST" in the top menu: 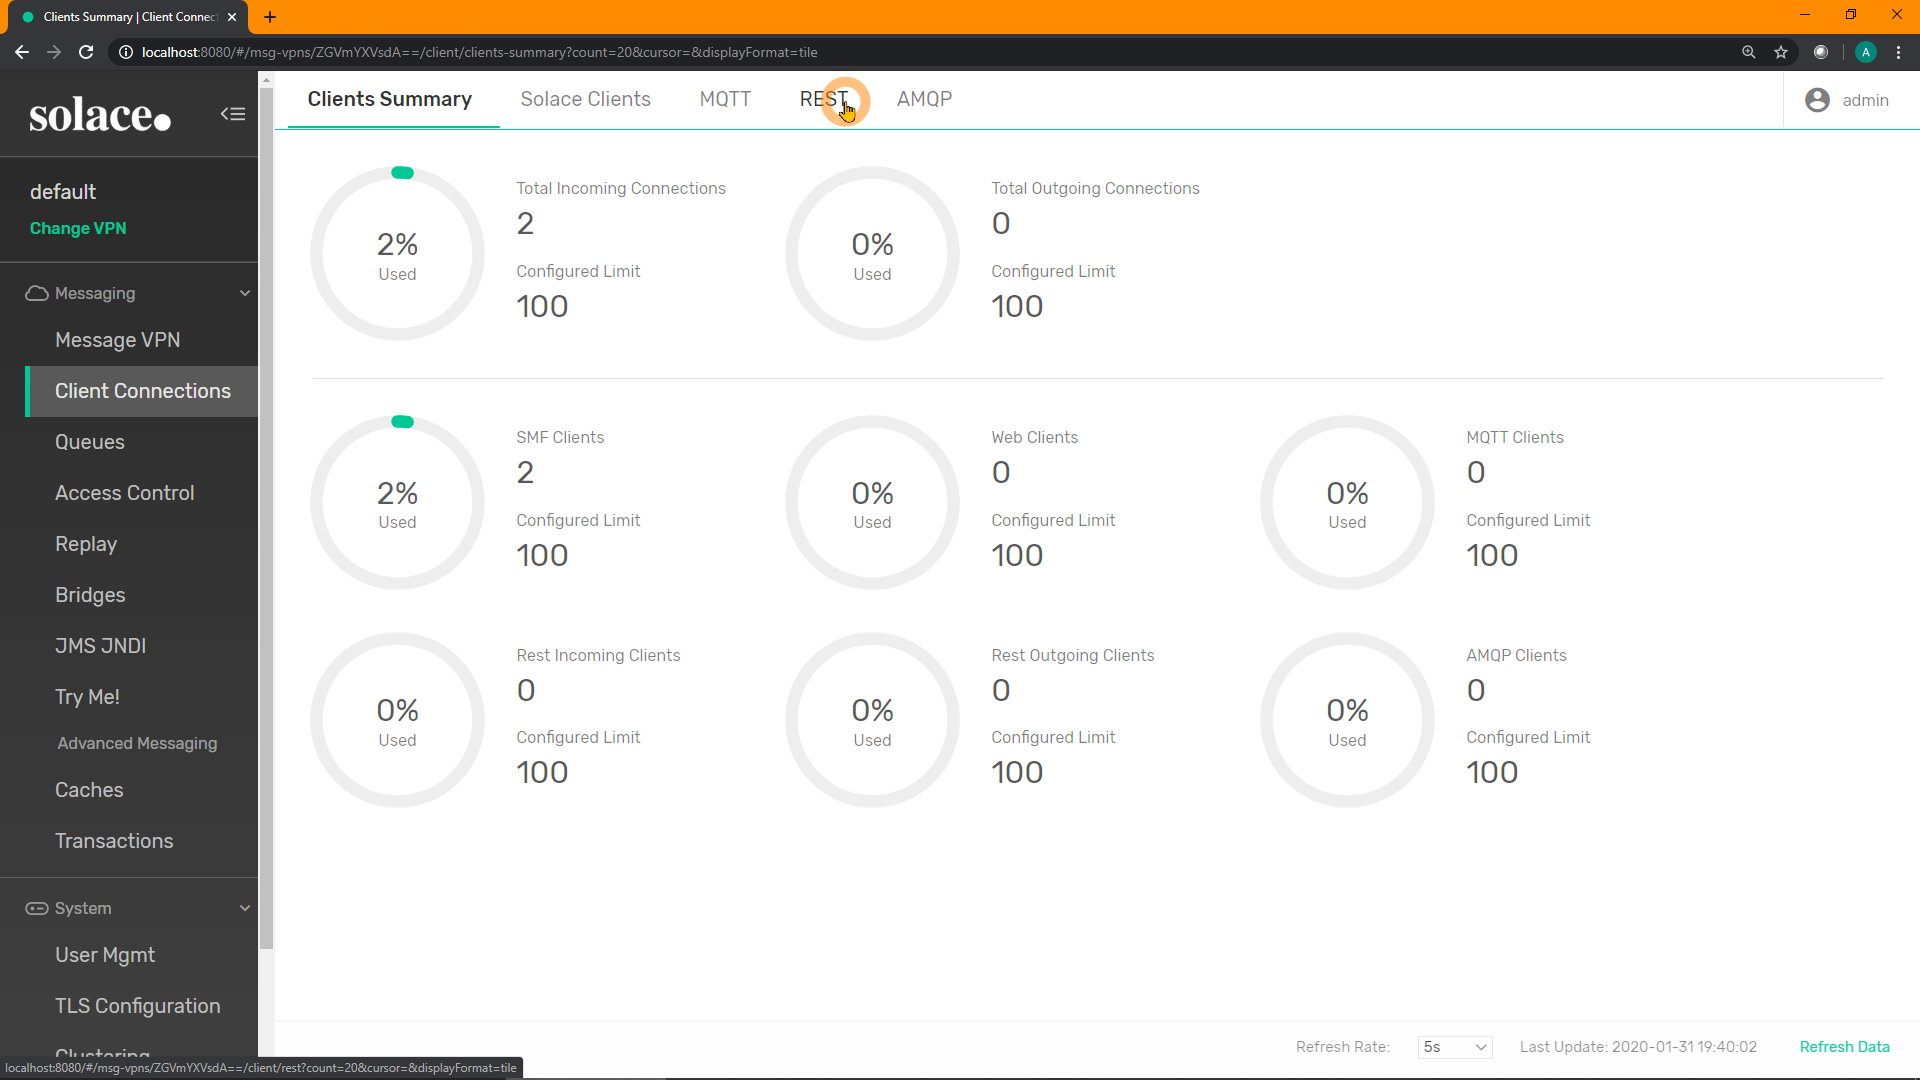
Click on "+ REST Delivery Point" in the top-right to create a new RDP: 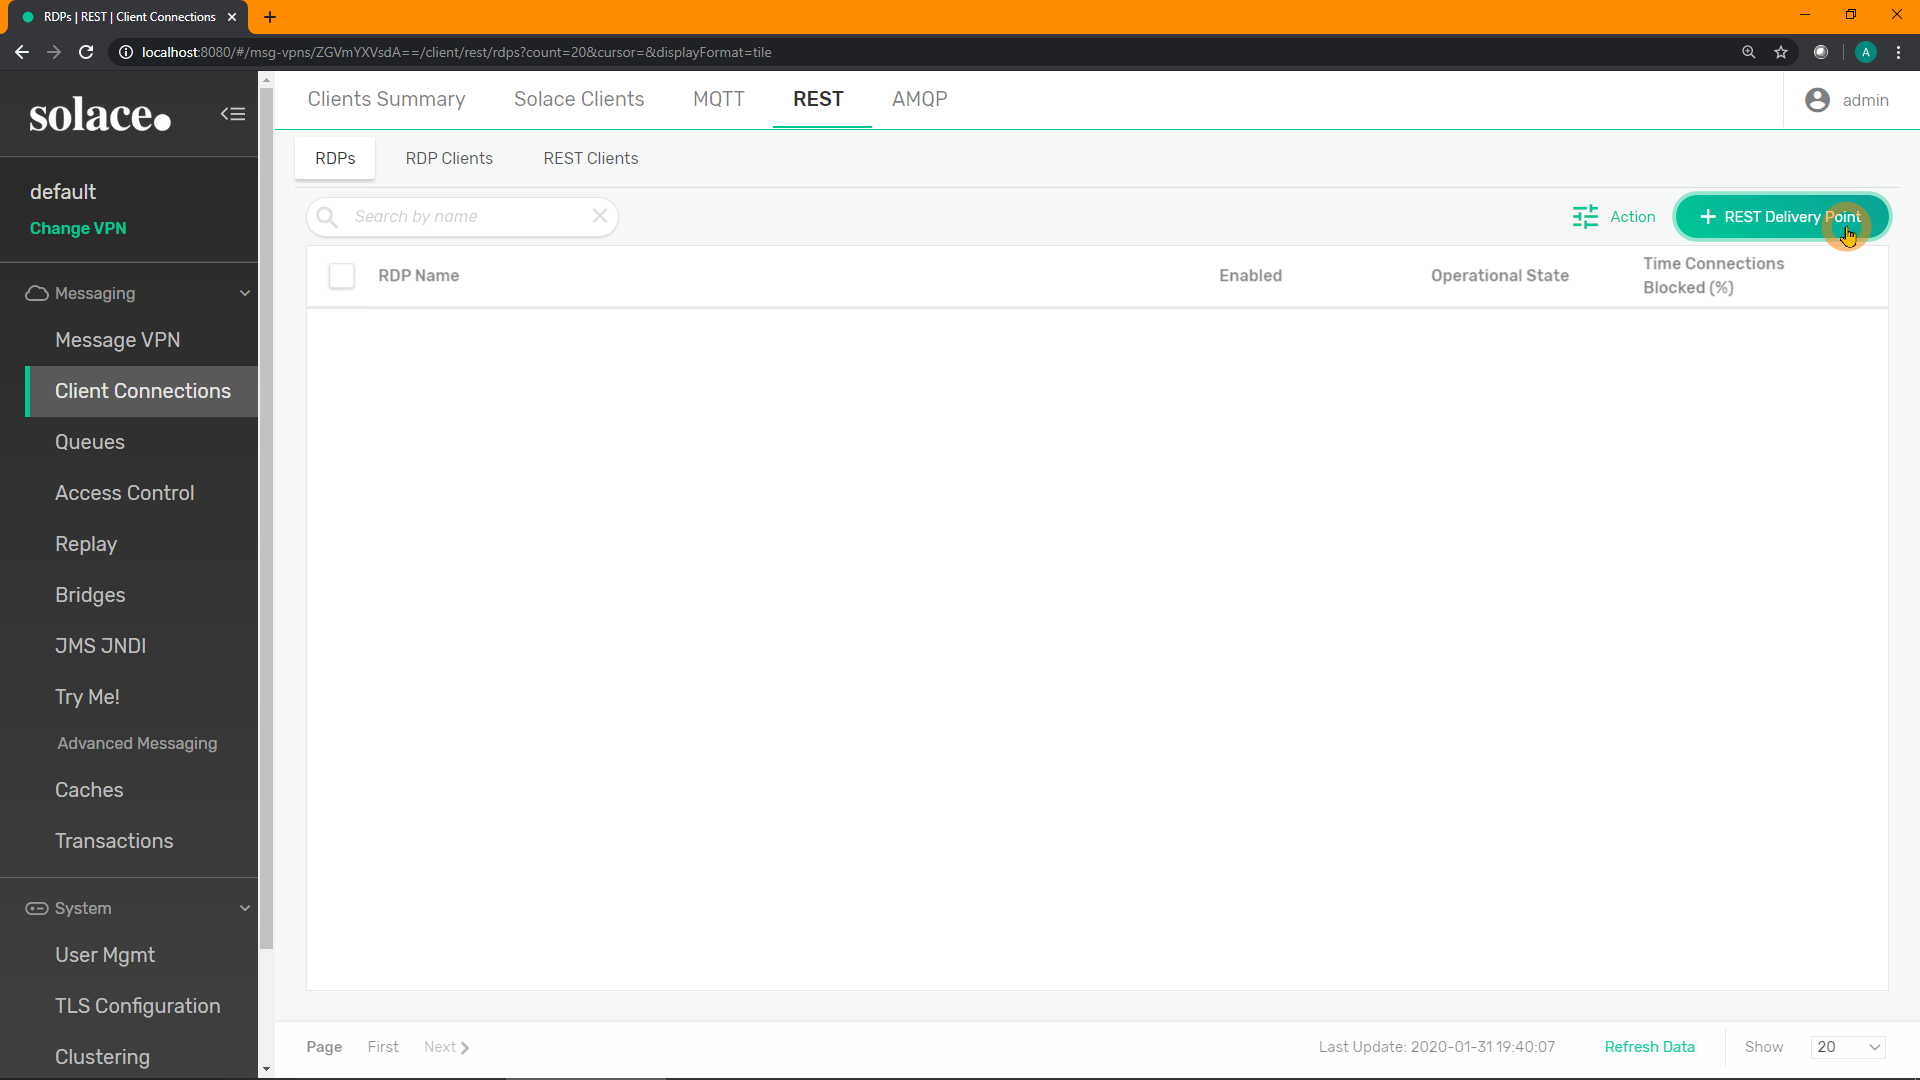
Enter a name for your new RDP. E.g. rdp_get. Click "Create": 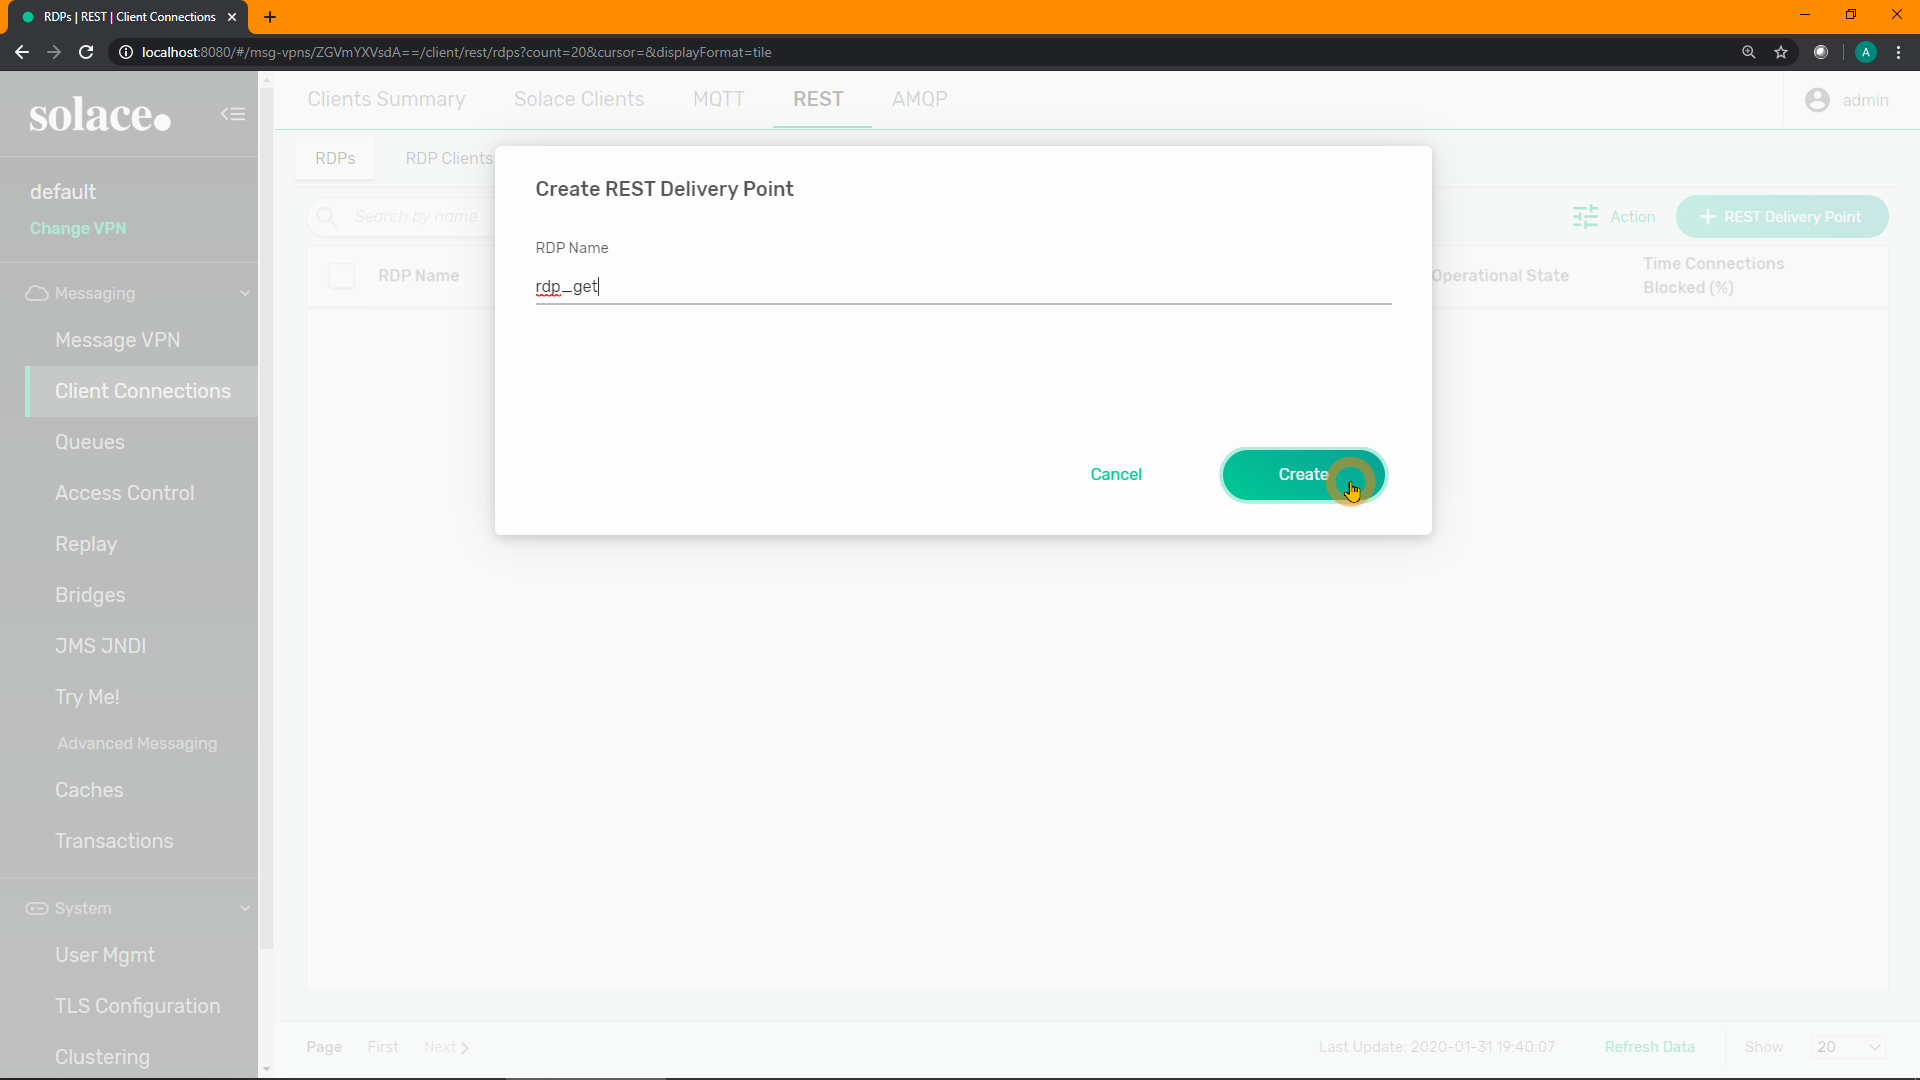
Enable the RDP. Click "Apply": 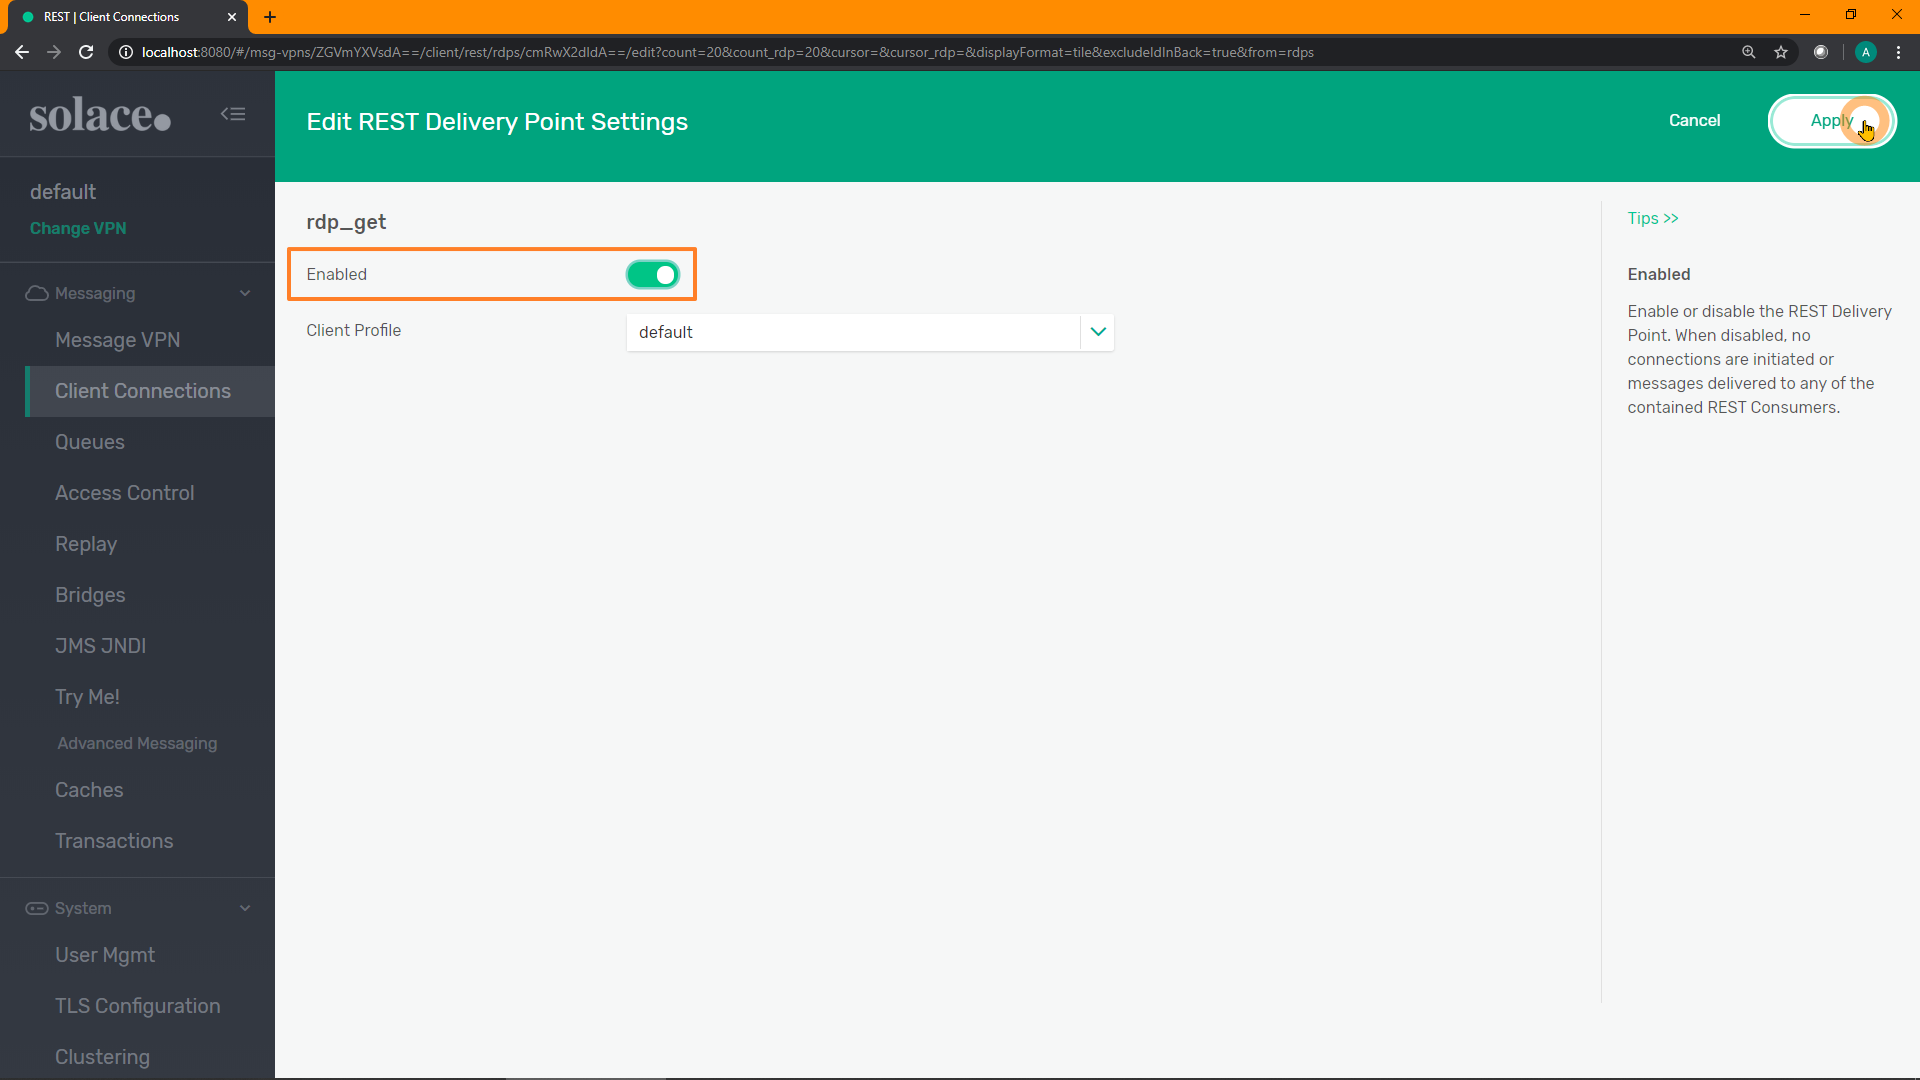
Click on the new RDP to view it: 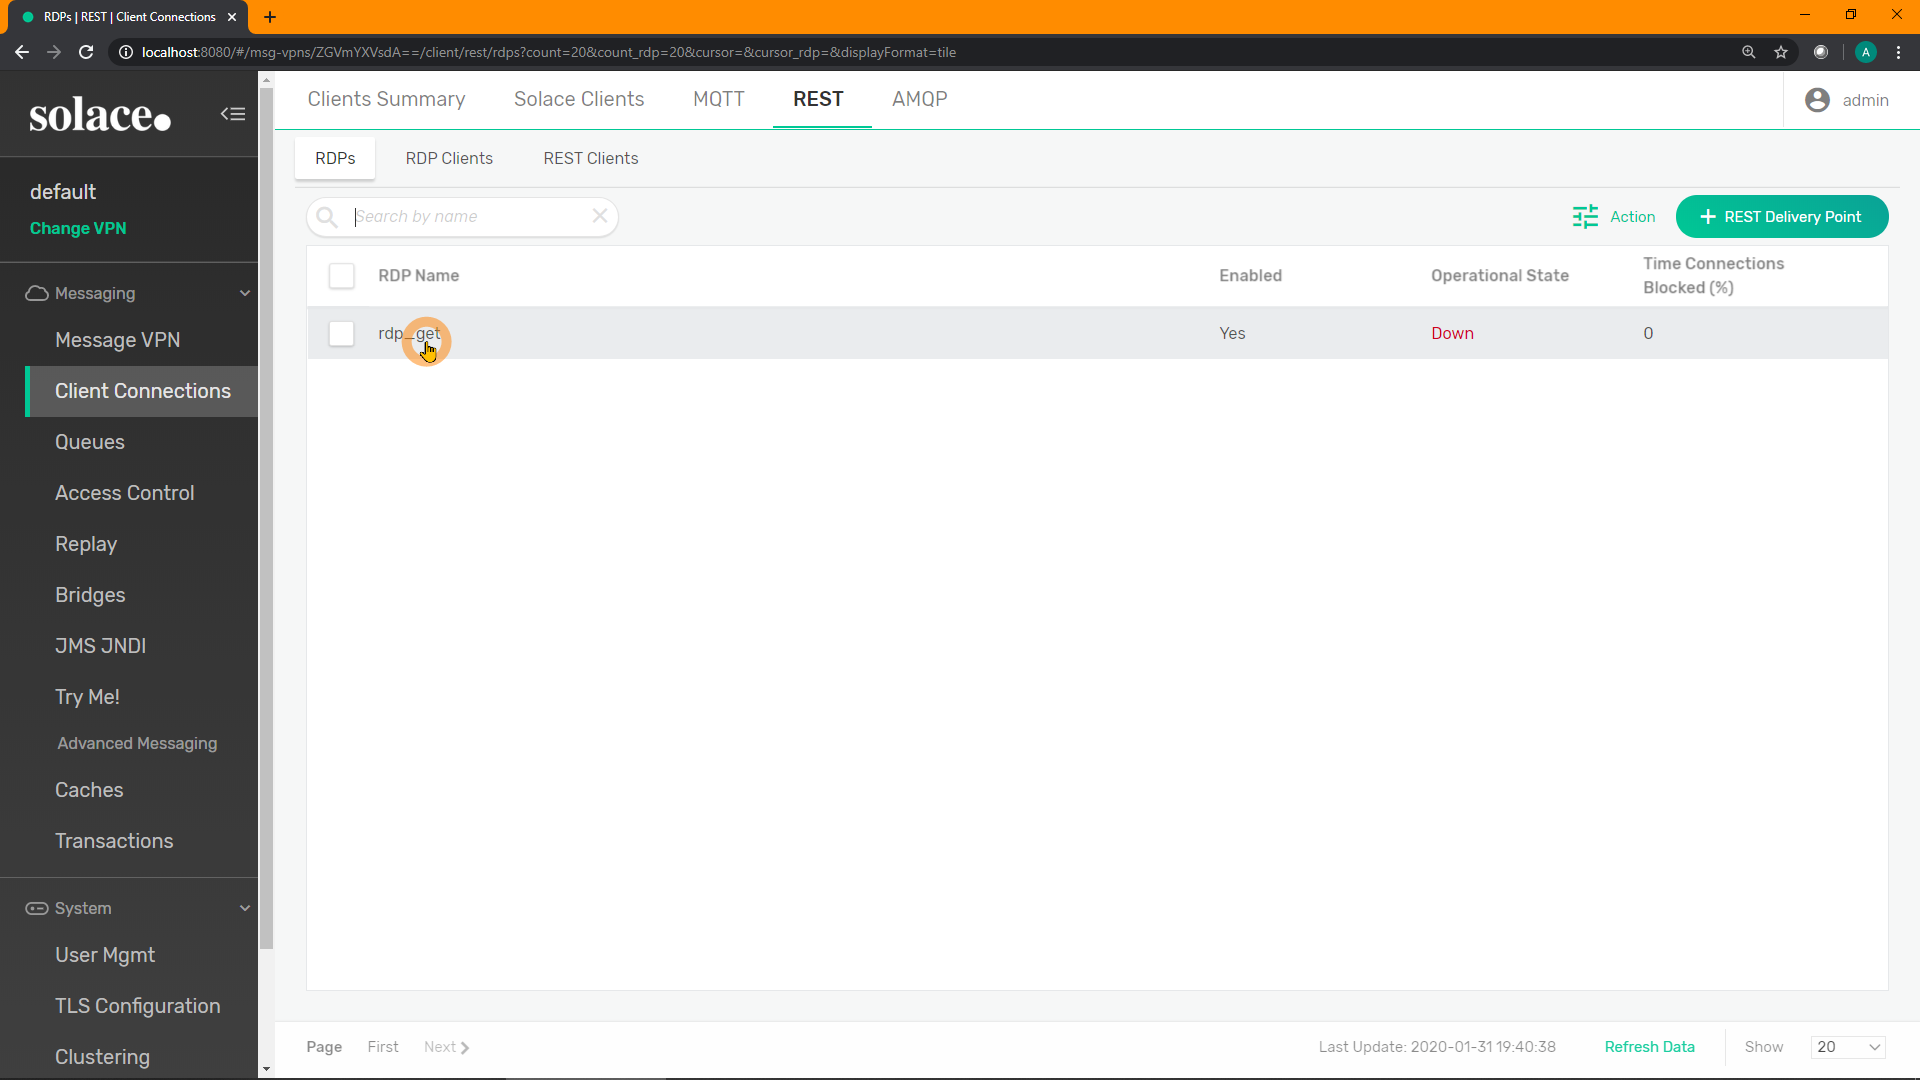
Click on "Queue Bindings" in the top menu: 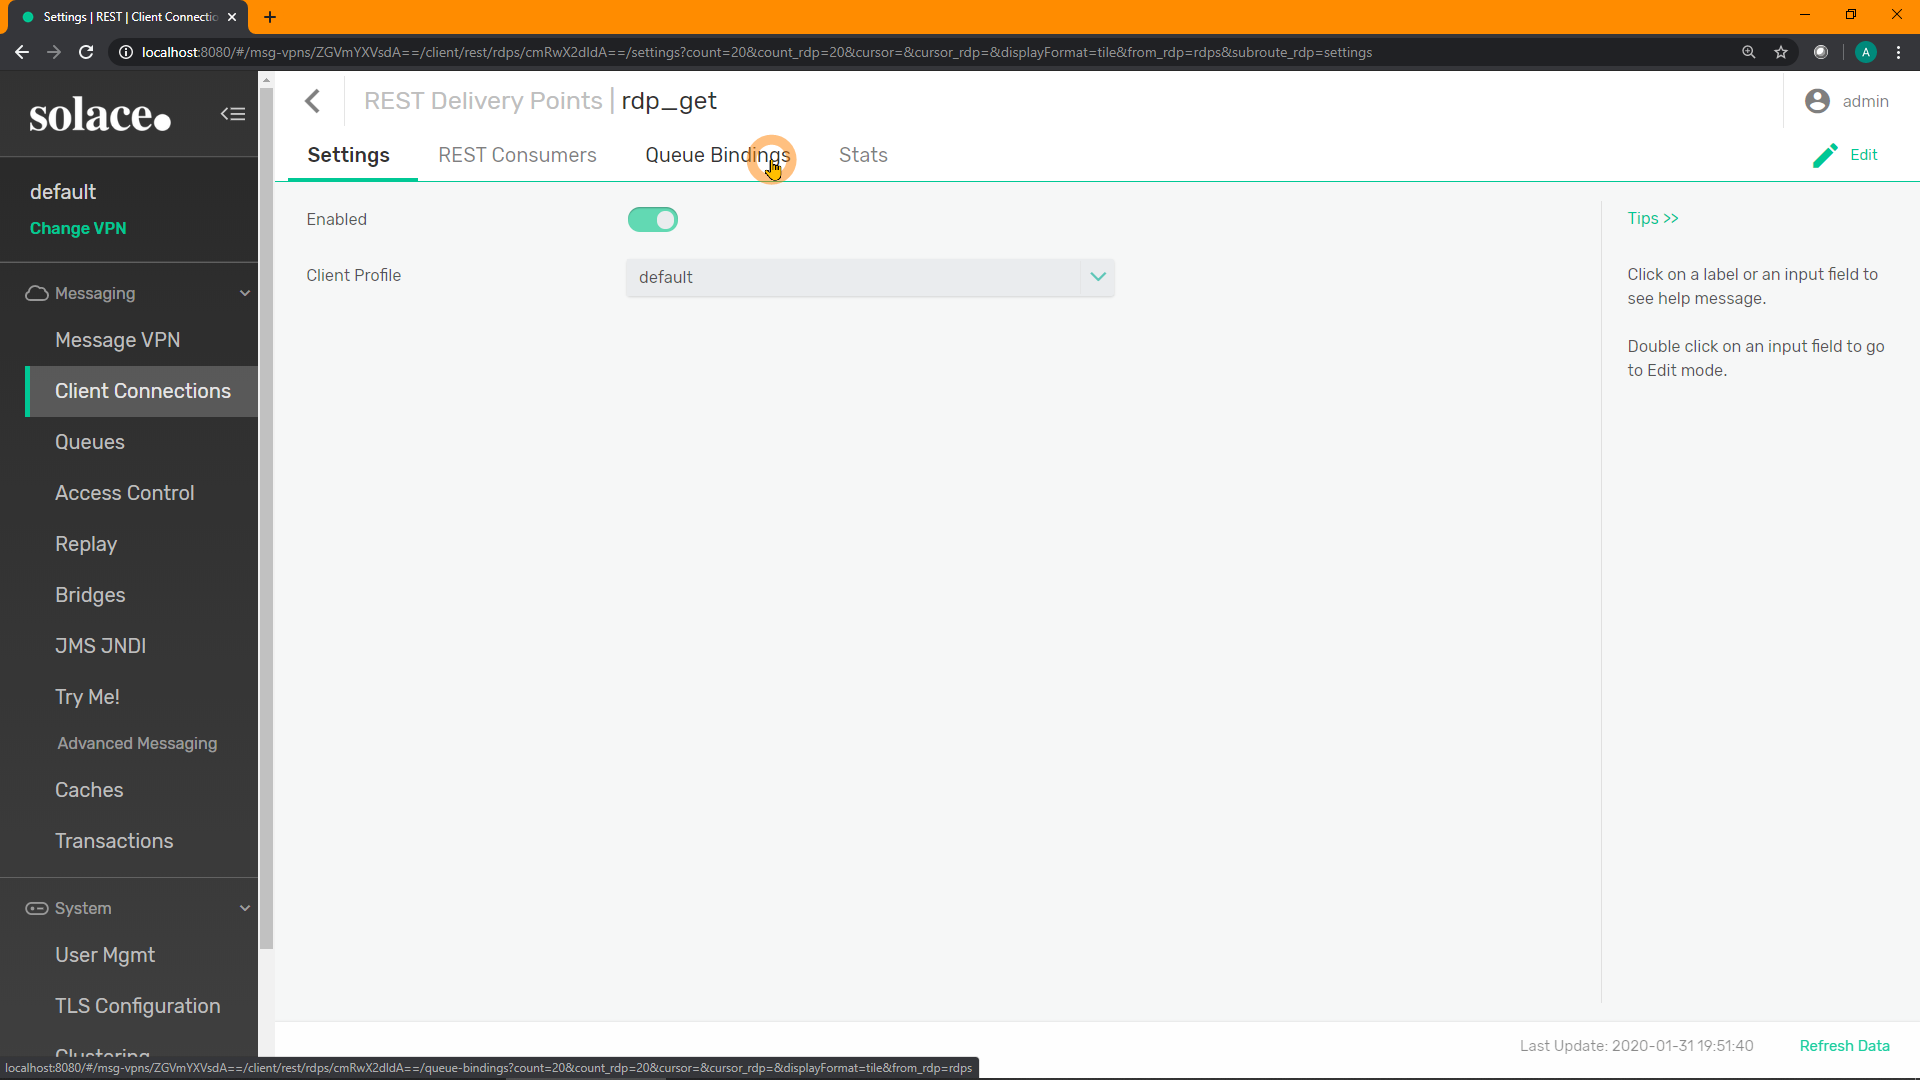
Click on "+ Queue Binding" in the top-right to create a new binding: 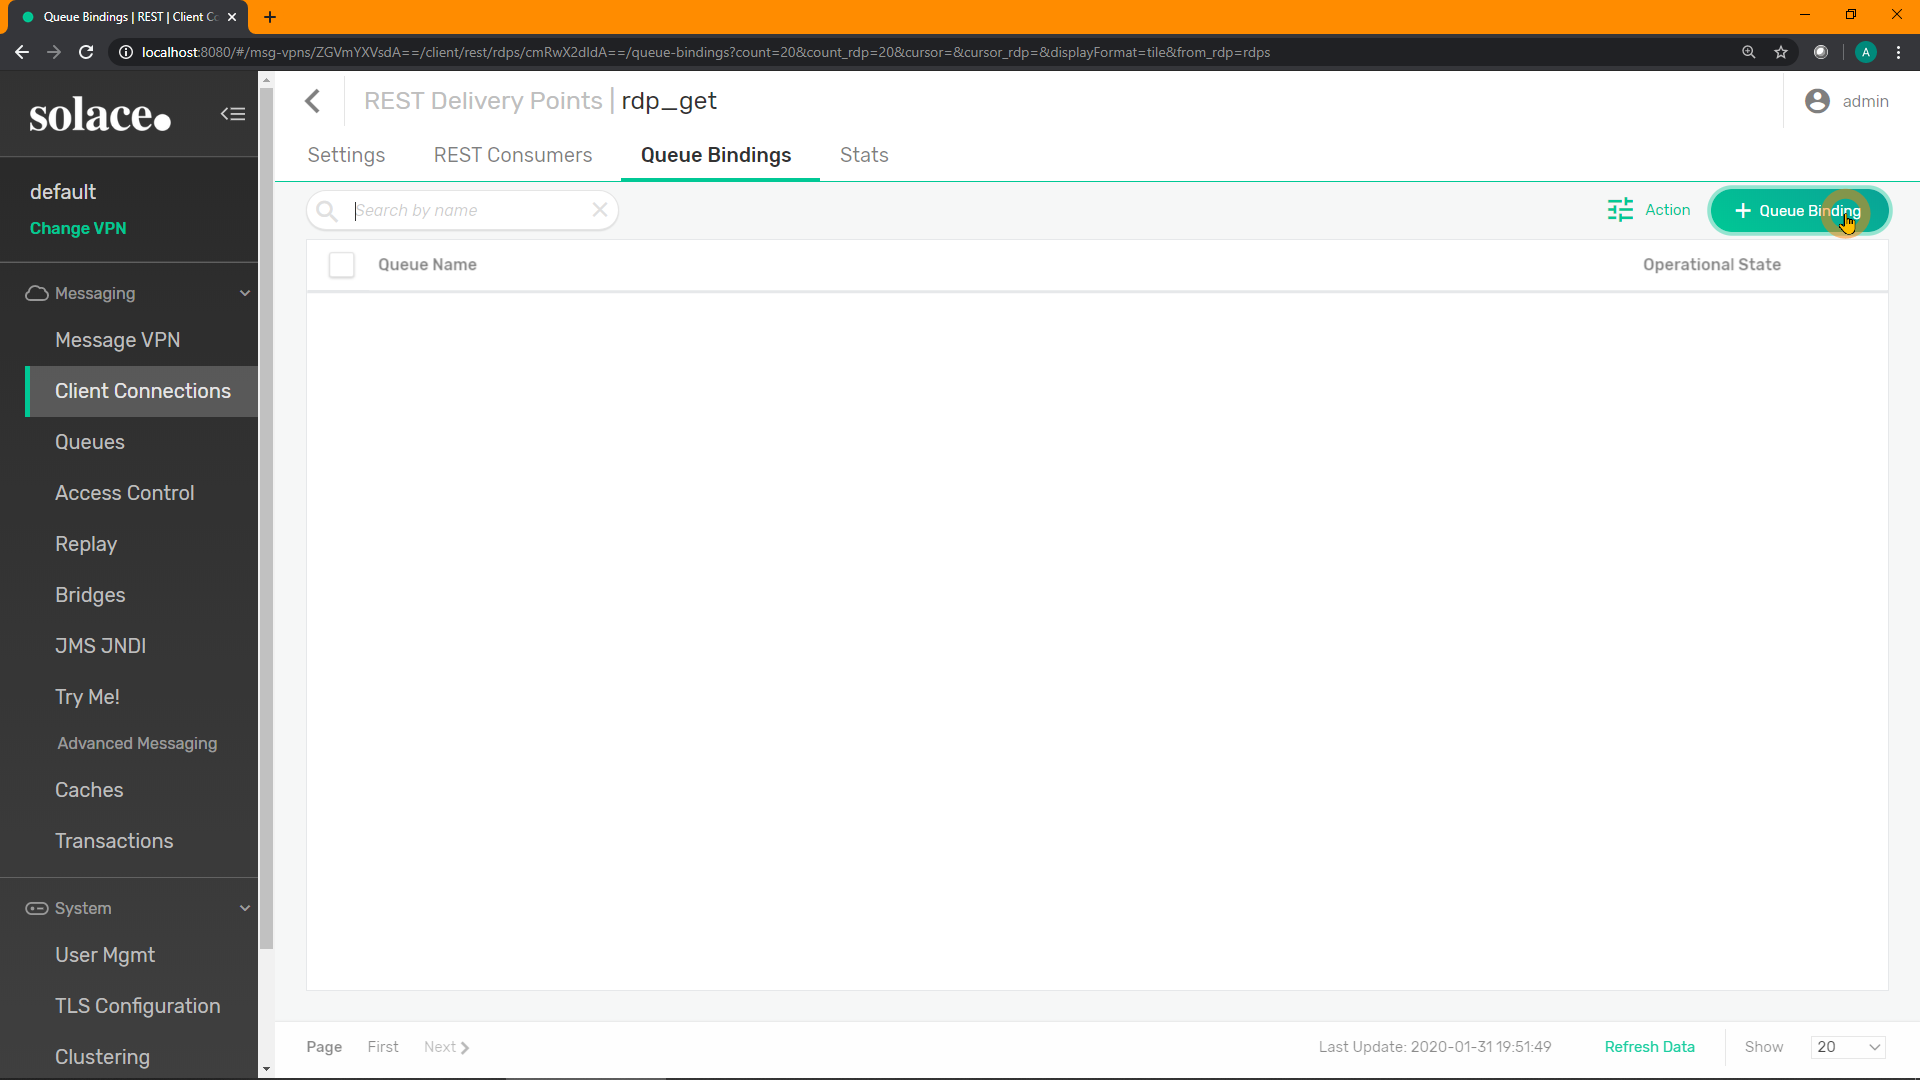
Enter the name of your new queue to bind to this RDP, E.g. q_rest_get. Click "Create": 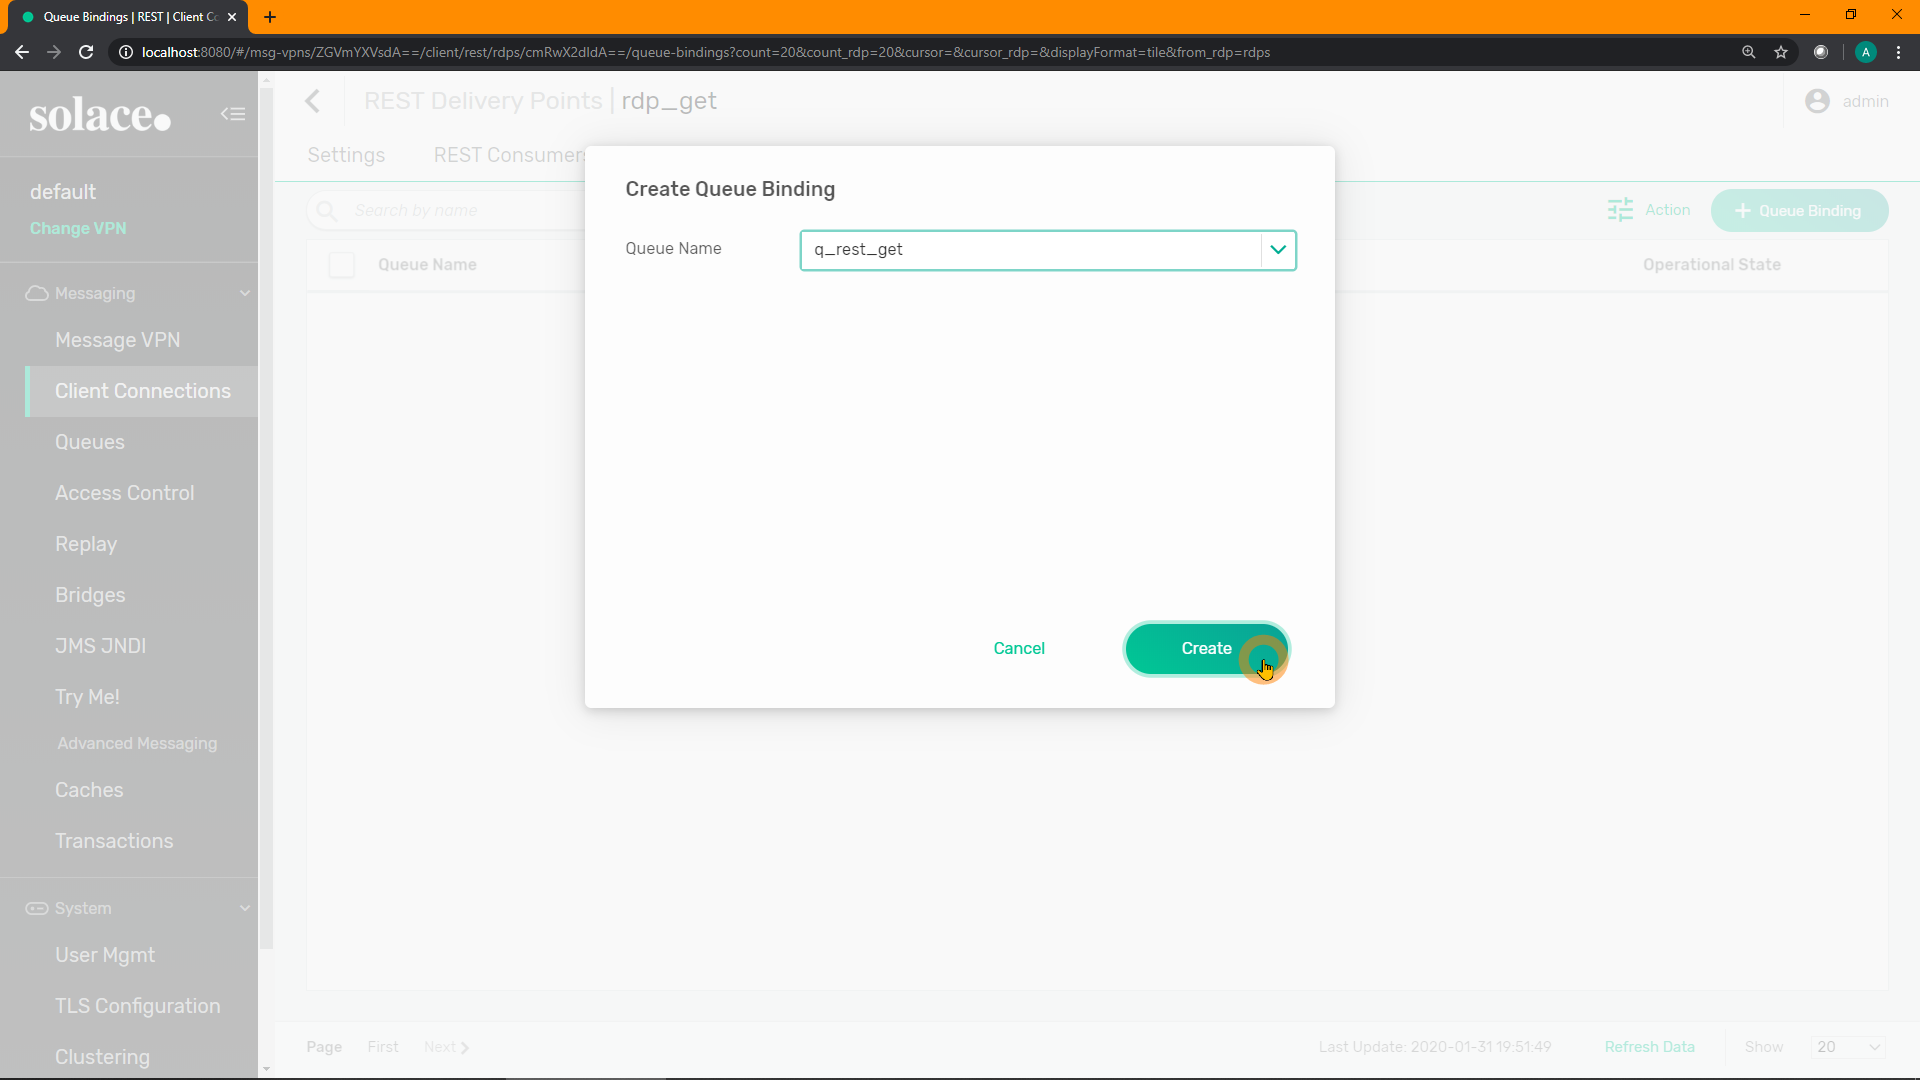
Click "Apply": 
SEMP
curl "http://localhost:8080/SEMP/v2/config/msgVpns/default/restDeliveryPoints" \
  -X POST \
  -u admin:admin \
  -H "Content-type:application/json" \
  -d '{ "restDeliveryPointName": "rdp_get",
        "enabled": true}'
curl "http://localhost:8080/SEMP/v2/config/msgVpns/default/restDeliveryPoints/rdp_get/queueBindings" \
  -X POST \
  -u admin:admin \
  -H "Content-type:application/json" \
  -d '{ "queueBindingName": "q_rest_get" }'
CLI
home
enable
  config
    message-vpn "default"
      rest
        create rest-delivery-point "rdp_get"
          create queue-binding "q_rest_get"
          exit
        no shut

show message-vpn default rest rest-delivery-point * detail
13. [B] Configure a REST Consumer
The final configuration step on the Solace broker to allow the REST request to pass-through is the REST Consumer. This is where the destination server/host is specified.
PubSub+ Manager
From within the newly created RDP, click on "REST Consumers" in the top menu: 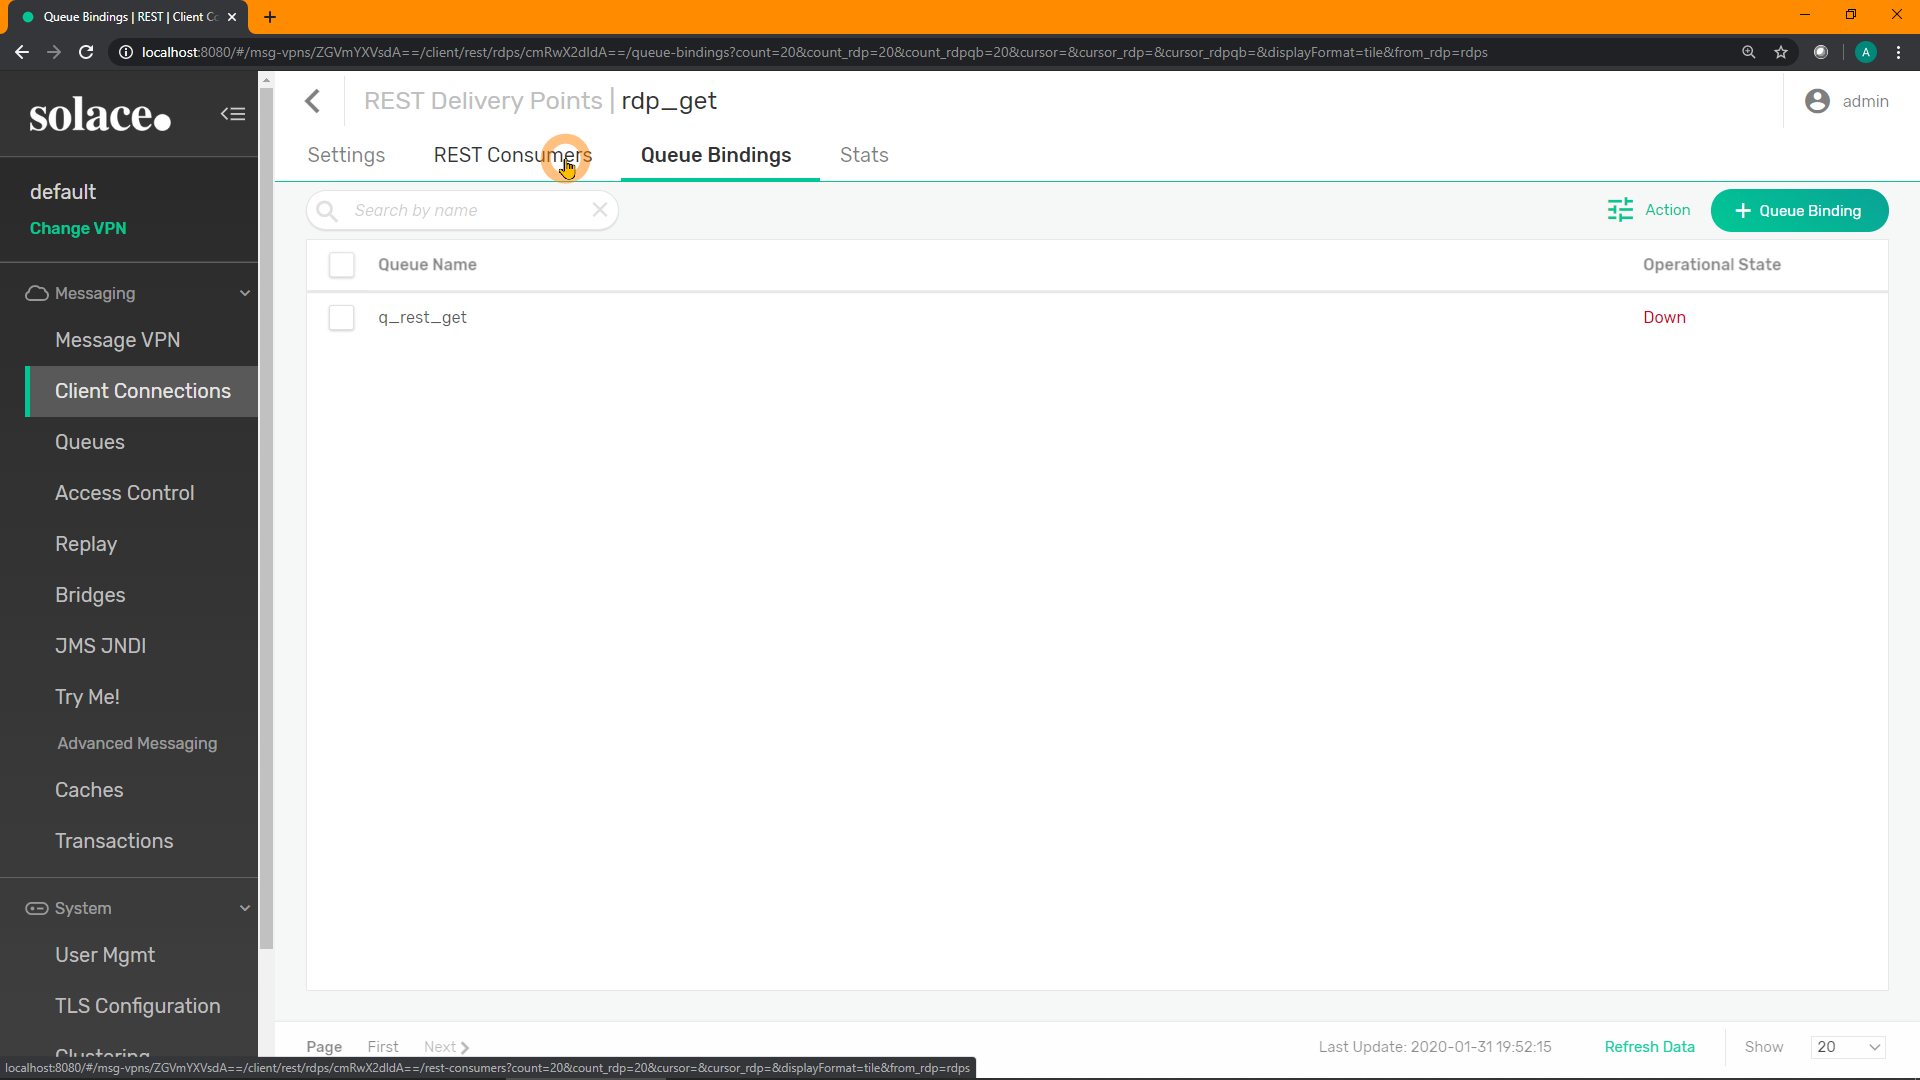
Click on "+ REST Consumer" in the top-right to create a new consumer: 
Enter a name for your new consumer. E.g. rc_get. Click "Create": 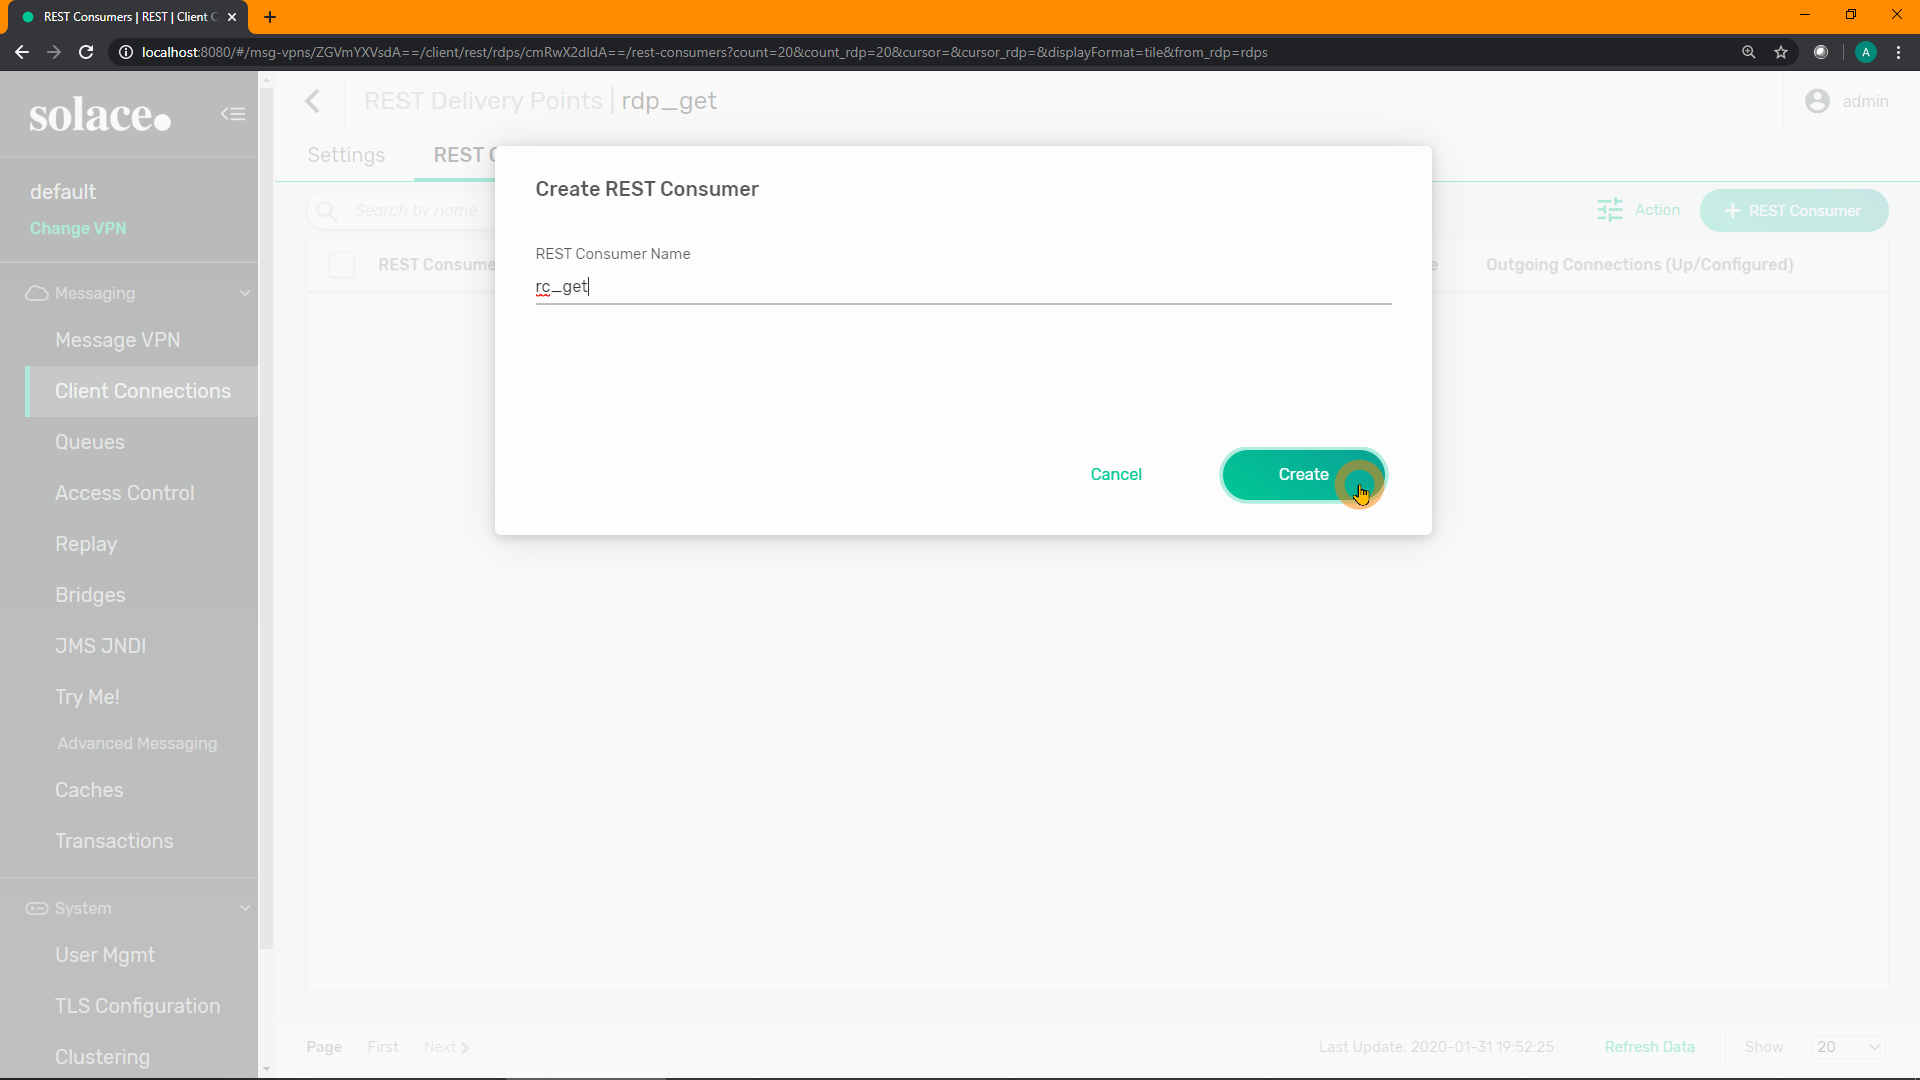
Enable the REST Consumer, and add the remote host, port, and any authentication required by the downstream REST server. In this example, the host is postman-echo.com and the port is 80. Toggle the enable option and click "Apply" 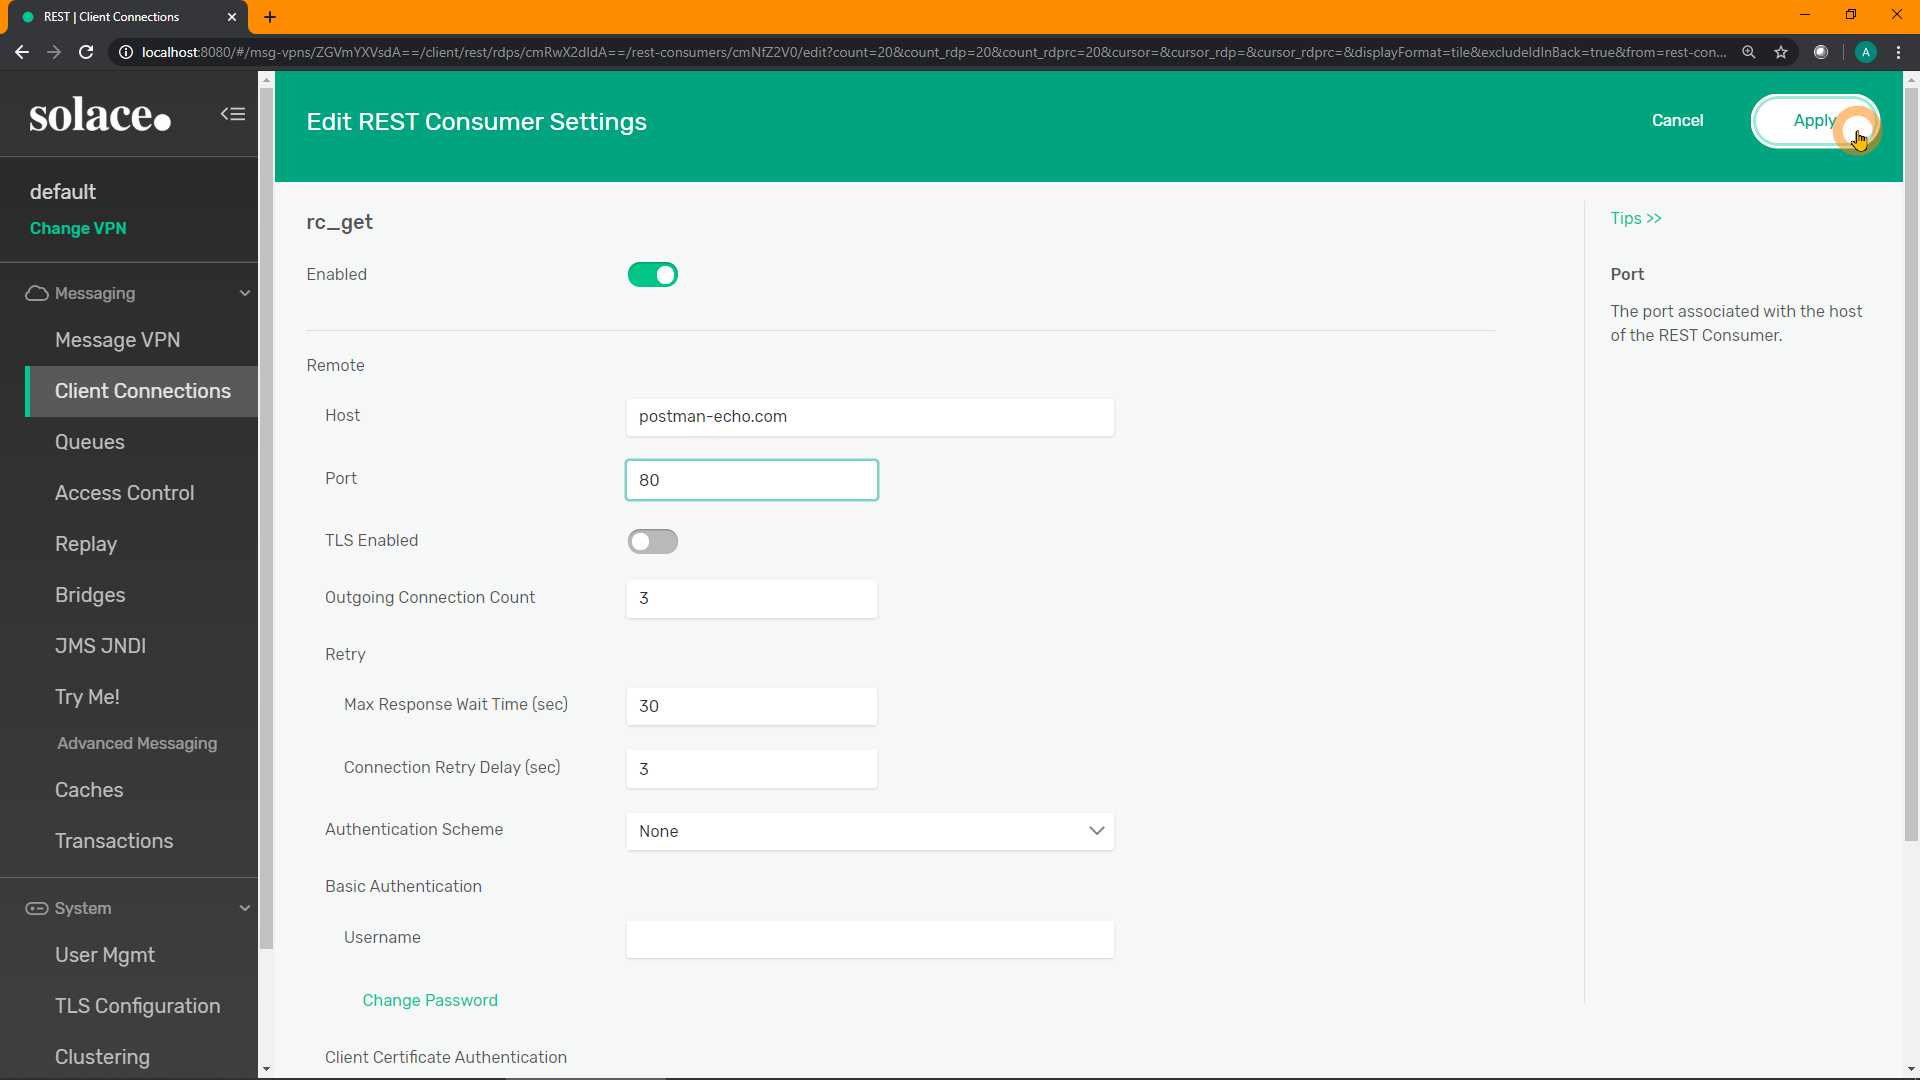
Refresh the screen, and ensure the REST Consumer reports an Operational State of Up: 
SEMP
One single SEMP API command will create and configure the REST Consumer:
curl "http://localhost:8080/SEMP/v2/config/msgVpns/default/restDeliveryPoints/rdp_get/restConsumers" \
  -X POST \
  -u admin:admin \
  -H "Content-type:application/json" \
  -d '{ "restConsumerName": "rc_get",
        "authenticationScheme": "none",
        "remoteHost": "postman-echo.com",
        "remotePort": 80,
        "tlsEnabled": false,
        "enabled": true }'
Make sure that it is reporting a good state, using the Monitor SEMP API:
curl -u admin:admin "http://localhost:8080/SEMP/v2/monitor/msgVpns/default/restDeliveryPoints/rdp_get/restConsumers"{
"data":[
{
"authenticationHttpBasicUsername":"",
// snip //
"restConsumerName":"rc_get",
"restDeliveryPointName":"rdp_get",
"retryDelay":3,
"tlsCipherSuiteList":"default",
"tlsEnabled":false,
"up":true <----
}
],
// snip //CLI
If continuing from the previous CLI command, and are still inside the rest-delivery-point level, start at line 7.
home
enable
  config
    message-vpn "default"
      rest
        rest-delivery-point "rdp_get"
          create rest-consumer "rc_get"
            authentication auth-scheme none
            remote host "postman-echo.com"
            remote port 80
            no shut
You should now see something that looks like:
solace> show message-vpn default rest rest-consumer * detail

REST Consumer Name:                  rc_get
REST Delivery Point:                 rdp_get
Message VPN:                         default
Admin State:                         Enabled       <----
Operational State:                   Up            <----

Last Failure:
  Reason:                            Shutdown
  Time:                              Jan 30 2020 09:27:20 UTC
Last Conn Failure:
  Local Endpoint:                    N/A
  Remote Endpoint:                   N/A
  Reason:                            Unknown Connect Event
  Time:                              Jan 30 2020 09:24:49 UTC
Local:
  Interface:
Remote:
  Host:                              postman-echo.com
  Port:                              80
  SSL:                               No
  Outgoing Connections (up):         3       <----
Outgoing Connections (configured): 3 <----14. [B] Test one more time!
Now that the configuration is done, let us test using almost the same cURL command from before, except replacing the postman-echo.com host and port with the Solace broker's REST port, and adding client username & password as required:
curl -u default:default "http://localhost:9000/get?hello=world&solace=cool"And the output should look like:
{
  "args": {
    "hello": "world",
    "solace": "cool"
  },
  "headers": {
    "x-forwarded-proto": "https",
    "host": "postman-echo.com",
    "accept": "*/*",
    "solace-delivery-mode": "Non-Persistent",
    "solace-message-id": "ID:Solace-b7603db440727f09",
    "solace-reply-wait-time-in-ms": "FOREVER",
    "solace-time-to-live-in-ms": "30000",
    "user-agent": "curl/7.58.0",
    "x-forwarded-port": "80"
  },
  "url": "https://postman-echo.com/get?hello=world&solace=cool"
}
Note the additional headers. But the original requesting client (cURL in this case) is unaffected.
15. Part C - Objective
Recall:
- Finally, configure a "sniffer" messaging application to listen to the REST request/reply flow through Solace broker, using the publish-subscribe pattern. Could be very useful for logging, diagnostics, or audit.
- Configure a messaging application to replace/extend/complement the back-end REST server, allowing a REST-to-pub/sub conversion within the Solace broker.
16. [C] Configuring a "Sniffer" App
Just like we did on the last step of Section A, use the Try Me! functionality of the PubSub+ Manager to "snoop" or "sniff" the messages going through Solace:
Enter the subscriptions GET/> and either #P2P/*/_rest*/> for SolOS >= 9.9 (or #P2P/*/#rest*/> for SolOS < 9.9) into the subscription text field. The 2nd subscription will receive all point-to-point replies for REST requests. 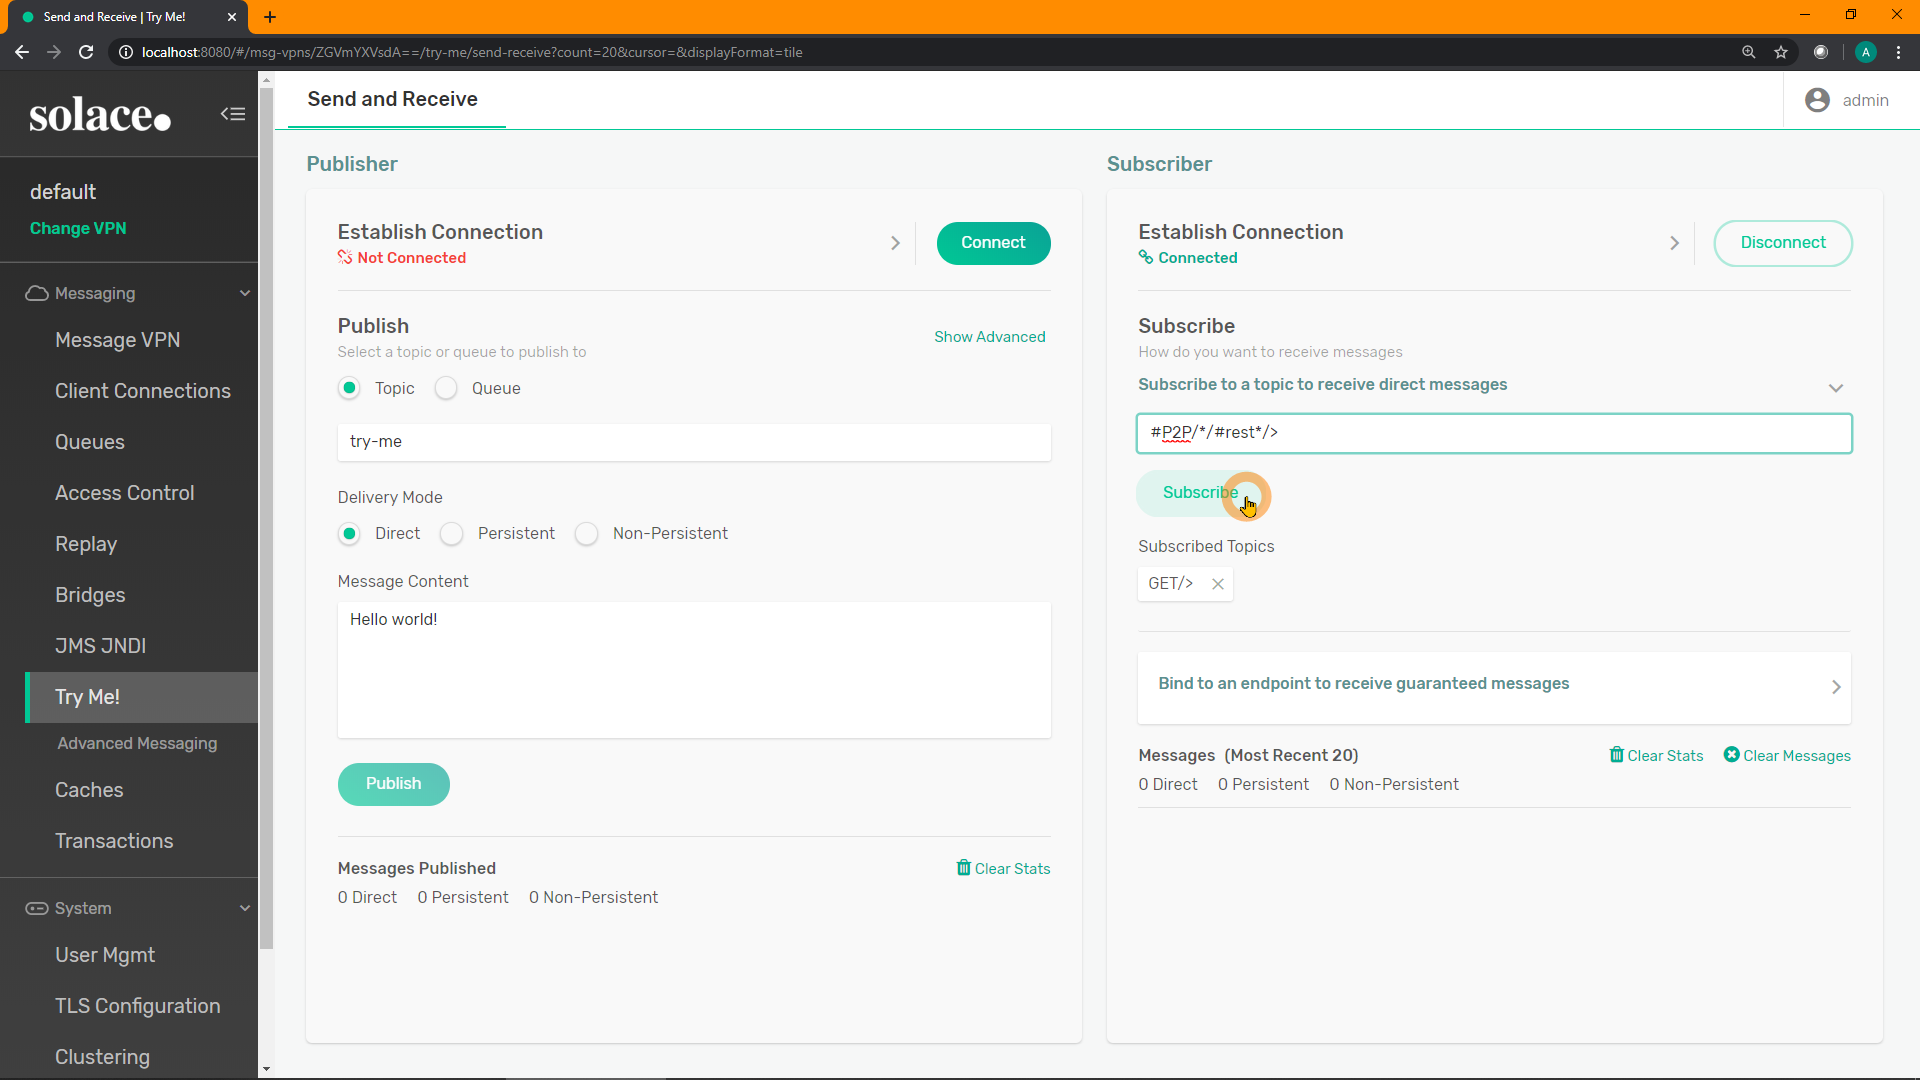
Re-run the same cURL command from the previous section:
curl -u default:default "http://localhost:9000/get?hello=world&solace=cool"Verify cURL still receives a response, but note that you can also see the request and reply in the Subscriber window: 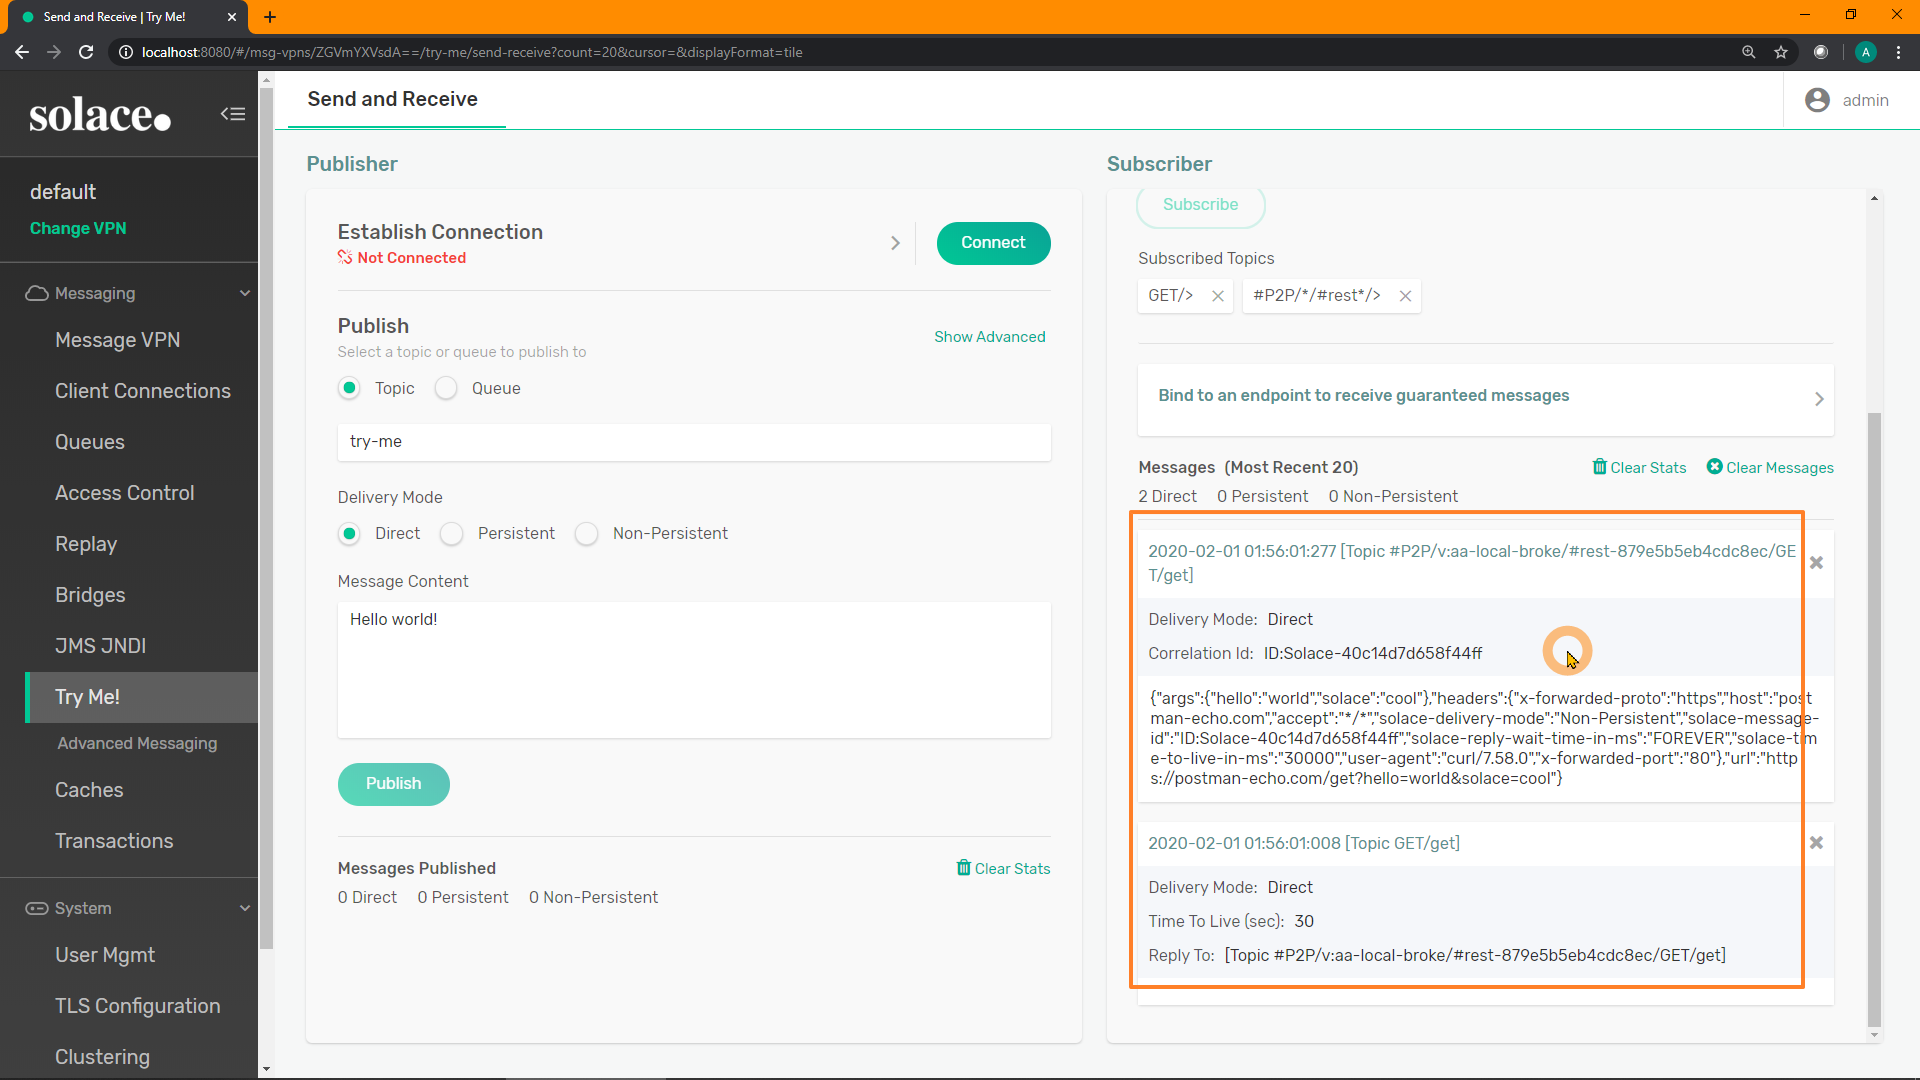
This shows that you can have an application passively receive a copy of all REST request-reply traffic as it moves through the broker, without impacting the original actors. This functionality could be very useful for logging, diagnostics, or audit.
17. [C] Building a Replier Messaging App
(AKA Who Needs a REST Server??)
Now that we have verified that the REST MicroGateway feature is passing through the various REST requests, let's take a look at some sample/example code to generate a response using a messaging topic consumer.
The following section assumes you are using the Solace Java JCSMP API, which is available at our Samples GitHub repo. However, the modifications and concepts apply to other Solace APIs and other messaging APIs (JMS, C, C#, JavaScript, etc.). Other APIs are available on https://github.com/solacesamples/
Shutdown the RDP
Make a Replier App
Take a look at the Basic Replier (source code) sample application. We are going to modify it slightly.
- Change the topic subscription from
tutorial/requeststoGET/>, approximately line 50. (Could be any REST verb, using wildcards or not) - Inside the
onReceive()callback method (approximately line 75), replace the linereply.setText(text);with the following, for something more interesting/dynamic:
    try {
        reply.setText("Your path was: "+request.getProperties().getString("JMS_Solace_HTTP_target_path_query_verbatim"));
    } catch (Exception e) {
        reply.setText(text);
}- Just after the new
try { }block, before the reply message is sent as a response to the request, add the following lines:
System.out.println(request.dump());  // prints the request message to the console
reply.setApplicationMessageId(request.getApplicationMessageId()); // needed for correlation- Run the application, and pass in the required arguments:
hostname username@vpn-name [password]. E.g.:
BasicReplier localhost default@default- Resubmit the original REST GET request, and you should see following printed to the console of the BasicReplier app:
BasicReplier initializing...
Jan 27, 2020 6:22:00 PM com.solacesystems.jcsmp.protocol.impl.TcpClientChannel call
INFO: Connecting to host 'orig=localhost, host=localhost' (host 1 of 1, smfclient 2, attempt 1 of 1, this_host_attempt: 1 of 1)
Jan 27, 2020 6:22:01 PM com.solacesystems.jcsmp.protocol.impl.TcpClientChannel call
INFO: Connected to host 'orig=localhost, host=localhost' (smfclient 2)
Listening for request messages on topic GET/> ... Press enter to exit

Received request, generating response
Destination:                            Topic 'GET/get'
AppMessageID:                           ID:Solace-d2dc2510dbfe295a
Priority:                               0
Class Of Service:                       USER_COS_1
DeliveryMode:                           DIRECT
Message Id:                             7
ReplyTo:                                Topic '#P2P/v:aa-local-broke/#rest-e135cb328ef67649/GET/get'
TimeToLive:                             30000
User Property Map:                      4 entries
      Key 'JMS_Solace_HTTP_field_Accept' (String): */*
      Key 'JMS_Solace_HTTP_field_User-Agent' (String): curl/7.58.0
      Key 'JMS_Solace_HTTP_method' (String): GET
Key 'JMS_Solace_HTTP_target_path_query_verbatim' (String): get?hello=world&solace=cool- And at the end of the cURL console, you should see the returned payload of "Sample response":
> curl -u default:default "http://localhost:9000/test" -v
*   Trying 127.0.0.1...
* TCP_NODELAY set
* Connected to localhost (127.0.0.1) port 9000 (#0)
* Server auth using Basic with user 'default'
> GET /test HTTP/1.1
> Host: localhost:9000
> Authorization: Basic ZGVmYXVsdDpkZWZhdWx0
> User-Agent: curl/7.58.0
> Accept: */*
>
< HTTP/1.1 200 OK
< Content-Length: 15
< Solace-Client-Name: #rest-55e4631320167e61
< Solace-Message-ID: ID:Solace-bf11a8964cec2d0e
<
* Connection #0 to host localhost left intact
Your path was: get?hello=world&solace=cool <----HTTP Response Codes
- For more advanced HTTP response codes, add the following to the sample code, just before the reply message is sent:
 SDTMap props = JCSMPFactory.onlyInstance().createMap();
 try {
        props.putShort("JMS_Solace_HTTP_status_code",(short)403);
        props.putString("JMS_Solace_HTTP_reason_phrase","declined");
 } catch (SDTException e) {
        // won't happen here
        e.printStackTrace();
 }
reply.setProperties(props);- Restart the Basic Replier, resubmit the REST GET request, and you should see something that looks the following:
$ curl -u default:default "http://localhost:9000/test" -v
*   Trying 127.0.0.1...
* TCP_NODELAY set
* Connected to localhost (127.0.0.1) port 9000 (#0)
* Server auth using Basic with user 'default'
> GET /test HTTP/1.1
> Host: localhost:9000
> Authorization: Basic ZGVmYXVsdDpkZWZhdWx0
> User-Agent: curl/7.58.0
> Accept: */*
>
< HTTP/1.1 403 declined                               <----
< Content-Length: 15
< Solace-Client-Name: #rest-e135cb328ef67649
< Solace-Message-ID: ID:Solace-d2dc2510dbfe295a
<
* Connection #0 to host localhost left intact
Your path was: get?hello=world&solace=coolShared Subscriptions
One very useful feature of Solace for this type back-end service is Shared Subscriptions. It allows multiple applications to all subscribe to the same subscription group, and the Solace broker will round-robin deliver the incoming request/message to only one of the consumers within the group.
18. Conclusion, Discussion, Best Practices, Links
Thanks for making it this far! :-D
What we've covered
- Configured the Solace broker to act as a REST proxy
- Snooped the messages as they have gone through Solace
- Built a messaging application to replace/extend/complement the functionality of the REST endpoint
Some Thoughts
- RDPs can be bound to more than one queue.
- Good practice to have different types of requests (e.g. GET, POST) go to different queues... then they can be serviced differently by more/less consumer threads/connections for differing levels of service.
- Create a 2nd queue, RDP, and REST Consumer to have two copies of the REST request getting sent out. Cheap/lazy/easy way for added redundancy.
- The replacement messaging application can either use Direct messaging (like it did in this tutorial), or Guaranteed messaging by using a queue.
- The Shared Subscriptions feature might be useful for application redundancy / load-balancing, if using Direct messaging.
Useful Links
Solace REST Multi-Protocol Integration
Thanks!
Thanks for reading my tutorial! Aaron@Solace